Archive for the ‘Cisco’ Category
วิธีการเชื่อมต่อสาย Serial Console ไป Cisco Switch บนเครื่อง Macbook Air
การเชื่อมต่อ Console Port ด้วยโปรแกรม Terminal บน MacBook สามารถทำได้ตามขั้นตอนดังนี้:
ขั้นตอนการเชื่อมต่อ
1. เชื่อมต่อสาย Console:
ใช้สาย Console (เช่น RJ-45 to Serial หรือ USB to Serial) เชื่อมต่ออุปกรณ์เครือข่ายกับ MacBook
2. เปิด Terminal:
ไปที่ Applications > Terminal
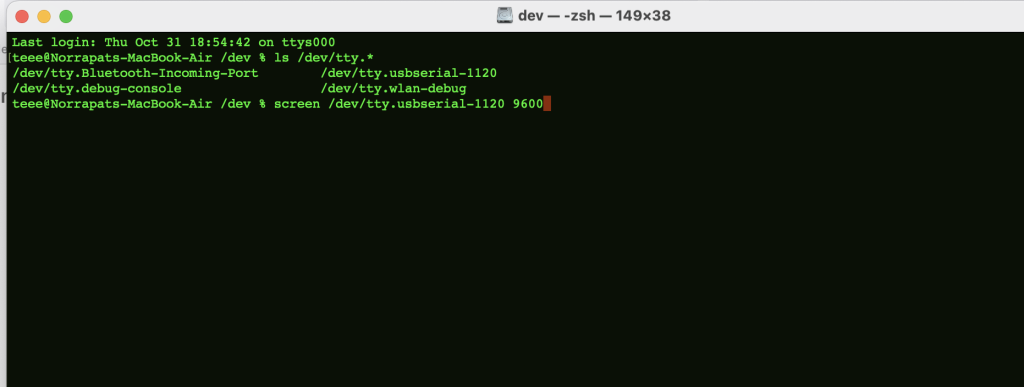
ค้นหา Serial Port:
ค้นหาชื่อ Serial Port ที่มีลักษณะคล้าย tty.usbserial-xxxx หรือ tty.usbmodemxxxx
ในที่นี้จะชื่อ tty.usbserial-1120 และตามด้วย baud rate 9600 (อาจแตกต่างกันตามอุปกรณ์ของคุณ)
3. เชื่อมต่อด้วย screen:
ใช้คำสั่งนี้เพื่อเชื่อมต่อกับ Console Port:
ใช้คำสั่งนี้ใน Terminal เพื่อตรวจสอบ Serial Port ที่เชื่อมต่อ:
เชื่อมต่อด้วยคำสั่ง screen
% screen /dev/tty.usbserial-1120 9600
เมื่อเชื่อมต่อสำเร็จ คุณควรเห็นข้อความจากอุปกรณ์ให้เข้าสู่ระบบ
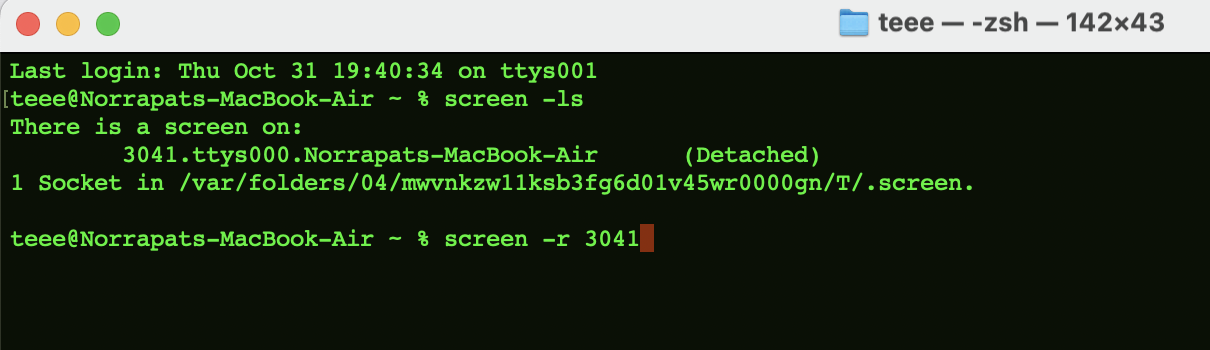
ถ้าต้องการออกจากโปรแกรม Screen ให้กด Ctrl+D (Dtached). จะเป็นการย่อปิด screen ออกไป Shell ของเครื่องเป็นการชั่วคราว ไม่ได้ออกจริงๆ ให้ ลิสต์รายการที่ย่อ(Dtached) ไว้มีอะไรบ้างให้ใช้คำสั่ง
% screen -ls
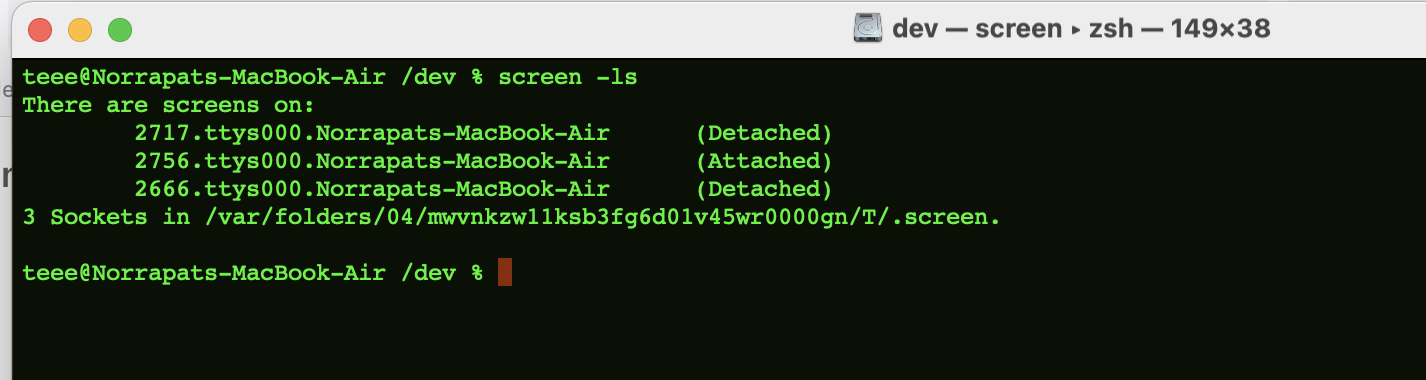
จะเห็นว่ามีหลายหน้าต่างที่ย่อไว้
ให้ใช้คำสั่ง
% screen -r [session_id]
เพื่อดึง session นั้นเปิดขึ้นมาอีกครั้ง
4. คำสั่งอื่นๆ
ปิด session ที่ต้องการ: คุณสามารถปิด session ได้ด้วยคำสั่ง:
% screen -X -S [session_id] quit
หากต้องการปิดทั้งหมด: คุณสามารถใช้คำสั่งต่อไปนี้เพื่อปิด session ทั้งหมดในครั้งเดียว:
% pkill screen
หมายเหตุ
- เมื่อคุณปิด session
screenทั้งหมด ข้อมูลใน session จะหายไป - ควรตรวจสอบให้แน่ใจว่าคุณไม่ต้องการข้อมูลใน session ก่อนที่จะลบ
การลบไดเรกทอรี (directory) บน Cisco switch
การลบไดเรกทอรี (directory) บน Cisco switch นั้นสามารถทำได้โดยใช้คำสั่งในโหมด privileged (enable mode) โดยมีขั้นตอนดังนี้:
- เข้าสู่ privileged mode:
- ตรวจสอบเนื้อหาใน flash memory:
- ลบไดเรกทอรี: ถ้าต้องการลบทั้งไดเรกทอรีและไฟล์ที่อยู่ภายใน ให้ใช้คำสั่ง
delete /force /recursiveดังนี้:/forceคือการบังคับลบโดยไม่ถามยืนยันการลบแต่ละไฟล์/recursiveคือการลบไฟล์และโฟลเดอร์ย่อยภายในทั้งหมด
- ตรวจสอบการลบ: เมื่อทำการลบเสร็จแล้ว สามารถใช้คำสั่ง
dir flash:อีกครั้งเพื่อยืนยันว่าไดเรกทอรีถูกลบแล้ว
หมายเหตุ: คำสั่งนี้จะลบข้อมูลในไดเรกทอรีที่ระบุอย่างถาวร ดังนั้นควรตรวจสอบให้แน่ใจก่อนใช้งาน
Cisco Switch เสียบสาย Console ให้ Login ด้วย Username และ Password
การตั้งค่าให้ Cisco Switch สามารถเข้าถึงได้ผ่าน Console ด้วยการยืนยันผู้ใช้งานและรหัสผ่าน สามารถทำได้โดยการตั้งค่าตามขั้นตอนดังนี้:
- เชื่อมต่อกับ Switch ผ่าน Console
ใช้โปรแกรมเชื่อมต่อ Console เช่น PuTTY หรือ Tera Term เพื่อเข้าถึง Switch - เข้าสู่โหมด Configure Terminal
- ตั้งค่าผู้ใช้และรหัสผ่าน
กำหนดชื่อผู้ใช้งานและรหัสผ่านที่ต้องการ โดยสามารถกำหนดระดับสิทธิ์ได้ด้วย - กำหนดให้ Console ใช้รหัสผ่านในการยืนยันตัวตน
- ตั้งรหัสผ่าน Enable Mode (ถ้ายังไม่ได้ตั้ง)
เพื่อความปลอดภัย ควรกำหนดรหัสผ่านสำหรับโหมด Enable ด้วย - บันทึกการตั้งค่า
เมื่อกำหนดค่าทั้งหมดเสร็จแล้ว ให้บันทึกการตั้งค่าเพื่อให้มีผลเมื่อ Switch เริ่มต้นใหม่
กำหนดชื่อผู้ใช้และรหัสผ่าน Cisco Switch และเปิด SSH
เพิ่ม Local User และตั้งรหัสผ่านพร้อมกำหนดสิทธิ์ในการเข้าถึง (เช่น ระดับ 15 สำหรับสิทธิ์เต็ม):
#enable

#configure terminal
#username <username> privilege 15 secret <password>
เปิดใช้งาน SSH บน Switch
กำหนดค่าการใช้งาน SSH และกำหนดเวอร์ชัน (แนะนำให้ใช้ SSH เวอร์ชัน 2):
#ip domain-name <domain_name> # กำหนด domain name ให้ Switch (เช่น example.com)
#crypto key generate rsa # สร้าง RSA key สำหรับ SSH
#ip ssh version 2 # ตั้งค่าให้ใช้ SSH เวอร์ชัน 2
กำหนดการเข้าถึง VTY Line สำหรับ SSH
กำหนดให้ VTY Line (พอร์ตที่ใช้สำหรับการเชื่อมต่อระยะไกล) อนุญาตการเข้าถึงผ่าน SSH และใช้ Local User ในการยืนยันตัวตน:
#line vty 0 4 # เข้าสู่ VTY Line 0 ถึง 4
#transport input ssh # อนุญาตเฉพาะ SSH
#login local # ใช้ Local User สำหรับการยืนยันตัวตน
#exit
วิธีเปิดหรือปิด การเข้าใช้งาน Cisco Switch ผ่านทาง Web
วิธีเปิด
Cisco2960G#conf t
Enter configuration commands, one per line. End with CNTL/Z.
Cisco2960G(config)#ip http server
หรือแบบ https
Cisco2960G(config)#ip http secure-server
Cisco2960G(config)#ip http authentication local
Cisco2960G(config)#end
Cisco2960G#wr
Building configuration..
วิธีปิด
Cisco2960G#conf t
Enter configuration commands, one per line. End with CNTL/Z.
Cisco2960G(config)#no ip http server
Cisco2960G(config)#no ip http secure-server
Cisco2960G(config)#no ip http authentication local
Cisco2960G(config)#end
Cisco2960G#wr
Building configuration…
[OK]
ถ้าต้องการจะให้ Cisco Switch Sync Public time Server
Switch#enable
Switch#conf t
Switch(config)#clock timezone THA 7
Switch(config)#ntp server time.navy.mi.th
Switch(config)#ntp server time.navy.mi.th
Translating “time.navy.mi.th”
^
% Invalid input detected at ‘^’ marker. <– ถ้าขึ้นแบบนี้แสดงว่าปิด DNS Lookup ไว้
บางกรณีที่ยัง Resolve ชื่อ DNS ไม่ได้เพราะยังไม่ได้กำหนดค่า Gateway ให้ออกเน็ทต้องทำการตั้งค่าก่อน
ตั้งค่า Default Gateway บน Switch
ตัวอย่าง > ให้ตั้งค่า IP ของ Fortigate (192.168.200.1) เป็น Default Gateway สำหรับ Switch ดังนี้:
#enable
#configure terminal
#ip default-gateway 192.168.200.1
#end

#write memory
Switch(config)#ip domain-lookup
Switch(config)#ip name-server 8.8.8.8
Switch(config)#ntp server time.navy.mi.th
Translating “time.navy.mi.th”…domain server (8.8.8.8) [OK]
Switch(config)#do show ntp status
Clock is unsynchronized, stratum 16, no reference clock
nominal freq is 119.2092 Hz, actual freq is 119.2092 Hz, precision is 2**18
reference time is 00000000.00000000 (07:00:00.000 THA Mon Jan 1 1900)
clock offset is 0.0000 msec, root delay is 0.00 msec
root dispersion is 0.00 msec, peer dispersion is 0.00 msec
Switch(config)#do show clock
14:56:02.971 THA Tue Oct 29 2024
Switch(config)#exit
Switch#wr
Building configuration…
[OK]
ปิด Auto Translation บน Cisco Switch และ ปิด Console Log
Switch(config)#no ip domain-lookup
Switch(config)#vtp mode transparent
Switch(config)#no logging console
Upgrade Firmware Cisco Switch Catalyst2960G
1.ตรวจสอบรุ่นและ Firmware ของ Switch ที่รันอยู่ปัจจุบัน
ROM: Bootstrap program is C2960 boot loader
BOOTLDR: C2960 Boot Loader (C2960-HBOOT-M) Version 12.2(44)SE6, RELEASE SOFTWARE (fc1)
Switch uptime is 11 minutes
System returned to ROM by power-on
System image file is “flash:c2960-lanbasek9-mz.122-44.SE6/c2960-lanbasek9-mz.122-44.SE6.bin”
Switch Ports Model SW Version SW Image
—— —– —– ———- ———-
* 1 24 WS-C2960G-24TC-L 12.2(44)SE6 C2960-LANBASEK9-M
** ดูรุ่นของ Switch และไปดาวน์โหลด Firmware Version ล่าสุดมาไว้ที่เครื่อง ในที่นี้ดาวน์โหลดมาแล้วสมมติเป็นเวอร์ชั่น
c2960-lanbasek9-mz.122-55.SE12.bin

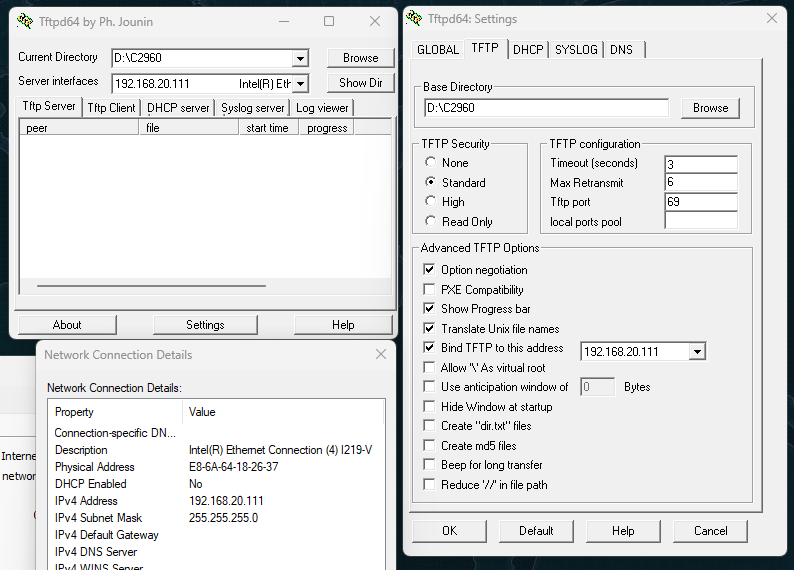
จากนั้นไปตั้งค่า TFTP ที่เครื่อง แนะนำใช้โปรแกรม tftpd64
https://pjo2.github.io/tftpd64/
ตั้งค่าที่เครื่อง Notebook ให้เป็น TFTP Server และนำ Image มาเก็บไว้ที่ Default Directory ที่เราสร้างมาใหม่ C2960
2. ที่ตัว Switch ตรวจเช็คว่าสามารถเชื่อมต่อมาที่ TFTP Server ได้ โดยปรกติถ้าเป็น Switch ใหม่ที่ยังไม่มี IP ให้ตั้ง IP ให้กับอุปกรณ์แบบคร่าวๆ ก็ได้
> ใช้คำสั่ง
Switch#show ip interface brief
Interface IP-Address OK? Method Status Protocol
Vlan1 unassigned YES manual up up
ถ้าขึ้น unassigned ให้กำหนดค่า IP คร่าวๆเพื่อให้สามารถเชื่อมต่อ TFTP Server ได้ เช่น
Switch#conf t
Switch(config)#interface vlan 1
Switch(config-if)#ip address 192.168.20.254 255.255.255.0
Switch(config-if)#no shut
Switch(config-if)#end

3. Backup Firmware ตัวเก่าออกมาก่อน
Switch#show flash:
Directory of flash:/
2 -rwx 2072 Mar 1 1993 00:02:44 +00:00 multiple-fs
4 -rwx 1919 Mar 1 1993 00:01:14 +00:00 private-config.text.renamed
5 -rwx 1657 Mar 1 1993 00:02:44 +00:00 config.text
6 -rwx 1919 Mar 1 1993 00:02:44 +00:00 private-config.text
7 drwx 192 Mar 1 1993 00:07:18 +00:00 c2960-lanbasek9-mz.122-44.SE6
549 -rwx 676 Mar 1 1993 00:02:11 +00:00 vlan.dat.renamed
551 -rwx 2612 Mar 1 1993 00:01:14 +00:00 config.text.renamed
Switch#copy flash:/c2960-lanbasek9-mz.122-44.SE6/c2960-lanbasek9-mz.122-44.SE6.bin tftp:
Address or name of remote host []? 192.168.20.111
Destination filename [c2960-lanbasek9-mz.122-44.SE6.bin]?
!!!!!!!!!!!!!!!!!!!!!!!!!!!!!
7075041 bytes copied in 21.542 secs (328430 bytes/sec)
4. Upload Firmware ตัวใหม่เข้าไป
Switch#copy tftp: flash:
Address or name of remote host [192.168.20.111]?
Source filename [c2960-lanbasek9-mz.122-55.SE12.bin]?
Destination filename [c2960-lanbasek9-mz.122-55.SE12.bin]?
Accessing tftp://192.168.20.111/c2960-lanbasek9-mz.122-55.SE12.bin…
Loading c2960-lanbasek9-mz.122-55.SE12.bin from 192.168.20.111 (via Vlan1): !!!!!!!!!!!!!!!!!!!!!!!!!!!!!!!!!!!!!!!
[OK – 9827106 bytes]
9827106 bytes copied in 106.309 secs (92439 bytes/sec)
ตรวจดูรายการว่าอัพโหลดเข้าไปใน Memory แล้วหรือยัง
Switch#dir flash:
Directory of flash:/
2 -rwx 2072 Mar 1 1993 00:02:44 +00:00 multiple-fs
3 -rwx 9827106 Mar 1 1993 00:25:43 +00:00 c2960-lanbasek9-mz.122-55.SE12.bin
4 -rwx 1919 Mar 1 1993 00:01:14 +00:00 private-config.text.renamed
5 -rwx 1657 Mar 1 1993 00:02:44 +00:00 config.text
6 -rwx 1919 Mar 1 1993 00:02:44 +00:00 private-config.text
7 drwx 192 Mar 1 1993 00:07:18 +00:00 c2960-lanbasek9-mz.122-44.SE6
549 -rwx 676 Mar 1 1993 00:02:11 +00:00 vlan.dat.renamed
551 -rwx 2612 Mar 1 1993 00:01:14 +00:00 config.text.renamed
32514048 bytes total (12265472 bytes free)
5. สั่ง Boot จาก Firmware ตัวใหม่
Switch#conf t
Enter configuration commands, one per line. End with CNTL/Z.
Switch(config)#boot system flash:c2960-lanbasek9-mz.122-55.SE12.bin
Switch(config)#exit
Switch#reload
System configuration has been modified. Save? [yes/no]: y
Building configuration…
[OK]
Proceed with reload? [confirm]
จากนั้น Switch จะรีบู๊ตเพื่อเริ่มใช้งาน Firmware เวอร์ชั่นใหม่