Archive for the ‘MacOS’ Category
ติดตั้ง Kea DHCP Server บนเครื่อง Mac M1 (Apple Silicon) เพื่อแจก DHCP สำหรับเครือข่าย 192.168.1.0/24
teee@NP ~ % brew install kea
ตรวจสอบตำแหน่งไฟล์ config
teee@NP ~ % cd /opt/homebrew/etc/kea/
teee@NP kea % ls
kea-ctrl-agent.conf kea-dhcp-ddns.conf kea-dhcp4.conf kea-dhcp6.conf keactrl.conf
แก้ไขไฟล์ kea-dhcp4.conf
ให้กำหนดการแจก IP สำหรับ subnet 192.168.1.0/24 แบบนี้:
sudo nano /opt/homebrew/etc/kea/kea-dhcp4.conf
ใส่ config (หรือแก้ไขบล็อก subnet4 ให้เหมือนด้านล่าง):
{
“Dhcp4”: {
“interfaces-config”: {
“interfaces”: [ “en0” ] // หรือใส่ชื่อ interface ที่ต้องการ
},
“lease-database”: {
“type”: “memfile”,
“persist”: true,
“name”: “/opt/homebrew/var/kea/kea-leases4.csv”
},
“subnet4”: [
{
“id”: 1,
“subnet”: “192.168.1.0/24”,
“pools”: [
{
“pool”: “192.168.1.100 – 192.168.1.200”
}
],
“option-data”: [
{
“name”: “routers”,
“data”: “192.168.1.1”
},
{
“name”: “subnet-mask”,
“data”: “255.255.255.0”
},
{
“name”: “domain-name-servers”,
“data”: “8.8.8.8, 1.1.1.1”
}
]
}
],
“loggers”: [
{
“name”: “kea-dhcp4”,
“output_options”: [
{
“output”: “/opt/homebrew/var/log/kea/kea-dhcp4.log”
}
],
“severity”: “INFO”
“debuglevel”: 0
}
]
}
}
แก้ “interfaces”: [ “en0” ] ให้ตรงกับชื่อ network interface ของคุณ (รัน ifconfig เพื่อเช็ค เช่น en0, bridge100, หรือ utun0)
สร้างโฟลเดอร์สำหรับ log และ leases ถ้ายังไม่มี
teee@NP kea % sudo mkdir -p /opt/homebrew/var/log/kea
teee@NP kea % sudo mkdir -p /opt/homebrew/var/kea
teee@NP kea % sudo mkdir -p /opt/homebrew/var/kea
teee@NP kea % sudo touch /opt/homebrew/var/kea/kea-leases4.csv
teee@NP kea % sudo chown $(whoami) /opt/homebrew/var/kea/kea-leases4.csv
กำหนด Static IP ให้ Mac (เช่น 192.168.1.1)
ไปที่ System Settings > Network > เลือก interface ที่คุณจะใช้ (เช่น Wi-Fi หรือ USB Ethernet) แล้วตั้งเป็น Manual IP: 192.168.1.1 Subnet: 255.255.255.0
รัน Kea DHCP Server
teee@NP kea % /opt/homebrew/sbin/kea-dhcp4 -c /opt/homebrew/etc/kea/kea-dhcp4.conf
ตรวจสอบ log
teee@NP /opt % tail -f /opt/homebrew/var/log/kea/kea-dhcp4.log
ทดสอบจากอุปกรณ์ลูกข่าย
เชื่อมต่อสาย LAN จาก Mac ไปยังเครื่องลูกข่าย หรือผ่าน Ethernet adapter แล้วให้เครื่องลูกข่ายขอ IP ผ่าน DHCP — จะได้รับ IP ในช่วง 192.168.1.100 – 192.168.1.200
teee@NP kea % sudo /opt/homebrew/sbin/kea-dhcp4 -c /opt/homebrew/etc/kea/kea-dhcp4.conf
2025-05-19 13:13:04.137 INFO [kea-dhcp4.dhcp4/8221.0x208ce1f00] DHCP4_STARTING Kea DHCPv4 server version 2.6.2 (stable) starting
2025-05-19 13:13:04.140 INFO [kea-dhcp4.commands/8221.0x208ce1f00] COMMAND_RECEIVED Received command ‘config-set’
แปลว่า Kea DHCPv4 server ได้เริ่มต้นทำงานเรียบร้อยแล้วโดยไม่มี error
teee@NP /opt % sudo lsof -iUDP:67
Password:
COMMAND PID USER FD TYPE DEVICE SIZE/OFF NODE NAME
kea-dhcp4 8221 root 12u IPv4 0x76203903121f674e 0t0 UDP 10.10.1.113:bootps
bootps = UDP/67 (DHCP Server)
วิธีการ STOP KEA
teee@NP /opt % ps aux | grep kea-dhcp4
teee 8652 0.0 0.0 410732512 1488 s000 S+ 1:20PM 0:00.01 grep kea-dhcp4
root 8221 0.0 0.1 410778736 6144 ?? S 1:13PM 0:00.09 /opt/homebrew/sbin/kea-dhcp4 -c /opt/homebrew/etc/kea/kea-dhcp4.conf
root 8220 0.0 0.0 410886720 3664 ?? S 1:13PM 0:00.02 sudo /opt/homebrew/sbin/kea-dhcp4 -c /opt/homebrew/etc/kea/kea-dhcp4.conf
Kill ด้วย PID:
teee@NP /opt % sudo kill 8221
teee@NP /opt % ps aux | grep kea-dhcp4
teee 8682 0.0 0.0 410724320 1392 s000 S+ 1:22PM 0:00.00 grep kea-dhcp4
tftpd on macbook m1
Check tftpd running
teee@NP ~ % netstat -na |grep \*.69
teee@NP ~ % apropos tftp
makewhatis: /opt/local/man: Not a directory
tftp(1) – trivial file transfer program
tftpd(8) – Internet Trivial File Transfer Protocol server
CURLOPT_TFTP_BLKSIZE(3) – TFTP block size
CURLOPT_TFTP_NO_OPTIONS(3) – send no TFTP options requests
tftp(1) – trivial file transfer program
tftpd(8) – Internet Trivial File Transfer Protocol server
Start tftpd
teee@NP ~ % sudo launchctl load -F /System/Library/LaunchDaemons/tftp.plist
Check tftpd start
teee@NP ~ % netstat -na |grep \*.69
udp4 0 0 *.69 *.*
udp6 0 0 *.69 *.*
Symlink the tftpboot folder
teee@NP ~ % cd /private
teee@NP /private % sudo rm -rf tftpboot
teee@NP / % mkdir /Users/teee/tftpboot
teee@NP / % sudo ln -s /Users/teee/tftpboot tftpboot
teee@NP / % sudo launchctl unload -F /System/Library/LaunchDaemons/tftp.plist
teee@NP / % sudo launchctl load -F /System/Library/LaunchDaemons/tftp.plist
Copy file into position
teee@NP / % cd /Users/teee/tftpboot
Stop tftpd
teee@NP ~ % sudo launchctl unload -F /System/Library/LaunchDaemons/tftp.plist
teee@NP ~ % netstat -na |grep \*.69
วิธีการใช้งาน scrcpy เพื่อ mirror หน้าจอ samsung s24 บนเครื่อง mac
#ที่มือถือให้ทำการเปิด Developer Mode
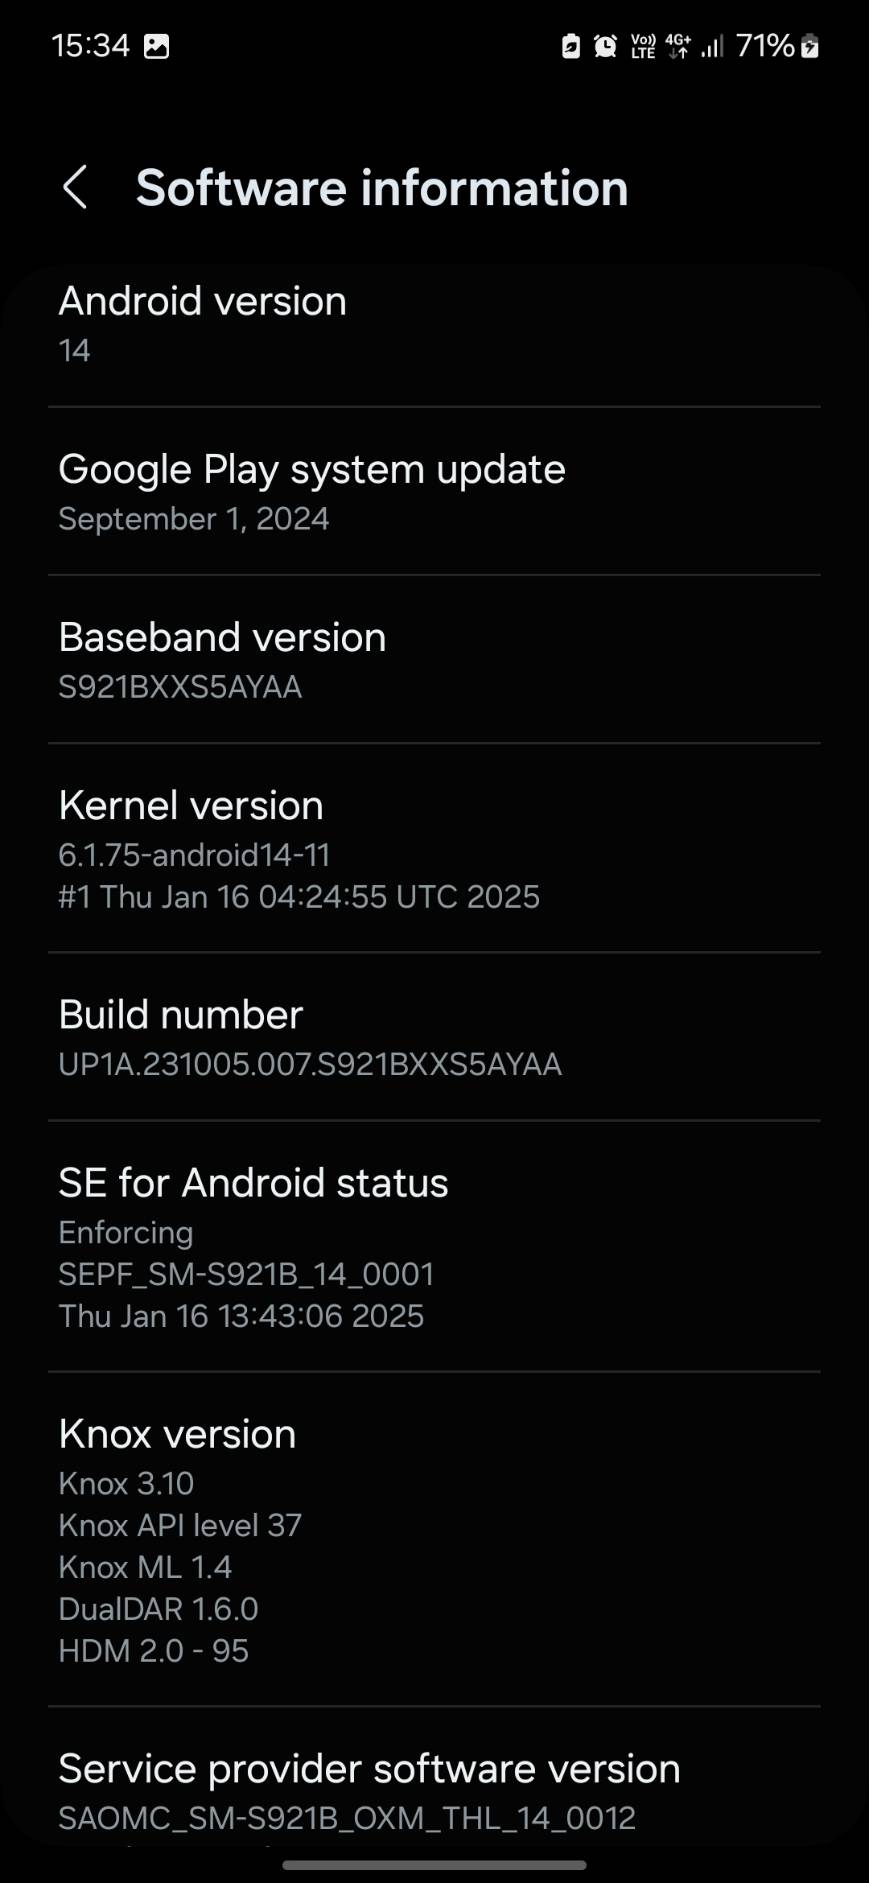
1. ไปที่ settings > About phone > Software information >
กดย้ำๆที่ Build number 7 ครั้ง มือถือจะแจ้งว่า Developer mode On
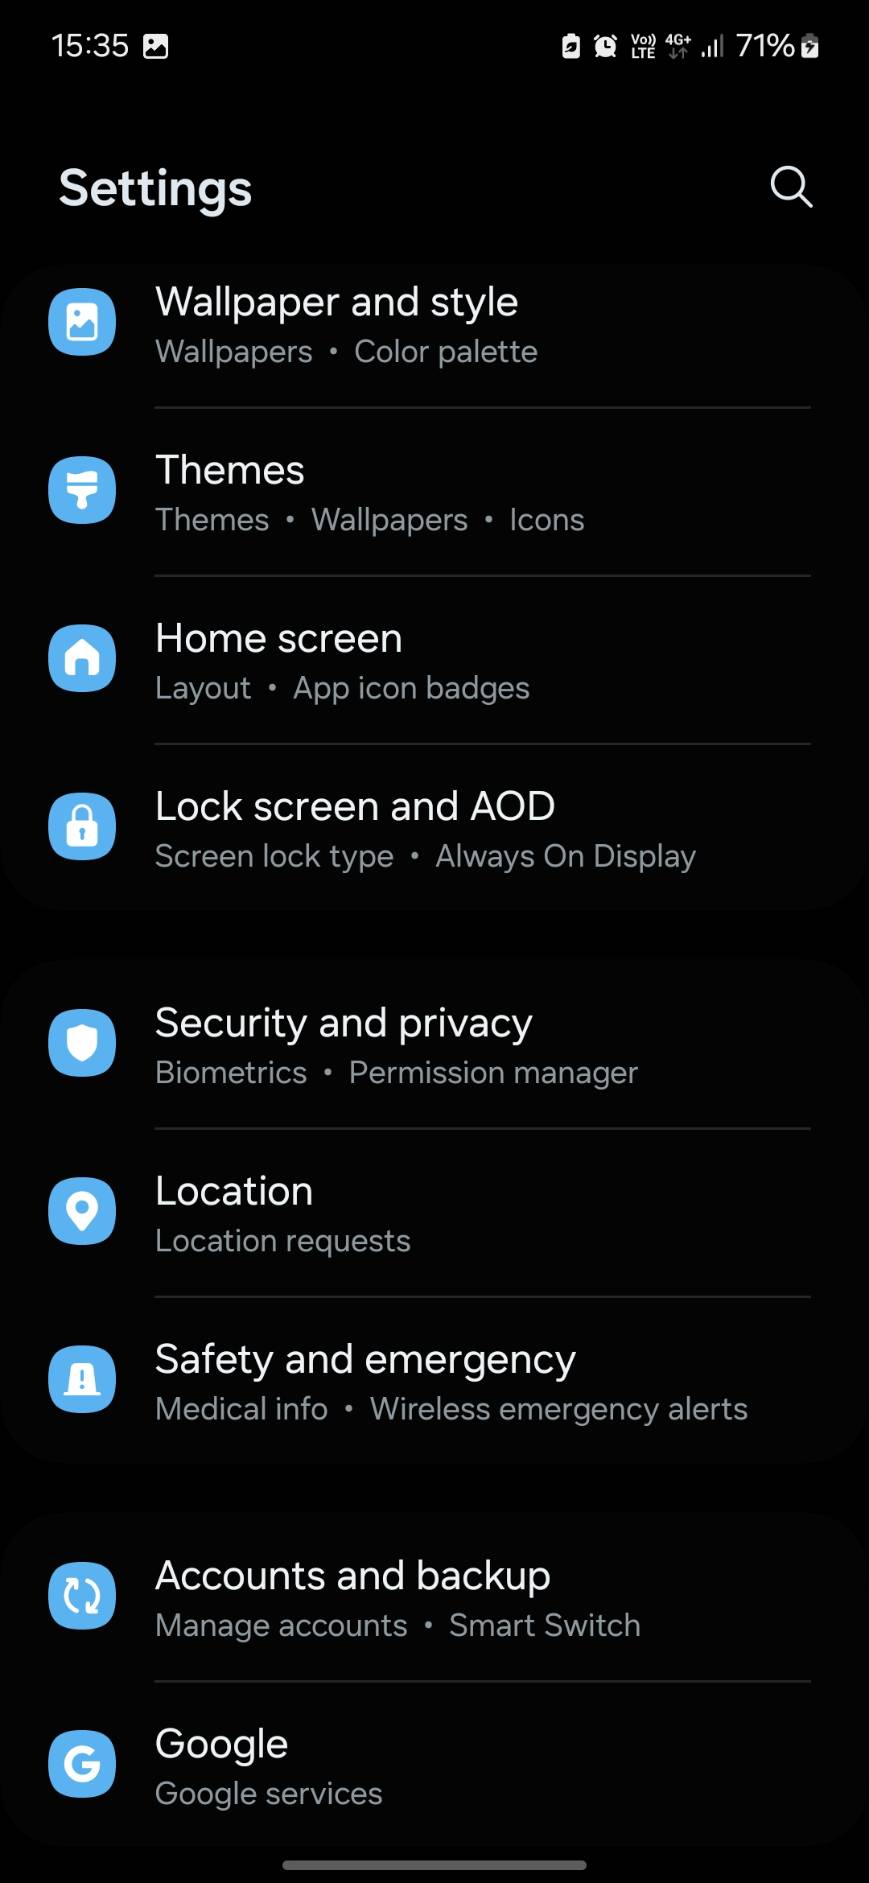
2. เลือก Settings > Security and privacy. กด ปิด Auto Blocker

3. ที่เครื่องมือถือจะมีป๊อปอัพเตือนว่ามีการเสียบสาย USB เข้ากับเครื่อง MAC. ให้เลือกใช้งานตามจุดประสงค์
4. ให้ทำการติดตั้งโปรแกรม scrcpy โดยจะติดตั้งผ่าน homebrew.
ถ้ายังไม่เคยติดตั้งใช้งาน homebrew ให้ไปติดตั้ง homebrew ก่อน
ติดตั้ง Homebrew บน Mac (ถ้ายังไม่มี)
# /bin/bash -c “$(curl -fsSL https://raw.githubusercontent.com/Homebrew/install/HEAD/install.sh)”
5. จากนั้นติดตั้ง ADB และ scrcpy ผ่าน Homebrew
brew install android-platform-tools # สำหรับ ADB
brew install scrcpy # ติดตั้ง scrcpy
6.เชื่อมต่อ S24 เข้ากับ Mac ผ่าน USB-C Cable
•ใช้สายแท้ หรือสายที่รองรับ Data Transfer
•หลังเสียบ → บนมือถือจะขึ้น “Allow USB Debugging?” → กด Allow
7.ตรวจสอบว่า Mac เจอ S24 หรือไม่
พิมพ์ใน Terminal:
adb devices
ถ้าเจออุปกรณ์มือถือจะแจ้งว่า
List of devices attached
xxxxxxxxxxxx device
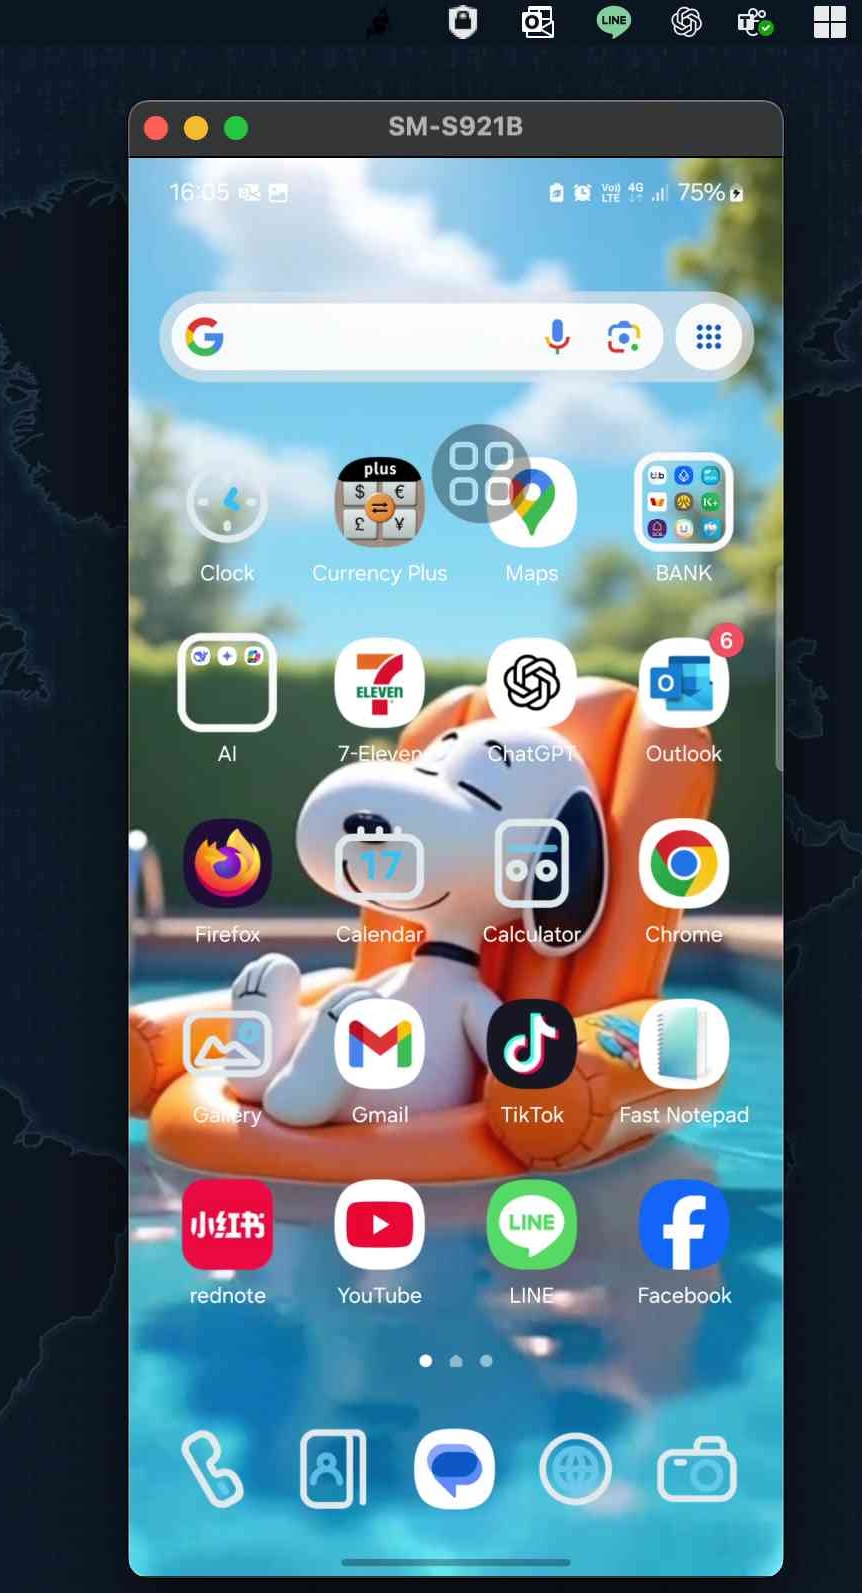
8. รัน scrcpy
teee@NP Programs % scrcpy
scrcpy 3.1 <https://github.com/Genymobile/scrcpy>
INFO: ADB device found:
INFO: –> (usb) RFCxxxxxxxx device SM_S921B
/opt/homebrew/Cellar/scrcpy/3.1/share/scrcpy/scrcpy-server: 1 file pushed, 0 skipped. 106.3 MB/s (90640 bytes in 0.001s)
[server] INFO: Device: [samsung] samsung SM-XXXXX (Android 14)
INFO: Renderer: metal
INFO: Texture: 1080×2336
2025-03-17 15:31:22.355 scrcpy[37968:994087] +[IMKClient subclass]: chose IMKClient_Modern
2025-03-17 15:31:22.355 scrcpy[37968:994087] +[IMKInputSession subclass]: chose IMKInputSession_Modern
ในการรัน TFTP server บนเครื่อง Mac
คุณสามารถทำตามขั้นตอนด้านล่างนี้:
1. เปิด Terminal: ไปที่ Applications > Terminal
2. ตรวจสอบสถานะ: คุณสามารถตรวจสอบว่า TFTP daemon กำลังทำงานอยู่หรือไม่ โดยใช้คำสั่ง:
% sudo launchctl list | grep tftp
หรือใช้คำสั่ง
%sudo lsof -i :69
หรือคำสั่ง
%netstat -atp UDP | grep tftp
หรือลอง ทดสอบเชื่อม localhost
%tftp localhost
ถ้าเข้าสู่ prompt ของ tftp ได้ (เช่น tftp>) หมายความว่า TFTP server ของคุณทำงานอยู่
3.เช็คว่า tftpd มีอยู่ในเครื่อง
% cat /System/Library/LaunchDaemons/tftp.plist
4.เพื่อความง่ายในการหา Folder จะทำการเปลี่ยนแปลงนิดหน่อย
% cd /private
% sudo rm -rf tftpboot
% mkdir /Users/(YourUser)/tftpboot
% sudo ln -s /Users/(YourUser)/tftpboot tftpboot
ให้ทำการ Start tftp ด้วยคำสั่ง
% sudo launchctl load -F /System/Library/LaunchDaemons/tftp.plist
ถ้าต้องการ Stop process ให้ใช้คำสั่ง
% sudo launchctl unload /System/Library/LaunchDaemons/tftp.plist