Archive for the ‘Ubuntu’ Category
วิธี Limit SSH ให้สามารถเข้าได้ เฉพาะ IP ที่กำหนด
 สิงหาคม 13th, 2026 |
  Author:
 เราสามารถกำหนดให้ Server Linux สามารถ SSH เข้าใช้งานได้เฉพาะ ผู้ใช้งานที่กำหนด และ IP ที่กำหนดไว้ได้เช่น
#nano /etc/ssh/sshd_config
เพิ่ม
AllowUsers user01 user02 < — อันนี้คือ Allow เฉพาะผู้ใช้งานที่กำหนดให้เท่านั้นถึงจะ SSH เข้าได้
AllowUsers user01@161.82.224.172 user02@161.82.224.172 <– อันนี้คือ Allow เฉพาะผู้ใช้งานและ IP ที่กำหนดให้เท่านั้นถึงจะเข้าใช้งานได้ (ถ้าใช้ IP แบบ Dynamic แล้ว ssh เข้ามาจาก IP อื่นนอกเหนือจาก 161.82.224.172 จะไม่สามารถเข้าใช้งานได้)
 Posted in
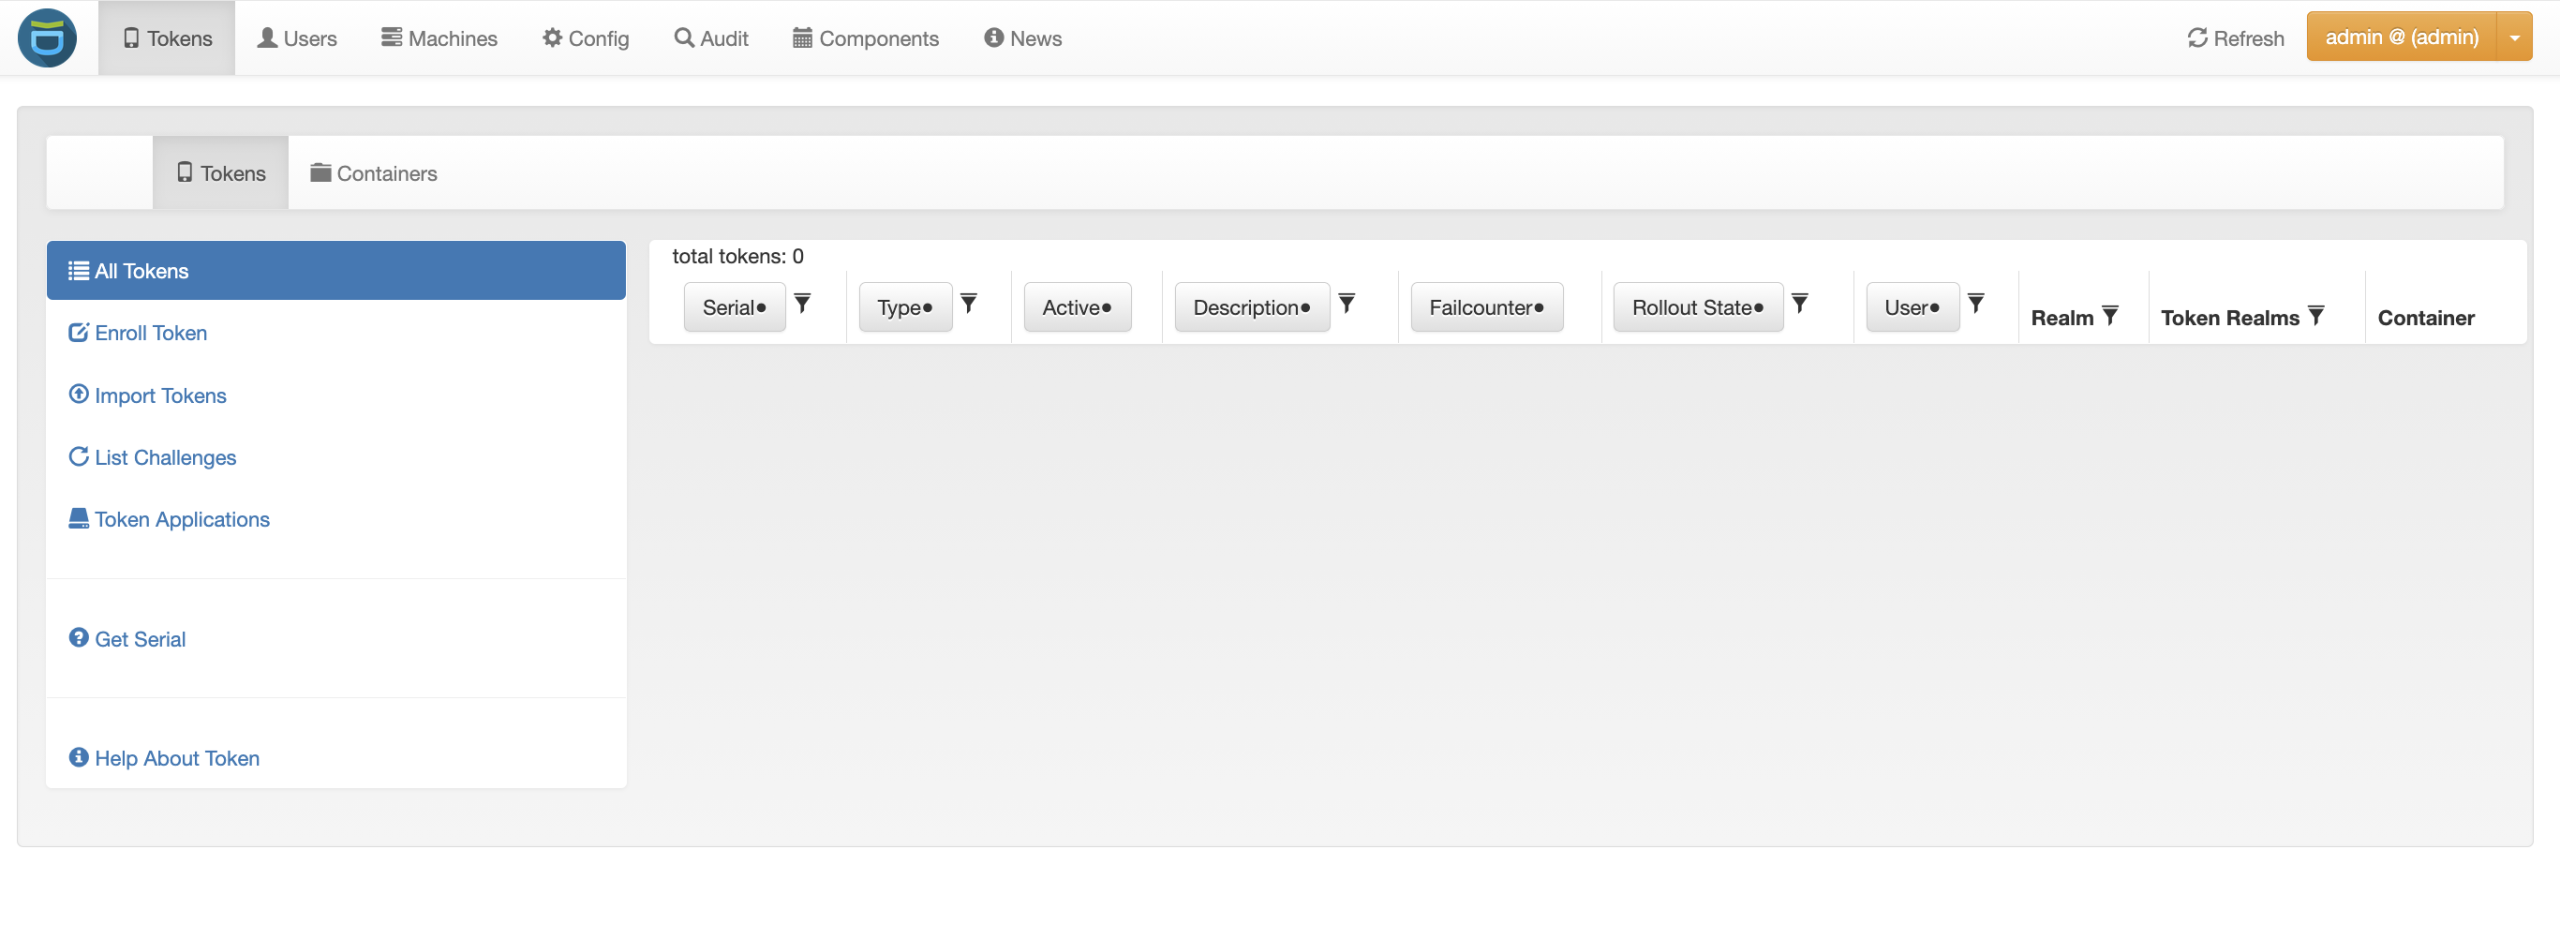
ติดตั้ง privacyIDEA Server- 2FA Authen
ติดตั้ง privacyIDEA Server
* Debian 13
* CPU 2 Core
* RAM 4GB
* SSD 40GB
* Static IP
ข้อดีของวิธีนี้
* Windows และ Linux ใช้ OTP Server ตัวเดียว
* เลือกบังคับเฉพาะบาง User ได้
* ใช้ Local User ก็ได้ ไม่จำเป็นต้องมี AD
* ส่ง Email OTP ได้
* รองรับ SSH, Console Login และ Windows Logon
* ภายหลังสามารถต่อ LDAP/AD ได้โดยไม่ต้องติดตั้งใหม่
root@IDEA-Server:/home/teee# apt install curl wget gnupg2 lsb-release ca-certificates -y
root@IDEA-Server:/home/teee# apt update
Hit:1 http://security.debian.org/debian-security trixie-security InRelease
Hit:2 http://deb.debian.org/debian trixie InRelease
Hit:3 http://deb.debian.org/debian trixie-updates InRelease
All packages are up to date.
root@IDEA-Server:/home/teee# apt upgrade -y
Summary:
Upgrading: 0, Installing: 0, Removing: 0, Not Upgrading: 0
จากนั้นเราจะทำต่อจนได้ระบบที่ใช้งานได้จริง ได้แก่
1. ติดตั้ง PostgreSQL
2. ติดตั้ง privacyIDEA ใน Virtual Environment
3. ตั้งค่า Nginx + uWSGI
4. เปิดใช้งาน HTTPS
5. เชื่อม Gmail SMTP สำหรับ Email OTP
6. ทดสอบ OTP
7. ติดตั้ง PAM บน Linux
8. ติดตั้ง Windows Credential Provider
Debian 13
├── Python 3 Virtual Environment
├── privacyIDEA 3.x
├── PostgreSQL
├── Nginx
├── uWSGI
├── HTTPS
└── SMTP Gmail/O365
Directory ที่จะใช้
/opt/privacyidea
1.ติดตั้ง Packages
ติดตั้ง Package ที่จำเป็น
root@IDEA-Server:/home/teee# apt install -y \
python3 \
python3-dev \
python3-venv \
python3-pip \
build-essential \
gcc \
g++ \
libffi-dev \
libssl-dev \
libxml2-dev \
libxslt1-dev \
libldap2-dev \
libsasl2-dev \
libpq-dev \
git \
curl \
nginx \
postgresql \
postgresql-contrib
ตรวจสอบเวอร์ชัน
root@IDEA-Server:/home/teee# python3 –version
Python 3.13.5
root@IDEA-Server:/home/teee# pip3 –version
pip 25.1.1 from /usr/lib/python3/dist-packages/pip (python 3.13)
2.สร้าง PostgreSQL
เข้า postgres
root@IDEA-Server:/home/teee# sudo -u postgres psql
psql (17.10 (Debian 17.10-0+deb13u1))
Type “help” for help.
สร้าง Database
root@IDEA-Server:/home/teee# sudo -u postgres psql
psql (17.10 (Debian 17.10-0+deb13u1))
Type “help” for help.
postgres=# CREATE USER privacyidea WITH PASSWORD ‘MySecurePassword!’;
CREATE ROLE
postgres=# CREATE DATABASE privacyidea OWNER privacyidea;
CREATE DATABASE
postgres=# GRANT ALL PRIVILEGES ON DATABASE privacyidea TO privacyidea;
GRANT
postgres=# \q
ทดสอบ
root@IDEA-Server:/home/teee# psql -U privacyidea -h localhost privacyidea
Password for user privacyidea:
psql (17.10 (Debian 17.10-0+deb13u1))
SSL connection (protocol: TLSv1.3, cipher: TLS_AES_256_GCM_SHA384, compression: off, ALPN: postgresql)
Type “help” for help.
privacyidea=>
3.สร้าง Virtual Environment
สร้างโฟลเดอร์
root@IDEA-Server:/home/teee# mkdir -p /opt/privacyidea
สร้าง venv
root@IDEA-Server:/home/teee# python3 -m venv /opt/privacyidea/venv
Activate
root@IDEA-Server:/home/teee# source /opt/privacyidea/venv/bin/activate
(venv) root@IDEA-Server:/home/teee#
4.อัปเดต pip
(venv) root@IDEA-Server:/home/teee# pip install –upgrade pip
Requirement already satisfied: pip in /opt/privacyidea/venv/lib/python3.13/site-packages (25.1.1)
Collecting pip
Downloading pip-26.2.1-py3-none-any.whl.metadata (4.6 kB)
Downloading pip-26.2.1-py3-none-any.whl (1.8 MB)
━━━━━━━━━━━━━━━━━━━━━━━━━━━━━━━━━━━━━━━━ 1.8/1.8 MB 22.3 MB/s eta 0:00:00
Installing collected packages: pip
Attempting uninstall: pip
Found existing installation: pip 25.1.1
Uninstalling pip-25.1.1:
Successfully uninstalled pip-25.1.1
Successfully installed pip-26.2.1
(venv) root@IDEA-Server:/home/teee# pip install wheel setuptools
Collecting wheel
Downloading wheel-0.47.0-py3-none-any.whl.metadata (2.3 kB)
Collecting setuptools
Downloading setuptools-84.0.0-py3-none-any.whl.metadata (6.6 kB)
Collecting packaging>=24.0 (from wheel)
Downloading packaging-26.3-py3-none-any.whl.metadata (3.5 kB)
Downloading wheel-0.47.0-py3-none-any.whl (32 kB)
Downloading setuptools-84.0.0-py3-none-any.whl (818 kB)
━━━━━━━━━━━━━━━━━━━━━━━━━━━━━━━━━━━━━━━━ 818.2/818.2 kB 6.9 MB/s 0:00:00
Downloading packaging-26.3-py3-none-any.whl (129 kB)
Installing collected packages: setuptools, packaging, wheel
Successfully installed packaging-26.3 setuptools-84.0.0 wheel-0.47.0
(venv) root@IDEA-Server:/home/teee#
5.ติดตั้ง privacyIDEA
ติดตั้งจาก PyPI
(venv) root@IDEA-Server:/home/teee# pip install privacyidea
การติดตั้งผ่าน PyPI เป็นวิธีที่ privacyIDEA ระบุว่าสามารถใช้ได้กับ Linux distribution ทั่วไป และเหมาะเมื่อไม่มีแพ็กเกจสำหรับระบบปฏิบัติการนั้นโดยตรง
ตรวจสอบ
(venv) root@IDEA-Server:/home/teee# pip show privacyidea
Name: privacyIDEA
Version: 3.13.3
Summary: privacyIDEA: multifactor authentication management system
Home-page: https://privacyidea.org
Author:
Author-email: Cornelius Kölbel <cornelius@privacyidea.org>
License-Expression: AGPL-3.0-or-later
Location: /opt/privacyidea/venv/lib/python3.13/site-packages
Requires: argon2_cffi, beautifulsoup4, cbor2, configobj, croniter, cryptography, defusedxml, feedparser, Flask, Flask-Babel, Flask-Migrate, Flask-SQLAlchemy, Flask-Talisman, Flask-Versioned, google-auth, grpcio, huey, ldap3, msal, netaddr, passlib, protobuf, pydash, PyJWT, PyMySQL, pyOpenSSL, pyrad, python-dateutil, python-gnupg, PyYAML, redis, requests, segno, smpplib, SQLAlchemy, webauthn
Required-by:
6.ติดตั้ง uWSGI
ภายใน venv
(venv) root@IDEA-Server:/home/teee# pip install uwsgi
Collecting uwsgi
Downloading uwsgi-2.0.31.tar.gz (822 kB)
━━━━━━━━━━━━━━━━━━━━━━━━━━━━━━━━━━━━━━━━ 822.8/822.8 kB 6.0 MB/s 0:00:00
Installing build dependencies … done
Getting requirements to build wheel … done
Preparing metadata (pyproject.toml) … done
Building wheels for collected packages: uwsgi
Building wheel for uwsgi (pyproject.toml) … done
Created wheel for uwsgi: filename=uwsgi-2.0.31-cp313-cp313-linux_x86_64.whl size=553481 sha256=890e2acc27131b948d37d75c308fb8fdf395d8e6eaa35bd2f273d0a822fd4b85
Stored in directory: /root/.cache/pip/wheels/53/b9/a5/dda46ceec0dcb8061c25414e005da3acc95162d7615ab6d2d9
Successfully built uwsgi
Installing collected packages: uwsgi
Successfully installed uwsgi-2.0.31
7.สร้าง Config
สร้างโฟลเดอร์
(venv) root@IDEA-Server:/home/teee# mkdir -p /etc/privacyidea
สร้าง
nano /etc/privacyidea/pi.cfg
SQLALCHEMY_DATABASE_URI = “postgresql://privacyidea:MySecurePassword!’@localhost/privacyidea”
SECRET_KEY = “CHANGE_THIS_SECRET_KEY”
PI_PEPPER = “CHANGE_THIS_PEPPER”
PI_ENCFILE = “/etc/privacyidea/enckey”
PI_AUDIT_KEY_PRIVATE = “/etc/privacyidea/private.pem”
PI_AUDIT_KEY_PUBLIC = “/etc/privacyidea/public.pem”
8.สร้าง Encryption Key
ภายใน venv
(venv) root@IDEA-Server:/home/teee# source /opt/privacyidea/venv/bin/activate
ให้ติดตั้ง driver ก่อนจากใน (venv):
(venv) root@IDEA-Server:/home/teee# pip install psycopg2-binary
Collecting psycopg2-binary
Downloading psycopg2_binary-2.9.12-cp313-cp313-manylinux2014_x86_64.manylinux_2_17_x86_64.whl.metadata (4.9 kB)
Downloading psycopg2_binary-2.9.12-cp313-cp313-manylinux2014_x86_64.manylinux_2_17_x86_64.whl (4.3 MB)
━━━━━━━━━━━━━━━━━━━━━━━━━━━━━━━━━━━━━━━━ 4.3/4.3 MB 14.9 MB/s 0:00:00
Installing collected packages: psycopg2-binary
Successfully installed psycopg2-binary-2.9.12
privacyIDEA ระบุว่า PostgreSQL ใช้ psycopg2 และสามารถติดตั้งใน virtual environment ด้วย pip install psycopg2_binary ได้โดยตรง
(venv) root@IDEA-Server:/home/teee# pip show psycopg2-binary
Name: psycopg2-binary
Version: 2.9.12
Summary: psycopg2 – Python-PostgreSQL Database Adapter
Home-page: https://psycopg.org/
Author: Federico Di Gregorio
Author-email: fog@initd.org
License: LGPL with exceptions
Location: /opt/privacyidea/venv/lib/python3.13/site-packages
Requires:
Required-by:
ให้แก้ /etc/privacyidea/pi.cfg ให้ connection string ระบุ driver ชัดเจน:
(venv) root@IDEA-Server:/home/teee# nano /etc/privacyidea/pi.cfg
SQLALCHEMY_DATABASE_URI = “postgresql+psycopg2://privacyidea:” “MySecurePassword!’@localhost/privacyidea”
SECRET_KEY = “MySecurePassword!'”
PI_PEPPER = “MySecurePassword!'”
PI_ENCFILE = “/etc/privacyidea/enckey”
PI_AUDIT_KEY_PRIVATE = “/etc/privacyidea/private.pem”
PI_AUDIT_KEY_PUBLIC = “/etc/privacyidea/public.pem”
สร้างไฟล์:
(venv) root@IDEA-Server:/home/teee# pi-manage setup create_enckey
Encryption key written to /etc/privacyidea/enckey
The file permission of /etc/privacyidea/enckey was set to 400!
Please ensure, that it is owned by the right user.
ถ้าสำเร็จควรสร้างไฟล์:
(venv) root@IDEA-Server:/home/teee# ls -lah /etc/privacyidea/enckey
-r——– 1 root root 96 Aug 10 03:45 /etc/privacyidea/enckey
จากนั้นสร้าง Audit Keys:
(venv) root@IDEA-Server:/home/teee# pi-manage setup create_audit_keys
Signing keys written to /etc/privacyidea/private.pem and /etc/privacyidea/public.pem
The file permission of /etc/privacyidea/private.pem was set to 400!
Please ensure, that it is owned by the right user.
(venv) root@IDEA-Server:/home/teee# ls -lah /etc/privacyidea/*.pem
-r——– 1 root root 1.7K Aug 10 03:47 /etc/privacyidea/private.pem
-rw-r–r– 1 root root 451 Aug 10 03:47 /etc/privacyidea/public.pem
privacyIDEA ต้องใช้ encryption key สำหรับข้อมูลลับในฐานข้อมูล และ audit keys สำหรับตรวจสอบความถูกต้องของ Audit Log
ต่อไปสร้าง Database Tables:
(venv) root@IDEA-Server:/home/teee# pi-manage setup create_tables
Using connect string
INFO [alembic.env] Running migrations online
แปลว่า
* ✅ อ่านไฟล์ /etc/privacyidea/pi.cfg ได้แล้ว
* ✅ เชื่อมต่อ PostgreSQL ได้แล้ว
* ✅ โหลด psycopg2 ได้แล้ว
* ✅ เริ่มสร้าง Database Schema (Alembic Migration)
ถ้า create_tables ผ่านแล้ว ขั้นต่อไปคือสร้าง privacyIDEA Admin:
(venv) root@IDEA-Server:/home/teee# pi-manage admin add admin
Password:
Repeat for confirmation:
Admin admin was registered successfully.
แล้วทดลอง Web Server ด้วยคำสั่งรุ่นใหม่:
(venv) root@IDEA-Server:/home/teee# pi-manage run
* Debug mode: off
WARNING: This is a development server. Do not use it in a production deployment. Use a production WSGI server instead.
* Running on http://127.0.0.1:5000
Press CTRL+C to quit
เปิด SSH อีก Session นึง
root@IDEA-Server:/home/teee# netstat -lntup
Active Internet connections (only servers)
Proto Recv-Q Send-Q Local Address Foreign Address State PID/Program name
tcp 0 0 127.0.0.1:5000 0.0.0.0:* LISTEN 5379/python3 <— รันแล้ว
tcp 0 0 127.0.0.1:5432 0.0.0.0:* LISTEN 4295/postgres
tcp 0 0 0.0.0.0:22 0.0.0.0:* LISTEN 719/sshd: /usr/sbin
tcp 0 0 0.0.0.0:80 0.0.0.0:* LISTEN 3152/nginx: master
tcp6 0 0 ::1:5432 :::* LISTEN 4295/postgres
tcp6 0 0 :::22 :::* LISTEN 719/sshd: /usr/sbin
tcp6 0 0 :::80 :::* LISTEN 3152/nginx: master
9.สร้างไฟล์ WSGI
(venv) root@IDEA-Server:/home/teee# uwsgi –version
2.0.31
ถ้ายังไม่มีติดตั้งก็ให้ติดตั้ง
source /opt/privacyidea/venv/bin/activate
pip install uwsgi
root@IDEA-Server:/home/teee# mkdir -p /etc/privacyidea
root@IDEA-Server:/home/teee# nano /etc/privacyidea/privacyideaapp.py
สร้าง uWSGI Config
root@IDEA-Server:/home/teee# mkdir -p /etc/uwsgi
root@IDEA-Server:/home/teee# nano /etc/uwsgi/privacyidea.ini
[uwsgi]
master = true
processes = 2
threads = 2
lazy-apps = true
need-app = true
buffer-size = 65535
socket = /run/privacyidea.sock
chmod-socket = 660
vacuum = true
die-on-term = true
chdir = /etc/privacyidea
module = privacyideaapp:application
virtualenv = /opt/privacyidea/venv
=========
สร้าง Systemd Service
root@IDEA-Server:/home/teee# nano /etc/systemd/system/privacyidea.service
[Unit]
Description=privacyIDEA uWSGI
After=network.target postgresql.service
[Service]
User=root
Group=www-data
ExecStart=/opt/privacyidea/venv/bin/uwsgi \
–ini /etc/uwsgi/privacyidea.ini
Restart=always
RestartSec=5
[Install]
WantedBy=multi-user.target
เพิ่มเติม: ระยะยาวควรสร้าง user เช่น privacyidea แล้วรัน Service ด้วย user นั้นแทน root เพื่อความปลอดภัย แต่ระหว่างทดสอบใช้ root ได้
root@IDEA-Server:/home/teee# systemctl daemon-reload
root@IDEA-Server:/home/teee# systemctl enable privacyidea
Created symlink ‘/etc/systemd/system/multi-user.target.wants/privacyidea.service’ → ‘/etc/systemd/system/privacyidea.service’.
root@IDEA-Server:/home/teee# systemctl start privacyidea
root@IDEA-Server:/home/teee# systemctl status privacyidea
● privacyidea.service – privacyIDEA uWSGI
Loaded: loaded (/etc/systemd/system/privacyidea.service; enabled; preset: enabled)
Active: active (running) since Mon 2026-08-10 04:10:43 EDT; 7s ago
Invocation: a408db229a75429dba79b28eb979634e
Main PID: 5585 (uwsgi)
Tasks: 9 (limit: 4639)
Memory: 96M (peak: 96.2M)
CPU: 2.270s
ติดตั้ง Nginx
สร้าง
root@IDEA-Server:/home/teee# nano /etc/nginx/sites-available/privacyidea
server {
listen 80;
server_name _;
location / {
include uwsgi_params;
uwsgi_pass unix:/run/privacyidea.sock;
}
}
เปิดใช้งาน
root@IDEA-Server:/home/teee# ln -s /etc/nginx/sites-available/privacyidea /etc/nginx/sites-enabled
root@IDEA-Server:/home/teee# ss -lntp | grep nginx
LISTEN 0 511 0.0.0.0:80 0.0.0.0:* users:((“nginx”,pid=5693,fd=5),(“nginx”,pid=5692,fd=5),(“nginx”,pid=5691,fd=5))
เปิด HTTPS
ถ้ายังไม่มี Certificate
สร้าง Self-Signed ก่อน
root@IDEA-Server:/home/teee# openssl req -x509 -nodes -days 3650 -newkey rsa:4096 -keyout /etc/nginx/ssl/privacyidea.key -out /etc/nginx/ssl/privacyidea.crt
Country Name (2 letter code) [AU]:TH
State or Province Name (full name) [Some-State]:BKK
Locality Name (eg, city) []:BKK
Organization Name (eg, company) [Internet Widgits Pty Ltd]:Omtel Co Ltd
Organizational Unit Name (eg, section) []:IT
Common Name (e.g. server FQDN or YOUR name) []:IDEA-Server
Email Address []:support@omtel.ltd
root@IDEA-Server:/home/teee# nano /etc/nginx/sites-available/privacyidea
server {
listen 80;
server_name _;
return 301 https://$host$request_uri;
}
server {
listen 443 ssl;
server_name _;
ssl_certificate /etc/nginx/ssl/privacyidea.crt;
ssl_certificate_key /etc/nginx/ssl/privacyidea.key;
location / {
include uwsgi_params;
uwsgi_pass unix:/run/privacyidea.sock;
}
}
root@IDEA-Server:/home/teee# nginx -t
nginx: the configuration file /etc/nginx/nginx.conf syntax is ok
nginx: configuration file /etc/nginx/nginx.conf test is successful
root@IDEA-Server:/home/teee# systemctl restart nginx
root@IDEA-Server:/home/teee# curl -k https://10.10.10.160/register
{“id”: 1, “jsonrpc”: “2.0”, “result”: {“status”: true, “value”: false}, “signature”: “rsa_sha256_pss:9ca4281edb38ad80611bffa6465c4e9389a39bdb0f6b287ace4b4db02a38cb0e4e3000452785166e5e7ca3ad90485a5dad73b41dded1e6e841aab11bcde8320e8972d8f6b189b1932e38351cd0d634574e5122eac3bdb1a64675a2be2fa656a76fe8b715dd88a1dd8cf41d3a7de40aa0e5cbaf018583d575be96e472967b4a122165c064583620d2c19bc94eb38700619d67520b03fc9f249bc96eb89fc1636621009d008560633fb6f3a91705f4b94504134103be7fdd1064d146040e8b9610f765b0711f871990a104ba4d533e88d8ec83deb94b4f2c66a3004eaaeb5c143febbbd280384d81cb53acbe3f7528b08f8b1ba513525722dec7a34aa72a4230ba”, “time”: 1786355386.5568333, “version”: “privacyIDEA 3.13.3”, “versionnumber”: “3.13.3”}root@IDEA-Server:/home/teee#
แปลว่า
SSH Server -> ติดต่อ privacyIDEA ได้แล้ว
ลบ Default
root@IDEA-Server:/home/teee# rm /etc/nginx/sites-enabled/default
root@IDEA-Server:/home/teee# nginx -t
nginx: the configuration file /etc/nginx/nginx.conf syntax is ok
nginx: configuration file /etc/nginx/nginx.conf test is successful
root@IDEA-Server:/home/teee# systemctl restart nginx
root@IDEA-Server:/home/teee# netstat -lntup
Active Internet connections (only servers)
Proto Recv-Q Send-Q Local Address Foreign Address State PID/Program name
tcp 0 0 127.0.0.1:5000 0.0.0.0:* LISTEN 5379/python3
tcp 0 0 127.0.0.1:5432 0.0.0.0:* LISTEN 4295/postgres
tcp 0 0 0.0.0.0:80 0.0.0.0:* LISTEN 5626/nginx: master <—nginx
tcp6 0 0 ::1:5432 :::* LISTEN 4295/postgres
เปิด Firewall และทดลองเข้าจากเครื่องอื่น
ชื่อผู้ใช้งานและรหัสผ่านหน้าเว็บ
(venv) root@IDEA-Server:/home/teee# source /opt/privacyidea/venv/bin/activate
(venv) root@IDEA-Server:/home/teee# pi-manage admin list
Name email
==============================
admin None
(venv) root@IDEA-Server:/home/teee#
(venv) root@IDEA-Server:/home/teee# pi-manage admin change admin <– เปลี่ยนรหัสผ่าน
Password:
Repeat for confirmation:
ถ้า pi-manage admin list ไม่มี admin ให้สร้างใหม่:
(venv) root@IDEA-Server:/home/teee#pi-manage admin add admin
แล้วกำหนด password ตามที่ระบบถาม
อีกจุดหนึ่ง: หน้า Login ของ privacyIDEA สามารถ Login ได้ทั้ง Administrator และ User จาก Realm ดังนั้นตอน Login Admin อย่าเลือก Realm/User resolver แปลก ๆ ถ้ามีช่อง Realm ให้ลองปล่อยว่าง แล้วใช้ admin โดยตรง
=============================
https://omtel.ltd/download/privacyidea-pam_1.0_amd64.deb
Client Install
1.ติดตั้ง Package ที่จำเป็น
root@fs:/home/teee# apt update
root@fs:/home/teee# apt install -y git build-essential cmake libpam0g-dev libcurl4-openssl-dev libjsoncpp-dev
2. ดาวน์โหลด Source
root@fs:/home/teee# cd /usr/src
root@fs:/usr/src# git clone https://github.com/privacyidea/privacyidea-pam.git
Cloning into ‘privacyidea-pam’…
remote: Enumerating objects: 159, done.
remote: Counting objects: 100% (20/20), done.
remote: Compressing objects: 100% (16/16), done.
remote: Total 159 (delta 7), reused 4 (delta 4), pack-reused 139 (from 1)
Receiving objects: 100% (159/159), 37.02 KiB | 1.76 MiB/s, done.
Resolving deltas: 100% (76/76), done.
root@fs:/usr/src# cd privacyidea-pam
root@fs:/usr/src/privacyidea-pam#
3.Compile
root@fs:/usr/src/privacyidea-pam# mkdir build
root@fs:/usr/src/privacyidea-pam# cd build
root@fs:/usr/src/privacyidea-pam/build# cmake ..
— The CXX compiler identification is GNU 14.2.0
— Detecting CXX compiler ABI info
— Detecting CXX compiler ABI info – done
— Check for working CXX compiler: /usr/bin/c++ – skipped
— Detecting CXX compile features
— Detecting CXX compile features – done
— Configuring done (0.6s)
— Generating done (0.0s)
— Build files have been written to: /usr/src/privacyidea-pam/build
root@fs:/usr/src/privacyidea-pam/build# make
[ 33%] Building CXX object CMakeFiles/pam_privacyidea.dir/src/pam_privacyidea.cpp.o
In file included from /usr/src/privacyidea-pam/src/pam_privacyidea.cpp:15:
/usr/src/privacyidea-pam/include/privacyidea.h:8:10: fatal error: json.hpp: No such file or directory
8 | #include “json.hpp”
| ^~~~~~~~~~
compilation terminated.
make[2]: *** [CMakeFiles/pam_privacyidea.dir/build.make:79: CMakeFiles/pam_privacyidea.dir/src/pam_privacyidea.cpp.o] Error 1
make[1]: *** [CMakeFiles/Makefile2:87: CMakeFiles/pam_privacyidea.dir/all] Error 2
make: *** [Makefile:136: all] Error 2
root@fs:/usr/src/privacyidea-pam/build# apt install -y nlohmann-json3-dev
root@fs:/usr/src/privacyidea-pam/build# cd /usr/src/privacyidea-pam/include
root@fs:/usr/src/privacyidea-pam/include# ln -s /usr/include/nlohmann/json.hpp json.hpp
root@fs:/usr/src/privacyidea-pam/include# ls -l /usr/src/privacyidea-pam/include/json.hpp
lrwxrwxrwx 1 root root 30 Aug 12 22:45 /usr/src/privacyidea-pam/include/json.hpp -> /usr/include/nlohmann/json.hpp
root@fs:/usr/src/privacyidea-pam/include# cd /usr/src/privacyidea-pam/build
root@fs:/usr/src/privacyidea-pam/build# rm -rf *
root@fs:/usr/src/privacyidea-pam/build# cmake ..
— The CXX compiler identification is GNU 14.2.0
— Detecting CXX compiler ABI info
— Detecting CXX compiler ABI info – done
— Check for working CXX compiler: /usr/bin/c++ – skipped
— Detecting CXX compile features
— Detecting CXX compile features – done
— Configuring done (0.3s)
— Generating done (0.0s)
— Build files have been written to: /usr/src/privacyidea-pam/build
root@fs:/usr/src/privacyidea-pam/build# make
[ 33%] Building CXX object CMakeFiles/pam_privacyidea.dir/src/pam_privacyidea.cpp.o
[ 66%] Building CXX object CMakeFiles/pam_privacyidea.dir/src/privacyidea.cpp.o
[100%] Linking CXX shared module pam_privacyidea.so
[100%] Built target pam_privacyidea
root@fs:/usr/src/privacyidea-pam/build# cd /usr/src
root@fs:/usr/src# mkdir -p privacyidea-pam-deb/DEBIAN
root@fs:/usr/src# mkdir -p privacyidea-pam-deb/lib/x86_64-linux-gnu/security
root@fs:/usr/src# cp /usr/src/privacyidea-pam/build/pam_privacyidea.so /usr/src/privacyidea-pam-deb/lib/x86_64-linux-gnu/security
root@fs:/usr/src/privacyidea-pam/build# uname -m
x86_64
root@fs:/usr/src/privacyidea-pam/build# file pam_privacyidea.so
pam_privacyidea.so: ELF 64-bit LSB shared object, x86-64, version 1 (GNU/Linux), dynamically linked, BuildID[sha1]=0d6ad0b047bedc89b0830e88b7c1aa20e80249b3, not stripped
root@fs:/usr/src/privacyidea-pam/build# ldd pam_privacyidea.so
linux-vdso.so.1 (0x00007fa81f9da000)
libcurl.so.4 => /lib/x86_64-linux-gnu/libcurl.so.4 (0x00007fa81f7f8000)
libcrypto.so.3 => /lib/x86_64-linux-gnu/libcrypto.so.3 (0x00007fa81f000000)
libpam.so.0 => /lib/x86_64-linux-gnu/libpam.so.0 (0x00007fa81f7e6000)
libstdc++.so.6 => /lib/x86_64-linux-gnu/libstdc++.so.6 (0x00007fa81ec00000)
libgcc_s.so.1 => /lib/x86_64-linux-gnu/libgcc_s.so.1 (0x00007fa81f7b7000)
libc.so.6 => /lib/x86_64-linux-gnu/libc.so.6 (0x00007fa81ea0c000)
libnghttp3.so.9 => /lib/x86_64-linux-gnu/libnghttp3.so.9 (0x00007fa81f78d000)
libnghttp2.so.14 => /lib/x86_64-linux-gnu/libnghttp2.so.14 (0x00007fa81f75b000)
libidn2.so.0 => /lib/x86_64-linux-gnu/libidn2.so.0 (0x00007fa81f728000)
librtmp.so.1 => /lib/x86_64-linux-gnu/librtmp.so.1 (0x00007fa81f70a000)
libssh2.so.1 => /lib/x86_64-linux-gnu/libssh2.so.1 (0x00007fa81f6bf000)
libpsl.so.5 => /lib/x86_64-linux-gnu/libpsl.so.5 (0x00007fa81f6ab000)
libssl.so.3 => /lib/x86_64-linux-gnu/libssl.so.3 (0x00007fa81eef2000)
libgssapi_krb5.so.2 => /lib/x86_64-linux-gnu/libgssapi_krb5.so.2 (0x00007fa81f655000)
libldap.so.2 => /lib/x86_64-linux-gnu/libldap.so.2 (0x00007fa81ee8e000)
liblber.so.2 => /lib/x86_64-linux-gnu/liblber.so.2 (0x00007fa81f644000)
libzstd.so.1 => /lib/x86_64-linux-gnu/libzstd.so.1 (0x00007fa81e942000)
libbrotlidec.so.1 => /lib/x86_64-linux-gnu/libbrotlidec.so.1 (0x00007fa81ee80000)
libz.so.1 => /lib/x86_64-linux-gnu/libz.so.1 (0x00007fa81e922000)
libaudit.so.1 => /lib/x86_64-linux-gnu/libaudit.so.1 (0x00007fa81e8eb000)
libm.so.6 => /lib/x86_64-linux-gnu/libm.so.6 (0x00007fa81e7fb000)
/lib64/ld-linux-x86-64.so.2 (0x00007fa81f9dc000)
libunistring.so.5 => /lib/x86_64-linux-gnu/libunistring.so.5 (0x00007fa81e613000)
libgnutls.so.30 => /lib/x86_64-linux-gnu/libgnutls.so.30 (0x00007fa81e200000)
libhogweed.so.6 => /lib/x86_64-linux-gnu/libhogweed.so.6 (0x00007fa81e5c8000)
libnettle.so.8 => /lib/x86_64-linux-gnu/libnettle.so.8 (0x00007fa81e572000)
libgmp.so.10 => /lib/x86_64-linux-gnu/libgmp.so.10 (0x00007fa81e4e8000)
libkrb5.so.3 => /lib/x86_64-linux-gnu/libkrb5.so.3 (0x00007fa81e128000)
libk5crypto.so.3 => /lib/x86_64-linux-gnu/libk5crypto.so.3 (0x00007fa81e4ba000)
libcom_err.so.2 => /lib/x86_64-linux-gnu/libcom_err.so.2 (0x00007fa81ee7a000)
libkrb5support.so.0 => /lib/x86_64-linux-gnu/libkrb5support.so.0 (0x00007fa81ee6c000)
libsasl2.so.2 => /lib/x86_64-linux-gnu/libsasl2.so.2 (0x00007fa81e49e000)
libbrotlicommon.so.1 => /lib/x86_64-linux-gnu/libbrotlicommon.so.1 (0x00007fa81e47b000)
libcap-ng.so.0 => /lib/x86_64-linux-gnu/libcap-ng.so.0 (0x00007fa81e473000)
libp11-kit.so.0 => /lib/x86_64-linux-gnu/libp11-kit.so.0 (0x00007fa81df87000)
libtasn1.so.6 => /lib/x86_64-linux-gnu/libtasn1.so.6 (0x00007fa81e45d000)
libkeyutils.so.1 => /lib/x86_64-linux-gnu/libkeyutils.so.1 (0x00007fa81e456000)
libresolv.so.2 => /lib/x86_64-linux-gnu/libresolv.so.2 (0x00007fa81e444000)
libffi.so.8 => /lib/x86_64-linux-gnu/libffi.so.8 (0x00007fa81e437000)
root@fs:/usr/src# apt install -y dpkg-dev debhelper
root@fs:/usr/src# cd /usr/src
root@fs:/usr/src# rm -rf privacyidea-pam-deb
root@fs:/usr/src# mkdir -p privacyidea-pam-deb/DEBIAN
root@fs:/usr/src# mkdir -p privacyidea-pam-deb/lib/x86_64-linux-gnu/security
root@fs:/usr/src# cp /usr/src/privacyidea-pam/build/pam_privacyidea.so /usr/src/privacyidea-pam-deb/lib/x86_64-linux-gnu/security
root@fs:/usr/src# chmod 755 /usr/src/privacyidea-pam-deb/lib/x86_64-linux-gnu/security/pam_privacyidea.so
root@fs:/usr/src# readlink -f /lib/x86_64-linux-gnu/libcurl.so.4
/usr/lib/x86_64-linux-gnu/libcurl.so.4.8.0
root@fs:/usr/src# readlink -f /lib/x86_64-linux-gnu/libcrypto.so.3
/usr/lib/x86_64-linux-gnu/libcrypto.so.3
root@fs:/usr/src# readlink -f /lib/x86_64-linux-gnu/libpam.so.0
/usr/lib/x86_64-linux-gnu/libpam.so.0.85.1
root@fs:/usr/src# readlink -f /lib/x86_64-linux-gnu/libstdc++.so.6
/usr/lib/x86_64-linux-gnu/libstdc++.so.6.0.33
root@fs:/usr/src# dpkg -S “$(readlink -f /lib/x86_64-linux-gnu/libcurl.so.4)”
libcurl4t64:amd64: /usr/lib/x86_64-linux-gnu/libcurl.so.4.8.0
root@fs:/usr/src# dpkg -S “$(readlink -f /lib/x86_64-linux-gnu/libcrypto.so.3)”
libssl3t64:amd64: /usr/lib/x86_64-linux-gnu/libcrypto.so.3
root@fs:/usr/src# dpkg -S “$(readlink -f /lib/x86_64-linux-gnu/libpam.so.0)”
libpam0g:amd64: /usr/lib/x86_64-linux-gnu/libpam.so.0.85.1
root@fs:/usr/src# dpkg -S “$(readlink -f /lib/x86_64-linux-gnu/libstdc++.so.6)”
libstdc++6:amd64: /usr/lib/x86_64-linux-gnu/libstdc++.so.6.0.33
cat > /usr/src/privacyidea-pam-deb/DEBIAN/control <<‘EOF’
Package: privacyidea-pam
Version: 1.0
Section: admin
Priority: optional
Architecture: amd64
Depends: libc6, libcurl4t64, libssl3t64, libpam0g, libstdc++6
Maintainer: Omtel Engineering
Description: privacyIDEA PAM module for Linux authentication
PAM authentication module for integrating Linux login authentication
with a privacyIDEA server.
EOF
root@fs:/usr/src# dpkg-deb –build privacyidea-pam-deb privacyidea-pam_1.0_amd64.deb
dpkg-deb: building package ‘privacyidea-pam’ in ‘privacyidea-pam_1.0_amd64.deb’.
root@fs:/usr/src# ls -lh /usr/src/privacyidea-pam_1.0_amd64.deb
-rw-r–r– 1 root root 160K Aug 12 23:02 /usr/src/privacyidea-pam_1.0_amd64.deb
root@fs:/usr/src# apt install /usr/src/privacyidea-pam_1.0_amd64.deb
เพิ่มความปลอดภัยให้กับ Linux Server -SSH ด้วยการยืนยัน OTP
เพื่อเพิ่มความปลอดภัยให้กับ Linux Server -SSH นอกจากจะให้ใส่รหัสผ่าน Password แล้วผู้ดูแลระบบจะต้องยืนยัน OTP เพื่ออนุญาตให้ Remote เข้าใช้งานได้
1. ติดตั้ง PAM Python
apt update
root@IDEA-Server:/home/user01# apt install libpam-python libpam-python-doc -y
apt install libpam-python libpam-python-doc sqlite3 -y
root@IDEA-Server:/home/user01# find /usr/lib -name ‘pam_python.so’
/usr/lib/x86_64-linux-gnu/security/pam_python.so
root@IDEA-Server:/home/user01# find /usr/lib -name pam_python.so
/usr/lib/x86_64-linux-gnu/security/pam_python.so
root@IDEA-Server:/home/user01# mkdir -p /etc/pam-email-otp
root@IDEA-Server:/home/user01# mkdir -p /var/lib/pam-email-otp
root@IDEA-Server:/home/user01# mkdir -p /usr/local/lib/pam-email-otp
กำหนด permission:
root@IDEA-Server:/home/user01# chown root:root /etc/pam-email-otp
root@IDEA-Server:/home/user01# chmod 700 /etc/pam-email-otp
root@IDEA-Server:/home/user01# chown root:root /var/lib/pam-email-otp
root@IDEA-Server:/home/user01# chmod 700 /var/lib/pam-email-otp
libpam-python ถูกออกแบบมาเพื่อเขียน PAM authentication module ด้วย Python โดยตรง ซึ่งตรงกับงานนี้
2. สร้างกลุ่ม User ที่ต้องใช้ OTP
ไม่บังคับทุก Account ตั้งแต่แรก ให้ทำเฉพาะสมาชิกกลุ่ม otpusers
เช่นต้องการให้ user user01 ใช้ OTP
root@IDEA-Server:/home/user01# groupadd otpusers
root@IDEA-Server:/home/user01# usermod -aG otpusers user01
ตรวจสอบ
root@IDEA-Server:/home/user01# id user01
uid=1000(user01) gid=1000(teee) groups=1000(user01),24(cdrom),25(floppy),29(audio),30(dip),44(video),46(plugdev),100(users),101(netdev),103(bluetooth),1001(otpusers)
ตอนแรก อย่าเพิ่งใส่ root เพื่อป้องกันล็อกตัวเองออกจากระบบ
3. สร้างไฟล์กำหนด Email ของแต่ละ User
root@IDEA-Server:/home/user01# mkdir -p /etc/pam-email-otp
root@IDEA-Server:/home/user01# nano /etc/pam-email-otp/users.conf
ใส่
user01=user01@yourdomain.com
ถ้าต้องการให้ OTP ของ user บางคนส่งให้ผู้ดูแลระบบแทน ก็ใส่เมล Admin
user01=admin@yourdomain.com
หรือหลาย User
user01=user01@yourdomain.com
somchai=somchai@yourdomain.com
admin=it-admin@yourdomain.com
กำหนด permission
root@IDEA-Server:/home/user01# chown root:root /etc/pam-email-otp/users.conf
root@IDEA-Server:/home/user01# chmod 600 /etc/pam-email-otp/users.conf
4. สร้าง SMTP configuration
ก่อนอื่นผมแนะนำ อย่าเพิ่งผูกกับ Microsoft 365 username/password แบบเก่า เพราะ Microsoft 365 กำลังเลิก Basic Authentication สำหรับ SMTP AUTH และแนวทางปัจจุบันคือ OAuth หรือ SMTP Relay/Connector. Microsoft เองแนะนำ Modern Authentication หรือ SMTP Relay สำหรับ application/device sending.
เพื่อให้เราทดสอบ PAM ก่อน สร้าง configuration แบบ generic:
สร้าง Gmail SMTP Configuration
nano /etc/pam-email-otp/smtp.conf
SMTP_HOST=smtp.gmail.com
SMTP_PORT=587
SMTP_USER=youraccount@gmail.com
SMTP_PASSWORD=abcdefghijklmnop
SMTP_FROM=youraccount@gmail.com
SMTP_STARTTLS=yes
แล้วบันทึก
กำหนดสิทธิ์
root@IDEA-Server:/home/user01# chmod 600 /etc/pam-email-otp/smtp.conf
root@IDEA-Server:/home/user01# chown root:root /etc/pam-email-otp/smtp.conf
ทดสอบการส่งอีเมล
สร้างไฟล์
# nano /root/test-gmail.py
ใส่โค้ด
import smtplib
import ssl
from email.message import EmailMessage
SMTP_USER = “youraccount@gmail.com”
SMTP_PASSWORD = “abcdefghijklmnop”
msg = EmailMessage()
msg[“Subject”] = “Test Email OTP”
msg[“From”] = SMTP_USER
msg[“To”] = “recipient@example.com”
msg.set_content(“””This is a test.
OTP : 123456
“””)
context = ssl.create_default_context()
with smtplib.SMTP(“smtp.gmail.com”, 587) as smtp:
smtp.ehlo()
smtp.starttls(context=context)
smtp.ehlo()
smtp.login(SMTP_USER, SMTP_PASSWORD)
smtp.send_message(msg)
print(“Email Sent Successfully”)
แก้
SMTP_USER
SMTP_PASSWORD
recipient@example.com
ให้เป็นของคุณ
แล้วรัน
root@IDEA-Server:/home/user01# python3 /root/test-gmail.py
Email Sent Successfully
5. สร้าง Python OTP Module
root@IDEA-Server:/home/user01# nano /usr/local/lib/pam-email-otp/pam_email_otp.py
import os
import pwd
import grp
import ssl
import time
import socket
import sqlite3
import secrets
import hashlib
import smtplib
import syslog
from email.message import EmailMessage
# ——————————————————-
# Configuration
# ——————————————————-
SMTP_CONFIG = “/etc/pam-email-otp/smtp.conf”
USER_CONFIG = “/etc/pam-email-otp/users.conf”
DATABASE = “/var/lib/pam-email-otp/otp.db”
OTP_GROUP = “otpusers”
OTP_LENGTH = 6
OTP_EXPIRE = 300 # 5 minutes
MAX_ATTEMPTS = 3
# ——————————————————-
# Logging
# ——————————————————-
def log(message, priority=syslog.LOG_INFO):
syslog.openlog(
“pam-email-otp”,
syslog.LOG_PID,
syslog.LOG_AUTH
)
syslog.syslog(priority, message)
# ——————————————————-
# Read config
# ——————————————————-
def load_config(filename):
data = {}
with open(filename, “r”) as f:
for line in f:
line = line.strip()
if not line:
continue
if line.startswith(“#”):
continue
if “=” not in line:
continue
key, value = line.split(“=”, 1)
data[key.strip()] = value.strip()
return data
# ——————————————————-
# User requires OTP?
# ——————————————————-
def user_requires_otp(username):
try:
user_data = pwd.getpwnam(username)
otp_group = grp.getgrnam(OTP_GROUP)
except KeyError:
return False
# Primary group
if user_data.pw_gid == otp_group.gr_gid:
return True
# Supplementary group
if username in otp_group.gr_mem:
return True
return False
# ——————————————————-
# Get destination email
# ——————————————————-
def get_user_email(username):
users = load_config(USER_CONFIG)
return users.get(username)
# ——————————————————-
# Database
# ——————————————————-
def init_database():
conn = sqlite3.connect(
DATABASE,
timeout=5
)
conn.execute(
“””
CREATE TABLE IF NOT EXISTS otp_challenges
(
id INTEGER PRIMARY KEY AUTOINCREMENT,
username TEXT NOT NULL,
otp_hash TEXT NOT NULL,
created INTEGER NOT NULL,
expires INTEGER NOT NULL,
attempts INTEGER NOT NULL DEFAULT 0,
used INTEGER NOT NULL DEFAULT 0,
service TEXT,
remote_host TEXT
)
“””
)
conn.commit()
return conn
# ——————————————————-
# OTP generation
# ——————————————————-
def generate_otp():
maximum = 10 ** OTP_LENGTH
return str(
secrets.randbelow(maximum)
).zfill(OTP_LENGTH)
def hash_otp(otp):
return hashlib.sha256(
otp.encode(“utf-8”)
).hexdigest()
# ——————————————————-
# Save OTP
# ——————————————————-
def save_challenge(
username,
otp,
service,
remote_host
):
now = int(time.time())
expires = now + OTP_EXPIRE
conn = init_database()
try:
# Invalidate previous unused OTPs for this user
conn.execute(
“””
UPDATE otp_challenges
SET used = 1
WHERE username = ?
AND used = 0
“””,
(username,)
)
cursor = conn.execute(
“””
INSERT INTO otp_challenges
(
username,
otp_hash,
created,
expires,
attempts,
used,
service,
remote_host
)
VALUES (?, ?, ?, ?, 0, 0, ?, ?)
“””,
(
username,
hash_otp(otp),
now,
expires,
service,
remote_host
)
)
conn.commit()
return cursor.lastrowid
finally:
conn.close()
# ——————————————————-
# Verify OTP
# ——————————————————-
def verify_otp(
challenge_id,
entered_otp
):
conn = init_database()
try:
cursor = conn.execute(
“””
SELECT
otp_hash,
expires,
attempts,
used
FROM otp_challenges
WHERE id = ?
“””,
(challenge_id,)
)
row = cursor.fetchone()
if not row:
return False, “not_found”
stored_hash = row[0]
expires = row[1]
attempts = row[2]
used = row[3]
if used:
return False, “used”
now = int(time.time())
if now > expires:
conn.execute(
“””
UPDATE otp_challenges
SET used = 1
WHERE id = ?
“””,
(challenge_id,)
)
conn.commit()
return False, “expired”
attempts += 1
conn.execute(
“””
UPDATE otp_challenges
SET attempts = ?
WHERE id = ?
“””,
(
attempts,
challenge_id
)
)
conn.commit()
entered_hash = hash_otp(
entered_otp
)
matched = secrets.compare_digest(
stored_hash,
entered_hash
)
if matched:
conn.execute(
“””
UPDATE otp_challenges
SET used = 1
WHERE id = ?
“””,
(challenge_id,)
)
conn.commit()
return True, “success”
if attempts >= MAX_ATTEMPTS:
conn.execute(
“””
UPDATE otp_challenges
SET used = 1
WHERE id = ?
“””,
(challenge_id,)
)
conn.commit()
return False, “max_attempts”
return False, “incorrect”
finally:
conn.close()
# ——————————————————-
# Cleanup expired challenges
# ——————————————————-
def cleanup_database():
try:
conn = init_database()
now = int(time.time())
# Keep history only 24 hours
cutoff = now – 86400
conn.execute(
“””
DELETE FROM otp_challenges
WHERE created < ?
“””,
(cutoff,)
)
conn.commit()
conn.close()
except Exception as exc:
log(
“Database cleanup error: {}”.format(exc),
syslog.LOG_WARNING
)
# ——————————————————-
# Send email
# ——————————————————-
def send_email(
username,
destination,
otp,
service,
remote_host
):
config = load_config(
SMTP_CONFIG
)
smtp_host = config.get(
“SMTP_HOST”,
“smtp.gmail.com”
)
smtp_port = int(
config.get(
“SMTP_PORT”,
“587”
)
)
smtp_user = config.get(
“SMTP_USER”
)
smtp_password = config.get(
“SMTP_PASSWORD”
)
smtp_from = config.get(
“SMTP_FROM”,
smtp_user
)
smtp_timeout = int(
config.get(
“SMTP_TIMEOUT”,
“15”
)
)
use_starttls = (
config.get(
“SMTP_STARTTLS”,
“yes”
).lower()
== “yes”
)
hostname = socket.gethostname()
message = EmailMessage()
message[“From”] = smtp_from
message[“To”] = destination
message[“Subject”] = (
“Linux Login OTP – ”
+ hostname
)
message.set_content(
f”””
Linux Login Verification
Server:
{hostname}
User:
{username}
Service:
{service}
Source IP:
{remote_host}
Your verification code is:
{otp}
The code expires in 5 minutes.
If you did not attempt to login,
please contact your system administrator.
“””
)
context = ssl.create_default_context()
smtp = smtplib.SMTP(
smtp_host,
smtp_port,
timeout=smtp_timeout
)
try:
smtp.ehlo()
if use_starttls:
smtp.starttls(
context=context
)
smtp.ehlo()
smtp.login(
smtp_user,
smtp_password
)
smtp.send_message(
message
)
finally:
try:
smtp.quit()
except Exception:
pass
# ——————————————————-
# PAM Authentication
# ——————————————————-
def pam_sm_authenticate(
pamh,
flags,
argv
):
try:
username = pamh.get_user(None)
if not username:
return pamh.PAM_USER_UNKNOWN
# ———————————————–
# User not in otpusers
# ———————————————–
if not user_requires_otp(
username
):
log(
“OTP BYPASS ”
f”user={username} ”
f”service={pamh.service}”
)
return pamh.PAM_SUCCESS
# ———————————————–
# Get destination email
# ———————————————–
destination = get_user_email(
username
)
if not destination:
log(
“OTP DENY ”
f”user={username} ”
“reason=no_email”,
syslog.LOG_WARNING
)
return pamh.PAM_AUTH_ERR
service = str(
pamh.service or “unknown”
)
remote_host = str(
pamh.rhost or “console”
)
# ———————————————–
# Create OTP
# ———————————————–
otp = generate_otp()
challenge_id = save_challenge(
username,
otp,
service,
remote_host
)
# ———————————————–
# Send Email
# ———————————————–
try:
send_email(
username,
destination,
otp,
service,
remote_host
)
except Exception as exc:
log(
“OTP EMAIL ERROR ”
f”user={username} ”
f”error={repr(exc)}”,
syslog.LOG_ERR
)
return pamh.PAM_AUTH_ERR
log(
“OTP SENT ”
f”user={username} ”
f”service={service} ”
f”rhost={remote_host}”
)
# Remove OTP from memory reference ASAP
otp = None
# ———————————————–
# Ask OTP
# ———————————————–
for attempt in range(
1,
MAX_ATTEMPTS + 1
):
prompt = pamh.Message(
pamh.PAM_PROMPT_ECHO_OFF,
(
“Verification code ”
f”({attempt}/{MAX_ATTEMPTS}): ”
)
)
response = pamh.conversation(
prompt
)
entered_otp = (
response.resp or “”
).strip()
valid, reason = verify_otp(
challenge_id,
entered_otp
)
if valid:
log(
“OTP SUCCESS ”
f”user={username} ”
f”service={service} ”
f”rhost={remote_host}”
)
cleanup_database()
return pamh.PAM_SUCCESS
if reason == “expired”:
log(
“OTP EXPIRED ”
f”user={username}”,
syslog.LOG_WARNING
)
return pamh.PAM_AUTH_ERR
if reason == “max_attempts”:
log(
“OTP MAX ATTEMPTS ”
f”user={username}”,
syslog.LOG_WARNING
)
return pamh.PAM_AUTH_ERR
log(
“OTP INCORRECT ”
f”user={username} ”
f”attempt={attempt}”,
syslog.LOG_WARNING
)
return pamh.PAM_AUTH_ERR
except Exception as exc:
log(
“OTP SYSTEM ERROR ”
f”error={repr(exc)}”,
syslog.LOG_ERR
)
# Fail closed
return pamh.PAM_AUTH_ERR
# ——————————————————-
# Other PAM functions
# ——————————————————-
def pam_sm_setcred(
pamh,
flags,
argv
):
return pamh.PAM_SUCCESS
def pam_sm_acct_mgmt(
pamh,
flags,
argv
):
return pamh.PAM_SUCCESS
def pam_sm_open_session(
pamh,
flags,
argv
):
return pamh.PAM_SUCCESS
def pam_sm_close_session(
pamh,
flags,
argv
):
return pamh.PAM_SUCCESS
def pam_sm_chauthtok(
pamh,
flags,
argv
):
return pamh.PAM_SUCCESS
==========================
กำหนด permission:
root@IDEA-Server:/home/user01# chown root:root /usr/local/lib/pam-email-otp/pam_email_otp.py
root@IDEA-Server:/home/user01# chmod 600 /usr/local/lib/pam-email-otp/pam_email_otp.py
ตรวจ syntax:
root@IDEA-Server:/home/user01# python3 -m py_compile /usr/local/lib/pam-email-otp/pam_email_otp.py
root@IDEA-Server:/home/user01# ถ้า ไม่มี Output แปลว่า syntax ผ่าน
chown root:root /usr/local/lib/pam-email-otp/pam_email_otp.py
chmod 700 /usr/local/lib/pam-email-otp/pam_email_otp.py
chown root:root /etc/pam-email-otp/smtp.conf
chmod 600 /etc/pam-email-otp/smtp.conf
chown root:root /etc/pam-email-otp/users.conf
chmod 600 /etc/pam-email-otp/users.conf
chown root:root /var/lib/pam-email-otp
chmod 700 /var/lib/pam-email-otp
6. ทดสอบ Gmail ก่อน อย่าเพิ่งแตะ PAM
root@IDEA-Server:/home/user01# nano /root/test-otp.py
import sys
sys.path.insert(
0,
“/usr/local/lib/pam-email-otp”
)
import pam_email_otp
otp = pam_email_otp.generate_otp()
print(“Generated OTP:”, otp)
pam_email_otp.send_email(
username=”teee”,
destination=”YOUR-EMAIL@gmail.com”,
otp=otp,
service=”TEST”,
remote_host=”127.0.0.1″
)
print(“Email sent successfully.”)
แก้:YOUR-EMAIL@gmail.com. เป็นอีเมลที่จะรับ OTP
แล้วทดสอบ
root@IDEA-Server:/home/user01# python3 /root/test-otp.py
Generated OTP: 710926
Email sent successfully.
และ Gmail จะได้รับ:
Linux Login Verification
Server:
IDEA-Server
User:
teee
Service:
TEST
Source IP:
127.0.0.1
Your verification code is:
710926
The code expires in 5 minutes.
ถ้าข้อนี้ยังไม่ผ่าน อย่าเพิ่งแก้ /etc/pam.d/sshd
7. ตรวจ Database
หลังทดสอบ เราทดสอบ SQLite ได้:
root@IDEA-Server:/home/user01# ls -l /var/lib/pam-email-otp/
total 0
ตอน test mail อย่างเดียวยังอาจไม่มี otp.db เพราะเราไม่ได้สร้าง challenge
สามารถสร้างทดสอบ:
python3 – <<‘PY’
import sys
sys.path.insert(0, “/usr/local/lib/pam-email-otp”)
import pam_email_otp
otp = pam_email_otp.generate_otp()
cid = pam_email_otp.save_challenge(
“teee”,
otp,
“TEST”,
“127.0.0.1”
)
print(“Challenge ID:”, cid)
print(“OTP:”, otp)
PY
ตัวอย่าง
root@IDEA-Server:/home/user01# python3 – <<‘PY’
import sys
sys.path.insert(0, “/usr/local/lib/pam-email-otp”)
import pam_email_otp
otp = pam_email_otp.generate_otp()
cid = pam_email_otp.save_challenge(
“teee”,
otp,
“TEST”,
“127.0.0.1”
)
print(“Challenge ID:”, cid)
print(“OTP:”, otp)
PY
Challenge ID: 1
OTP: 346535
แล้ว:
root@IDEA-Server:/home/user01# sqlite3 /var/lib/pam-email-otp/otp.db
SQLite version 3.46.1 2024-08-13 09:16:08
Enter “.help” for usage hints.
sqlite> select id,username,expires,attempts,used,service,remote_host from otp_challenges;
1|teee|1786336565|0|0|TEST|127.0.0.1
sqlite>
Ctrl+Z
สังเกตว่า Database ไม่เก็บ OTP 6 หลักตรง ๆ แต่เก็บ hash
1|teee|1786332345|0|0|TEST|127.0.0.1
จะได้ประมาณ:
root@IDEA-Server:/home/user01# sqlite3 /var/lib/pam-email-otp/otp.db
SQLite version 3.46.1 2024-08-13 09:16:08
Enter “.help” for usage hints.
sqlite> select username,otp_hash from otp_challenges;
teee|e976f4fe029e209e2b5aa50753aac08fd6b75ea10e310c898abbd6d05e5a529b
8. Backup SSH/PAM ก่อน
root@IDEA-Server:/home/teee# cat /etc/pam.d/sshd
# PAM configuration for the Secure Shell service
# Standard Un*x authentication.
@include common-auth <—- หา ตัวนี้
# Disallow non-root logins when /etc/nologin exists.
account required pam_nologin.so
# Uncomment and edit /etc/security/access.conf if you need to set complex
# access limits that are hard to express in sshd_config.
# account required pam_access.so
# Standard Un*x authorization.
@include common-account
# SELinux needs to be the first session rule. This ensures that any
# lingering context has been cleared. Without this it is possible that a
# module could execute code in the wrong domain.
session [success=ok ignore=ignore module_unknown=ignore default=bad] pam_selinux.so close
# Set the loginuid process attribute.
session required pam_loginuid.so
# Create a new session keyring.
session optional pam_keyinit.so force revoke
# Standard Un*x session setup and teardown.
@include common-session
# Print the message of the day upon successful login.
# This includes a dynamically generated part from /run/motd.dynamic
# and a static (admin-editable) part from /etc/motd.
session optional pam_motd.so motd=/run/motd.dynamic
session optional pam_motd.so noupdate
# Print the status of the user’s mailbox upon successful login.
session optional pam_mail.so standard noenv # [1]
# Set up user limits from /etc/security/limits.conf.
session required pam_limits.so
# Read environment variables from /etc/environment and
# /etc/security/pam_env.conf.
session required pam_env.so # [1]
# In Debian 4.0 (etch), locale-related environment variables were moved to
# /etc/default/locale, so read that as well.
session required pam_env.so envfile=/etc/default/locale
# SELinux needs to intervene at login time to ensure that the process starts
# in the proper default security context. Only sessions which are intended
# to run in the user’s context should be run after this.
session [success=ok ignore=ignore module_unknown=ignore default=bad] pam_selinux.so open
# Standard Un*x password updating.
@include common-password
root@IDEA-Server:/home/teee#
9. เพิ่ม Email OTP เข้า PAM ของ SSH
root@IDEA-Server:/home/teee# nano /etc/pam.d/sshd
/etc/pam.d/sshd *
# PAM configuration for the Secure Shell service
# Standard Un*x authentication.
@include common-auth
auth required pam_python.so /usr/local/lib/pam-email-otp/pam_email_otp.py <– เพิ่มบรรทัดนี้
10. เปิด Keyboard Interactive
ตรวจปัจจุบันก่อน:
sshd -T | grep -Ei \
‘usepam|kbdinteractiveauthentication|passwordauthentication’
root@IDEA-Server:/home/user01# sshd -T | grep -Ei \
‘usepam|kbdinteractiveauthentication|passwordauthentication’
usepam yes
passwordauthentication yes
kbdinteractiveauthentication no
root@IDEA-Server:/home/user01# nano /etc/ssh/sshd_config
ค้นหาแล้วแก้
UsePAM yes
KbdInteractiveAuthentication yes จาก no ให้เป็น yes
PasswordAuthentication yes
ChallengeResponseAuthentication yes
root@IDEA-Server:/home/user01# sshd -t ไม่มี Output = ผ่าน
Last login: Mon Aug 10 10:43:59 on ttys000
teee@NP ~ % ssh teee@10.10.10.150
(teee@10.10.10.150) Password:
(teee@10.10.10.150) Verification code (1/3):
Linux IDEA-Server 6.12.101+deb13-amd64 #1 SMP PREEMPT_DYNAMIC Debian 6.12.101-1 (2026-08-05) x86_64
Last login: Sun Aug 9 23:28:26 2026 from 10.10.10.139
ดู auth.log (แนะนำ)
เปิดอีกหน้าต่าง SSH/Console แล้วรัน
#journalctl -f -u ssh
ดู log realtime
11. ยกเลิก OTP ของ User คนเดียว ให้เอา User ออกจากกลุ่ม otpusers
ใช้คำสั่งนี้
gpasswd -d username otpusers
ตัวอย่าง ถ้าจะยกเลิก OTP ของ user01
root@IDEA-Server:/home/user01# gpasswd -d user01 otpusers
root@IDEA-Server:/home/user01# getent group otpusers
otpusers:
ถ้า teee หายออกจากรายชื่อแล้ว แปลว่า User นี้จะกลับไปใช้ Password อย่างเดียว ไม่ต้องกรอก OTP
ถ้าต้องการตรวจเฉพาะ User:
root@IDEA-Server:/home/user01# id user01
uid=1000(user01) gid=1000(user01) groups=1000(user01),24(cdrom),25(floppy),29(audio),30(dip),44(video),46(plugdev),100(users),101(netdev),103(bluetooth)
ถ้าไม่เห็น otpusers ในรายการ group ก็ถือว่ายกเลิกเรียบร้อย
ไฟล์ /etc/pam-email-otp/users.conf จะลบ email ของ User นั้นออกด้วยก็ได้ เช่นลบ:
user01=user01@gmail.com
ถ้าจะ ยกเลิกการใช้งาน Email OTP ทั้งระบบ (ไม่ใช่แค่บาง User) ให้ทำดังนี้
เอา PAM Module ออก
#nano /etc/pam.d/sshd
ลบบรรทัดนี้ออก หรือใส่ # นำหน้า
#auth required pam_python.so /usr/local/lib/pam-email-otp/pam_email_otp.py
ถ้าเปิดใช้กับ Console ด้วย ให้แก้ไฟล์
nano /etc/pam.d/login
แล้วลบบรรทัดเดียวกันออก. จากนั้น Reload SSH
# systemctl reload ssh
ถ้าจะลบออกทั้งหมด
rm -rf /usr/local/lib/pam-email-otp
rm -rf /etc/pam-email-otp
rm -rf /var/lib/pam-email-otp
ถ้าไม่ต้องการกลุ่ม otpusers แล้ว
groupdel otpusers
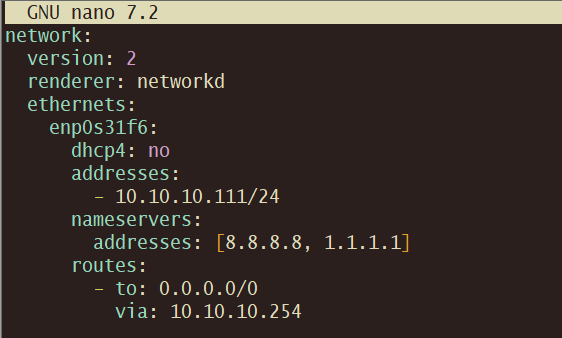
Netplan Ubuntu
LAN
nano /etc/netplan/00-installer-config.yaml
sudo chmod 600 /etc/netplan/00-installer-config.yaml
sudo netplan apply
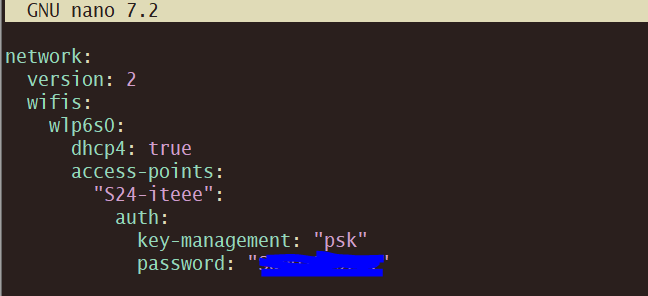
WiFi
sudo nano /etc/netplan/50-cloud-init.yaml
Notebook- ปรับการตั้งค่า power ของระบบ (ไม่ให้ suspend เมื่อพับหน้าจอ)-Debian
ปัญหาที่เจอบน Debian/ThinkPad คือเวลาพับหน้าจอ ระบบจะเข้าสู่ suspend/hibernate ทำให้ SSH server หยุดทำงาน ทำให้ไม่สามารถเข้า SSH ได้
วิธีแก้
ปรับการตั้งค่า power ของระบบ (ไม่ให้ suspend เมื่อพับหน้าจอ)
แก้ไขไฟล์ logind configuration:
sudo nano /etc/systemd/logind.conf
หา (หรือเพิ่ม) บรรทัดเหล่านี้:
HandleLidSwitch=ignore
HandleLidSwitchDocked=ignore
HandleLidSwitch=ignore → เมื่อพับฝา ไม่ทำ suspend
HandleLidSwitchDocked=ignore → ใช้เวลาเชื่อมต่อ docking station
รีสตาร์ท systemd-logind:
sudo systemctl restart systemd-logind
ทดสอบ: พับหน้าจอแล้วเครื่องยังคงทำงาน คุณยังสามารถ SSH เข้าได้
ติดตั้ง openldap บน ubuntu 24.04
ติดตั้ง OpenLDAP บน Ubuntu 24.04
1: อัปเดตระบบ
root@ldapserv:~# apt update && sudo apt upgrade -y
2: ติดตั้ง OpenLDAP และเครื่องมือที่เกี่ยวข้อง
root@ldapserv:~# apt install slapd ldap-utils -y
ระบบจะติดตั้ง slapd (OpenLDAP server) และ ldap-utils (เครื่องมือ CLI)
>> ใน Ubuntu 24.04 อาจไม่มี prompt ให้กำหนดรหัสผ่านของ admin (cn=admin) ในระหว่างติดตั้ง
Configuring slapd
Please enter the password for the admin entry in your LDAP directory.
Administrator password: xxxxx
Auto Start Service ตอนเปิดเครื่อง
#sudo systemctl enable slapd
3: ตั้งค่ารหัสผ่านสำหรับ LDAP admin ด้วย dpkg-reconfigure
ตั้งค่า config สำหรับ OPENLDAP ใหม่
root@ldapserv:~# dpkg-reconfigure slapd
คำถามที่คุณจะเจอ:
1. Omit OpenLDAP server configuration? → เลือก No
2. DNS domain name: → เช่น example.com
3. Organization name: → เช่น Example Inc
4. Administrator password: → ตั้งรหัสผ่าน
5. Database backend to use: → เลือก MDB (ค่าเริ่มต้น)
6. Remove the database when slapd is purged? → No
7. Move old database? → Yes
หลังจากนั้นระบบจะตั้งค่าฐานข้อมูลให้ใหม่ทั้งหมด
root@ldapserv:~# netstat -lntp
Active Internet connections (only servers)
tcp 0 0 0.0.0.0:389 0.0.0.0:* LISTEN 17736/slapd <–OPENLDAP
tcp6 0 0 :::22 :::* LISTEN 823/sshd: /usr/sbin
tcp6 0 0 :::389 :::* LISTEN 17736/slapd
4: ทดสอบ LDAP ด้วย ldapsearch ตัวอย่าง omtel.co.th
การ search ข้อมูลจาก LDAP server เช่น omtelldap.omtel.co.th จำเป็นต้องทราบ:
1.Base DN (จุดเริ่มต้นของ directory tree ที่จะค้นหา เช่น dc=omtel,dc=co,dc=th)
2.Credentials (ถ้าต้อง bind ด้วย user/password)
3.Port ที่ใช้ (ปกติ 389 สำหรับ LDAP หรือ 636 สำหรับ LDAPS)
4.Filter ที่ต้องการค้นหา เช่น (objectClass=person) หรือ (uid=someone)
ldapsearch -x -H ldap://localhost -D “cn=admin,dc=omtel,dc=ltd” -w ‘รหัสผ่าน’ -b “dc=omtel,dc=ltd”
# extended LDIF
#
# LDAPv3
# base <dc=omtel,dc=co,dc=th> with scope subtree
# filter: (objectclass=*)
# requesting: ALL
#
# omtel.co.th
dn: dc=omtel,dc=co,dc=th
objectClass: top
objectClass: dcObject
objectClass: organization
o: omptelldap
dc: omtel
# search result
search: 2
result: 0 Success
# numResponses: 2
# numEntries: 1
แบบนี้ถือว่าสำเร็จแล้ว!
การตอบกลับจาก ldapsearch ของคุณ:
•แสดงว่าเชื่อมต่อกับ LDAP server ได้สำเร็จ (result: 0 Success)
•มีการคืนค่า entry ของ dc=omtel,dc=co,dc=th ได้ 1 รายการ (root entry ของ directory tree)
•ไม่มี error ใด ๆ เช่น invalid credentials หรือ no such object
ขั้นตอนถัดไป (หากต้องการ):
5. หากต้องการ:
•สร้าง OU (organizationalUnit) เช่น People, Groups
•เพิ่มผู้ใช้ เช่น uid=tee,ou=People,…
ให้ใช้ไฟล์ .ldif เช่น:
ตัวอย่าง: add_base.ldif
dn: ou=People,dc=omtel,dc=co,dc=th
objectClass: organizationalUnit
ou: People
dn: uid=tee,ou=People,dc=omtel,dc=co,dc=th
objectClass: inetOrgPerson
cn: Naitinoi Sak
sn: Sak
uid: tee
userPassword: {SSHA} password
root@ldapserv:~# ldapadd -x -D “cn=admin,dc=omtel,dc=co,dc=th” -w ‘LDAP Password’ -f add_base.ldif
adding new entry “ou=People,dc=omtel,dc=co,dc=th”
adding new entry “uid=tee,ou=People,dc=omtel,dc=co,dc=th”
root@ldapserv:/home/teee# cat add_people_ou.ldif
dn: ou=People,dc=omtel,dc=co,dc=th
objectClass: organizationalUnit
ou: People
#ldapadd -x -D “cn=admin,dc=omtel,dc=co,dc=th” -w ‘xxxxPassxxxxx’ -f add_people_ou.ldif
root@ldapserv:/home/teee# cat gen-user.sh
#!/bin/bash
# BASE DN
BASE_DN=”dc=worldinfinity,dc=co,dc=th”
echo “==== สร้าง LDIF สำหรับเพิ่มผู้ใช้ LDAP ====”
read -p “Login (uid): ” LOGIN
read -p “Full Name (ชื่อ-นามสกุล): ” FULLNAME
# แยกชื่อกับนามสกุล
FIRSTNAME=$(echo “$FULLNAME” | cut -d’ ‘ -f1)
LASTNAME=$(echo “$FULLNAME” | cut -d’ ‘ -f2)
read -s -p “Password: ” PASSWORD
echo
# เข้ารหัสรหัสผ่าน
ENCRYPTED_PASS=$(slappasswd -s “$PASSWORD”)
# สร้าง LDIF
LDIF_FILE=”user_${LOGIN}.ldif”
cat < “$LDIF_FILE”
dn: uid=$LOGIN,ou=People,$BASE_DN
objectClass: inetOrgPerson
uid: $LOGIN
cn: $FULLNAME
sn: $LASTNAME
givenName: $FIRSTNAME
userPassword: $ENCRYPTED_PASS
EOF
echo “✅ ไฟล์ LDIF ถูกสร้างแล้ว: $LDIF_FILE”
root@ldapserv:/home/teee# cat list_ldap_users.sh
#!/bin/bash
# LDAP base และข้อมูลการล็อกอิน
BASE_DN=”ou=People,dc=worldinfinity,dc=co,dc=th”
BIND_DN=”cn=admin,dc=worldinfinity,dc=co,dc=th”
read -s -p “กรุณาใส่รหัสผ่านของ LDAP admin: ” LDAP_PASS
echo
echo “📋 รายชื่อผู้ใช้ใน $BASE_DN:”
echo “——————————-”
ldapsearch -x -D “$BIND_DN” -w “$LDAP_PASS” -b “$BASE_DN” “(objectClass=inetOrgPerson)” uid cn sn dn | \
awk ‘
BEGIN { user = “” }
/^dn:/ { if (user != “”) print user; user = $0 }
/^uid:/ { user = user “\n ” $0 }
/^cn:/ { user = user “\n ” $0 }
/^sn:/ { user = user “\n ” $0 }
END { if (user != “”) print user }
‘ | less
root@ldapserv:/home/teee# cat delete_ldap_user.sh
#!/bin/bash
# ฐานข้อมูล LDAP
BASE_DN=”dc=worldinfinity,dc=co,dc=th”
OU=”People”
# Admin DN และรหัสผ่าน
LDAP_ADMIN_DN=”cn=admin,$BASE_DN”
read -s -p “กรุณาใส่รหัสผ่านของ LDAP admin: ” LDAP_ADMIN_PASS
echo
# รับ UID จากผู้ใช้
read -p “กรอก UID ของผู้ใช้ที่ต้องการลบ: ” UID
# DN ที่จะลบ
USER_DN=”uid=$UID,ou=$OU,$BASE_DN”
# ยืนยันการลบ
read -p “คุณแน่ใจหรือไม่ว่าต้องการลบผู้ใช้ $USER_DN ? (y/n): ” CONFIRM
if [[ “$CONFIRM” != “y” ]]; then
echo “❌ ยกเลิกการลบ”
exit 1
fi
# ลบด้วย ldapdelete
ldapdelete -x -D “$LDAP_ADMIN_DN” -w “$LDAP_ADMIN_PASS” “$USER_DN”
# ตรวจสอบสถานะ
if [ $? -eq 0 ]; then
echo “✅ ลบผู้ใช้ $UID สำเร็จแล้ว”
else
echo “❌ ล้มเหลวในการลบผู้ใช้ $UID (อาจไม่มีอยู่จริงหรือรหัสผ่านผิด)”
fi
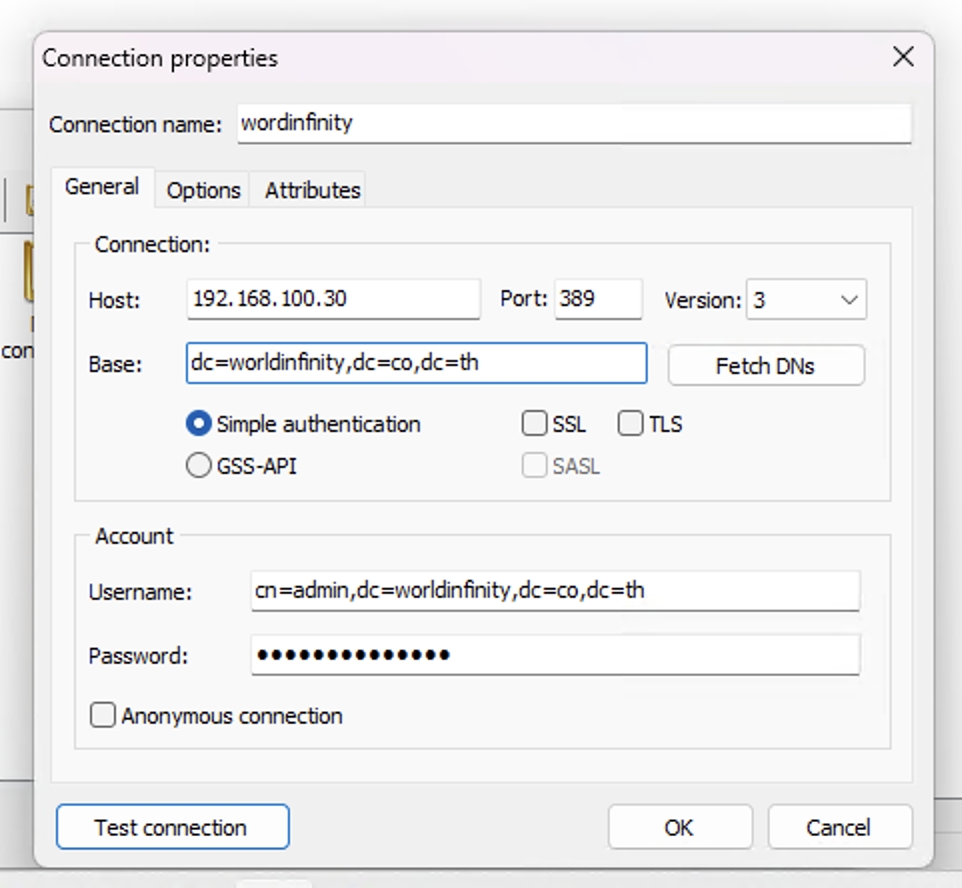
สามารถ Connect Test จากโปรแกรม LDAP Client Test เช่น
https://jxplorer.org/downloads/users.html
https://sourceforge.net/projects/ldapadmin/files/ldapadmin/1.8.3/
ตัวอย่าง

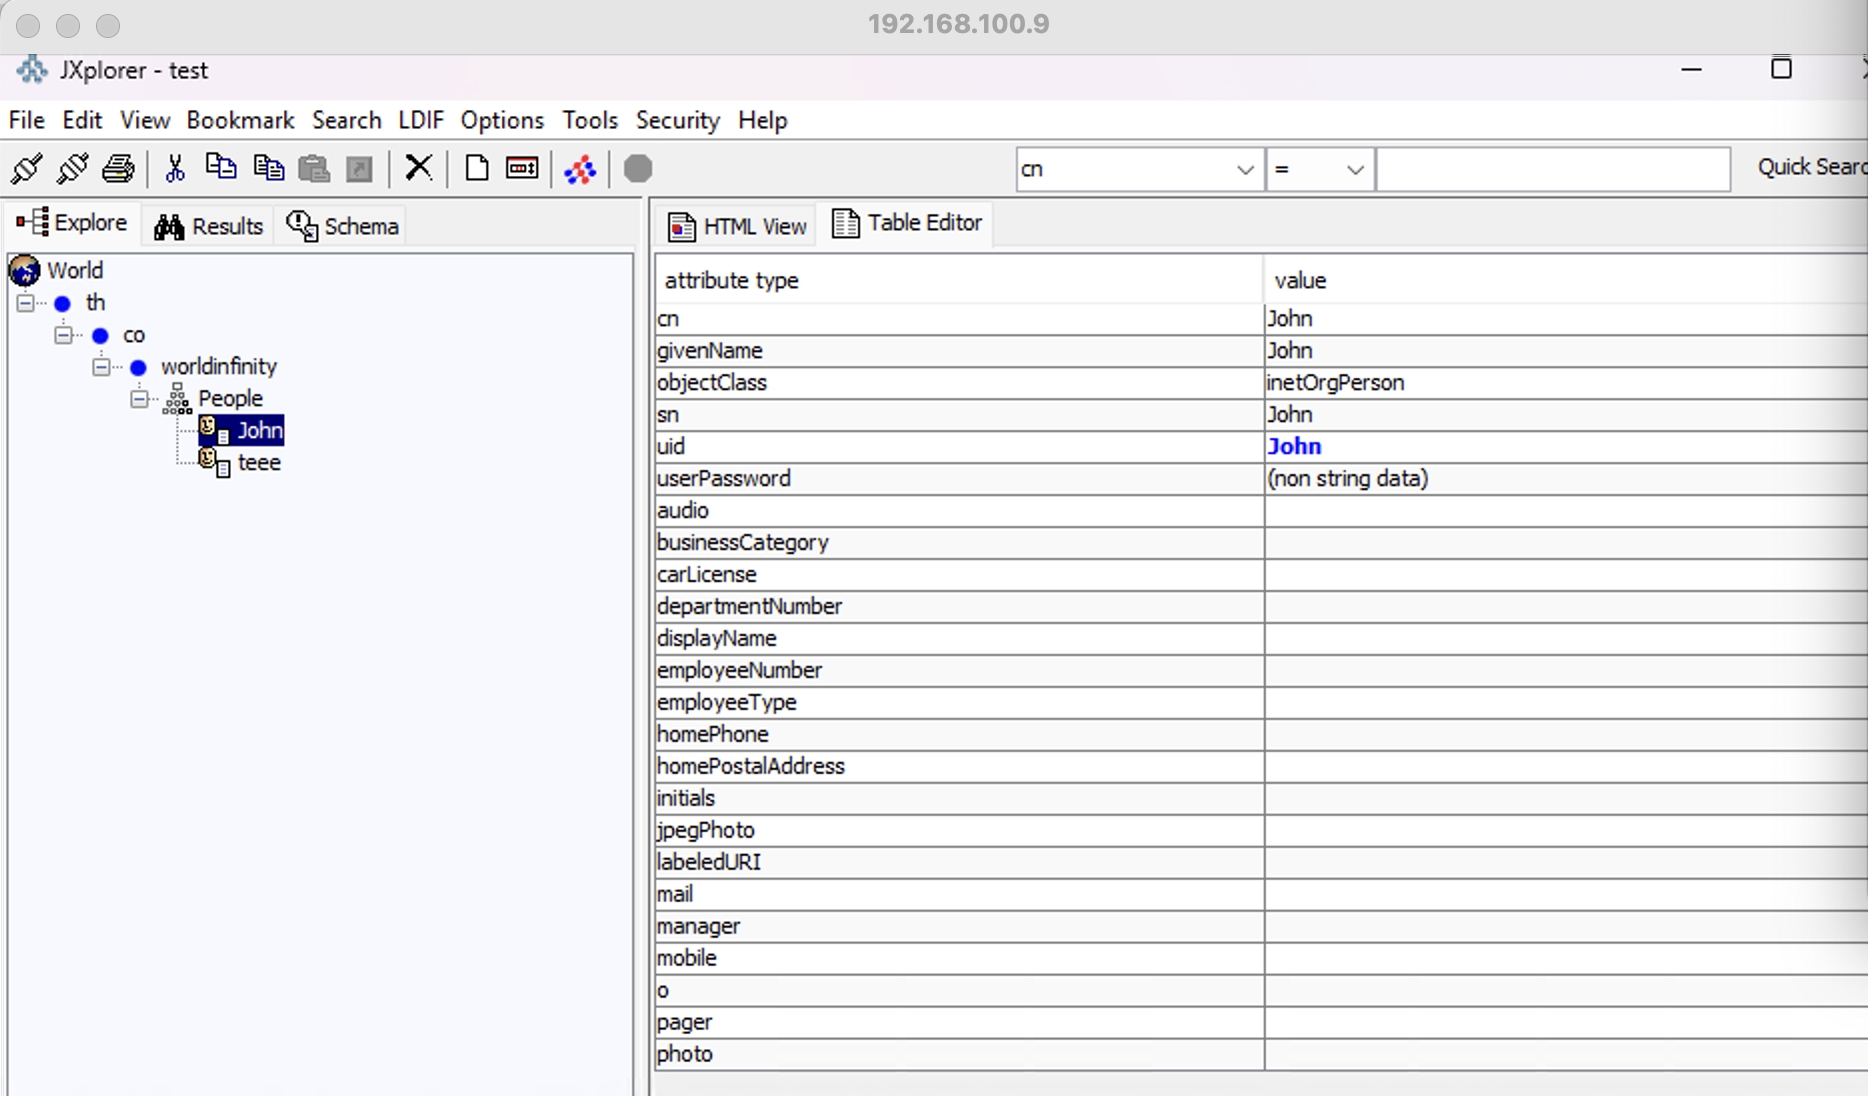
Ubuntu Netplan 24.04 Example- Proxmox
root@ldapserv:/etc/netplan# nano 50-cloud-init.yaml
network:
version: 2
ethernets:
ens18:
dhcp4: no
addresses:
– 192.168.100.30/24
routes:
– to: default
via: 192.168.100.1
nameservers:
addresses: [8.8.8.8, 1.1.1.1]
root@ldapserv:/etc/netplan# netplan apply
WARNING:root:Cannot call Open vSwitch: ovsdb-server.service is not running.
root@ldapserv:/etc/netplan# sudo systemctl status openvswitch-switch
Unit openvswitch-switch.service could not be found.
root@ldapserv:/etc/netplan# apt install openvswitch-switch -y
[*] systemd-logind.service
ตั้งให้เริ่มทำงานอัตโนมัติทุกครั้งที่บูต:
root@ldapserv:/etc/netplan# systemctl enable openvswitch-switch
Synchronizing state of openvswitch-switch.service with SysV service script with /lib/systemd/systemd-sysv-install.
Executing: /lib/systemd/systemd-sysv-install enable openvswitch-switch
Ubuntu แก้ไข motd
ปิดระบบ dynamic MOTD (ให้แสดงแค่ /etc/motd)
sudo chmod -x /etc/update-motd.d/*
sudo nano /etc/motd
ตั้งค่า Static IP ให้กับ Linux Ubuntu
#cd /etc/netplan# ls -l
#nano 50-cloud-init.yaml
network:
version: 2
ethernets:
ens160:
dhcp4: false
addresses:
– 192.168.100.22/24 # Replace with your desired IP and subnet
routes:
– to: default
via: 192.168.100.1 # Replace with your gateway IP
nameservers:
addresses:
– 8.8.8.8 # Google DNS
– 8.8.4.4 # Google DNS
# Restart Interface Card
#netplan apply
หรือให้ใช้งาน DHCP
network:
version: 2
ethernets:
ens160: # Replace with your Interface name
dhcp4: true
#netplan apply