Archive for the ‘ไม่มีหมวดหมู่’ Category
การตั้งค่า SD-WAN บน Fortigate เพื่อใช้งาน Internet มากกว่า 1 เส้น
เคสตัวอย่าง มี Internet ที่ใช้งาน อยู่ 2 เส้น โดยเป็น ISP คนละค่าย True และ NT
จุดประสงค์ของการตั้งค่าคือต้องการให้ True เป็น Internet เส้นหลัก จะสลับอัตโนมัติไปใช้งาน NT ในกรณีที่
True Fiber มีปัญหาไม่สามารถใช้งานได้ เมื่อ True กลับมาใช้งานได้แล้วก็จะสลับกลับมาใช้งานเป็นเส้นหลักเหมือนเดิม
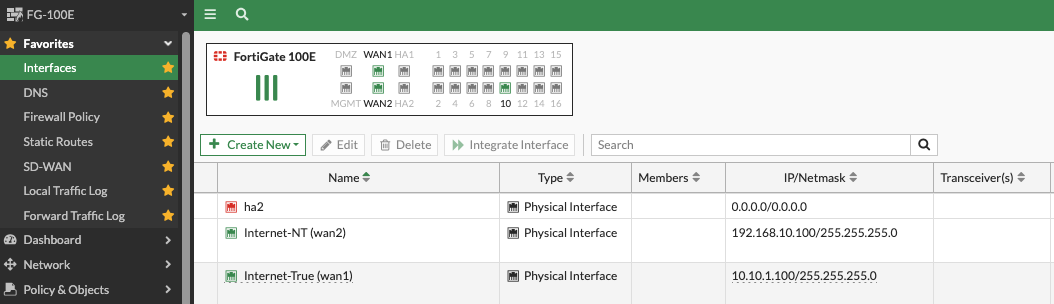
1. ขั้นแรกตั้งค่า SD-WAN ให้สามารถใช้งาน Internet ได้ก่อน โดยตั้งค่าให้ต่อไปที่พอร์ท WAN1(True), WAN2(NT)
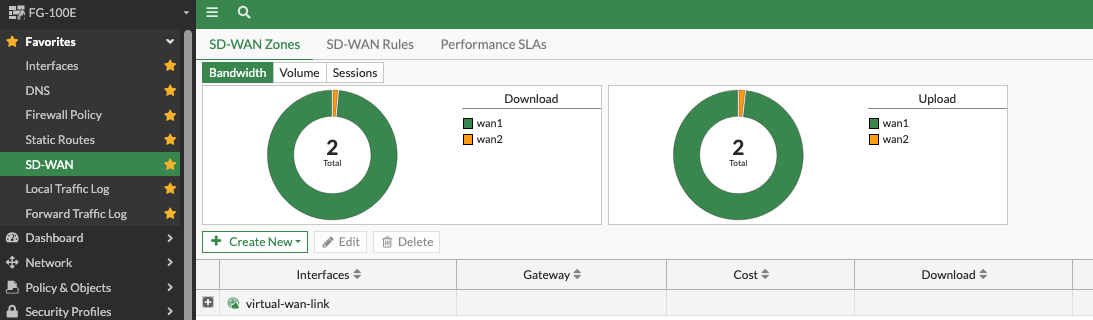
2. เพิ่ม Link ไปที่ SD-WAN ตามด้วย Cost ถ้ายิ่งน้อยคือจะให้ความสำคัญมาก่อนเป็นอันดับแรก

Statc Route ให้ชี้ Destination ไปที่ 0.0.0.0/0.0.0.0 เลือก Interface เป็น virtual-wan-link ตามตัวอย่าง

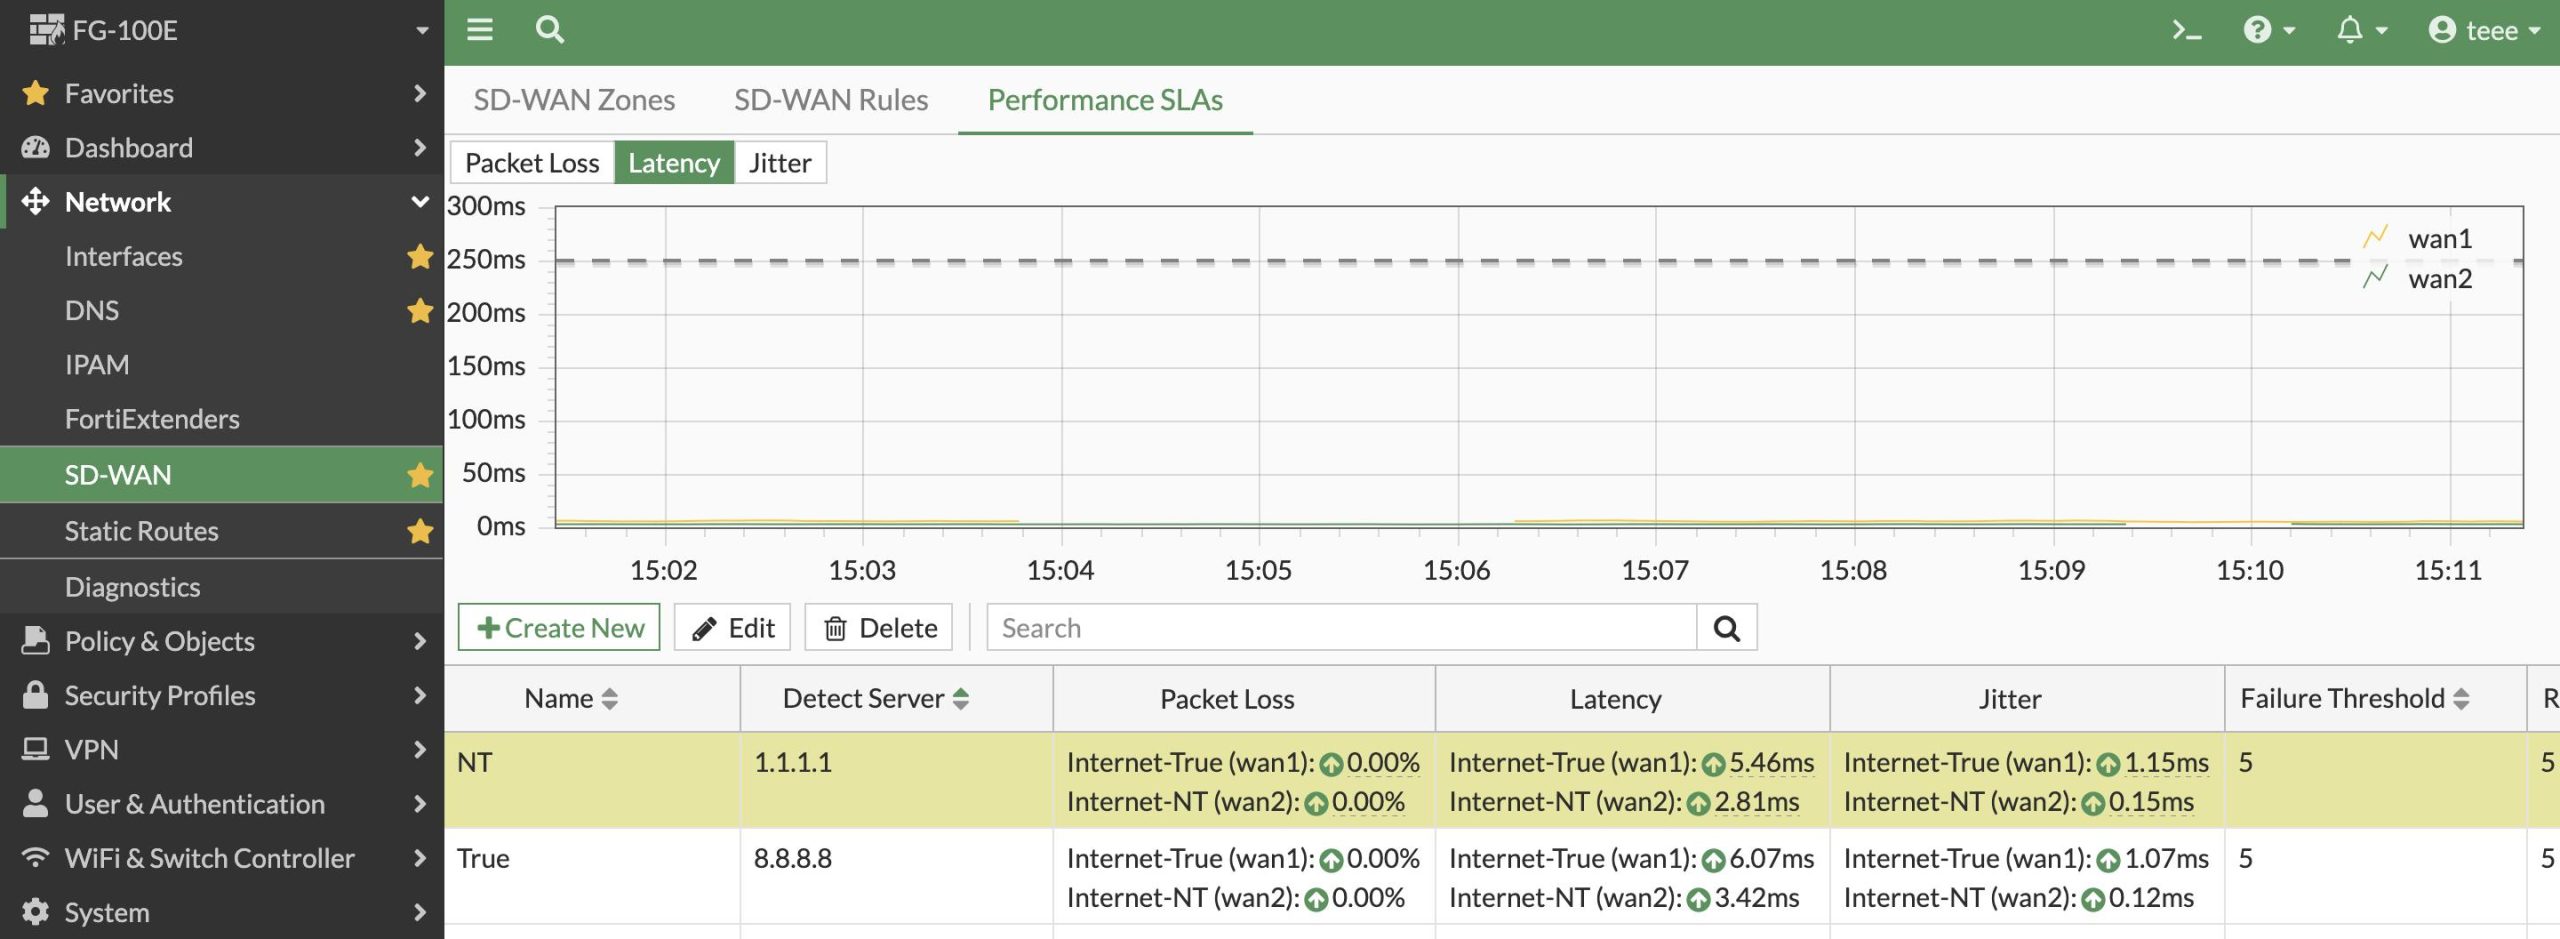
3. ถ้าจะ Monitor Link ด้วยก็ไห้ไปที่ SD-Wan เปิด SLA-target Ping
4. ข้อนี้สำคัญมากคือต้องการให้ True เป็น Link หลัก ถ้า Fiber ขาด ใช้งานไม่ได้ให้สลับไปใช้งาน NT และเมื่อ
ซ่อม Link กลับมาใช้งานได้แล้ว Fortigate ก็จะสลับกลับมาใช้งาน Link True เหมือนเดิม
Interface selection strategy > Manual
Interface preference > เลือก Interface True เป็น Link แรก เลือก NT เป็น Link ที่ 2 ตามลำดับ

5. สุดท้ายอย่าลืมเช็คหน้า Dash Board ตามสีว่า ใช้งาน Link ไหนอยู่
6. หรือเช็ค Speed test ที่เว็บ https://www.speedtest.net/th จะมีบอกว่า Internet ที่ใช้งานวิ่งออกไปที่ ISP จ้าวไหน
Debian locale
root@voip:/home/tee# sudo nano /etc/locale.gen
root@voip:/home/teee# sudo locale-gen
root@voip:/home/teee# sudo update-locale LANG=en_US.UTF-8 LC_ALL=en_US.UTF-8
LAB-เชื่อมต่อ Internet ด้วย Fortigate Firewall และ Cisco Switch แยก Vlan
1. Fortigate
Port WAN1 —DHCP Gateway 192.168.1.1
MGMT — 172.16.1.1/24
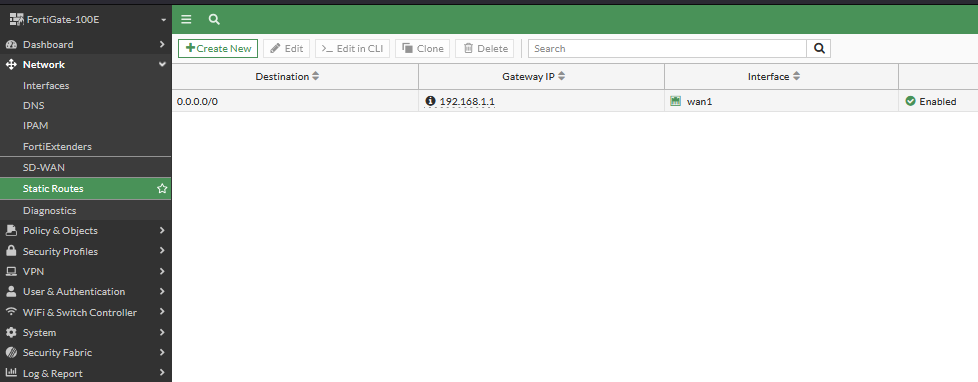
2. Static Route > 0.0.0.0 gateway 192.168.1.1
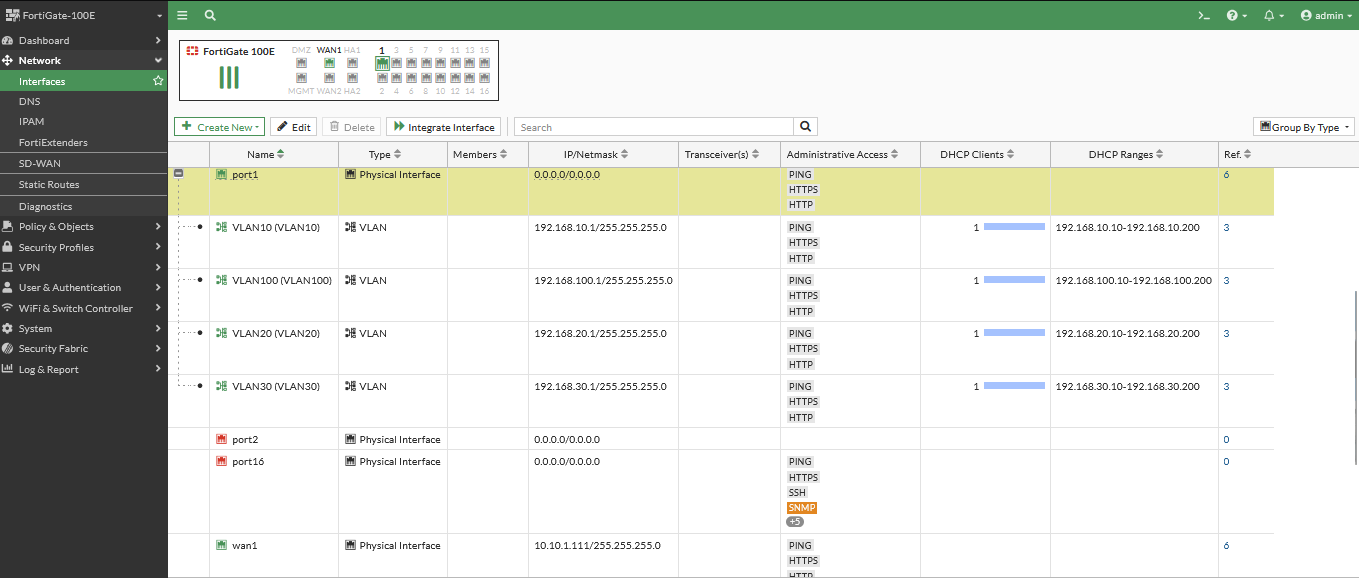
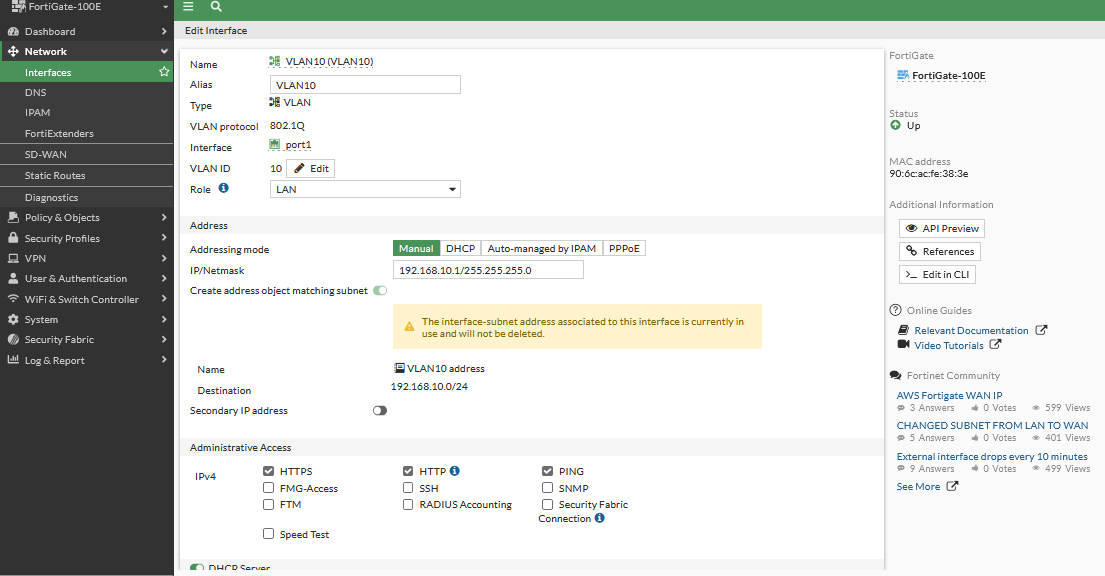
3. Interface 1
VLAN 10 192.168.10.1/24 DHCP 192.168.10.10-200
VLAN 20 192.168.20.1/24 DHCP 192.168.20.10-200
VLAN 30 192.168.30.1/24 DHCP 192.168.30.10-200
VLAN 100 192.168.100.1/24 DHCP 192.168.100.10-200
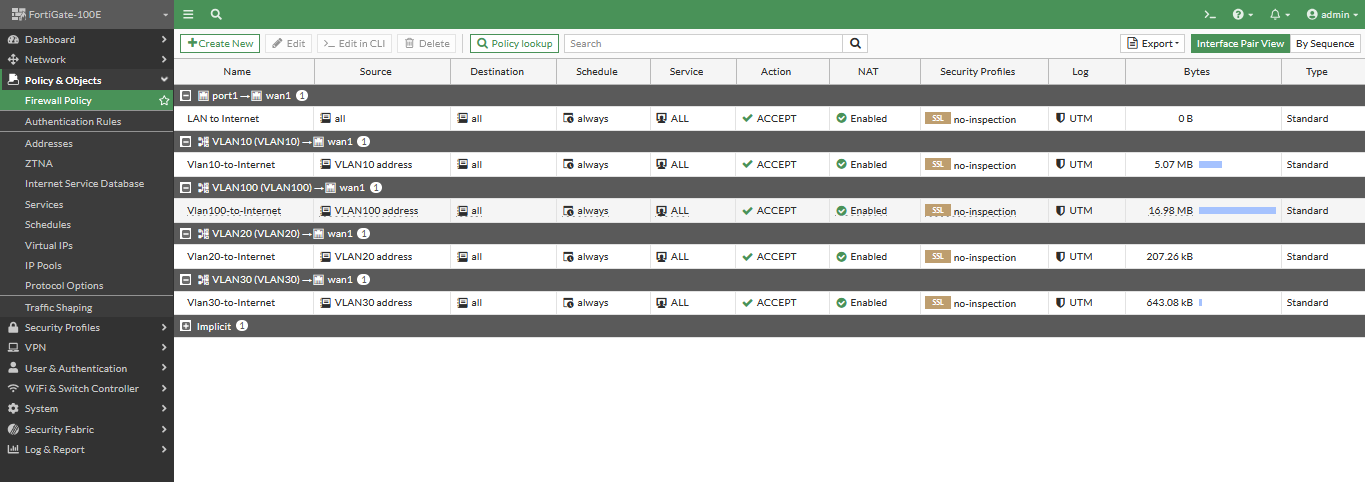
4. กำหนดค่าที่ Firewall
Allow Physical Port
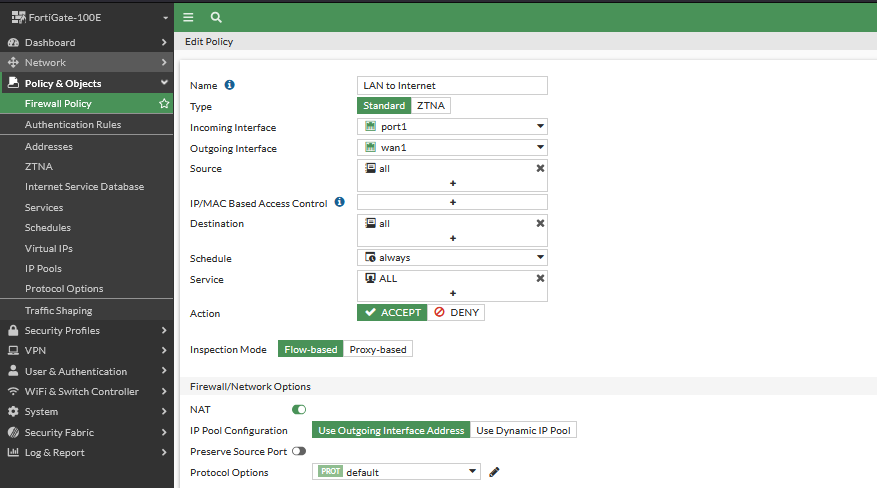
Allow VLAN(10,20,30,100) ออกอินเทอร์เน็ต
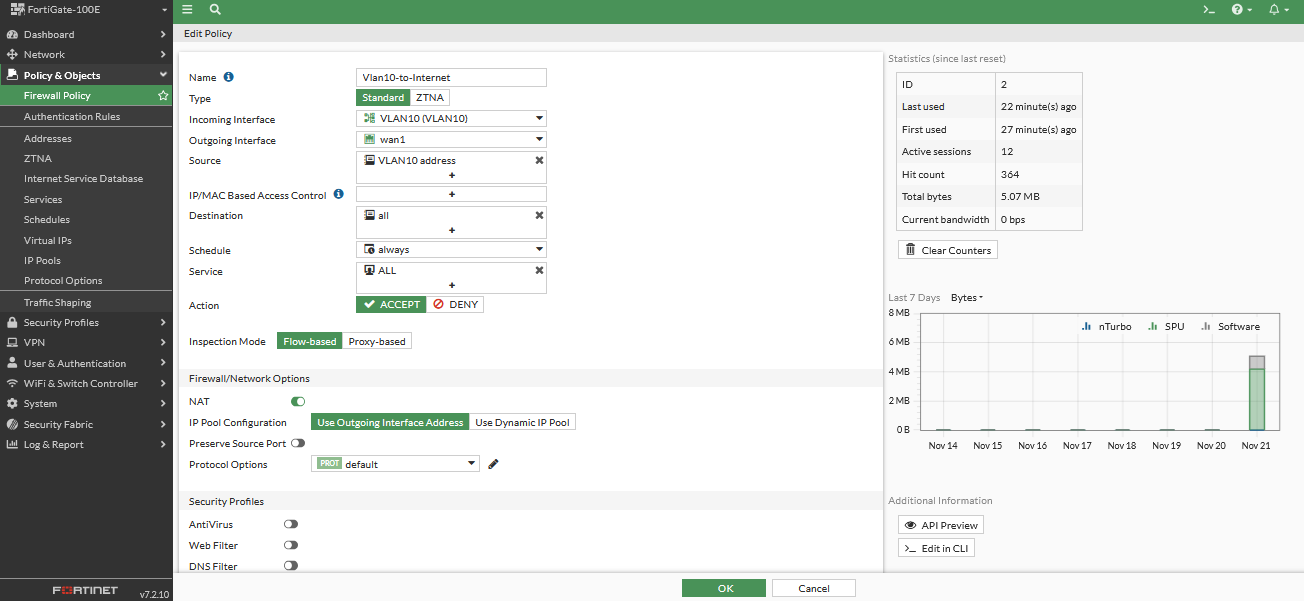
หน้าไฟล์วอล์ทั้งหมดที่สร้าง
จากนั้นไปกำหนดค่าที่ Cisco Switch
Switch(config)#no logging console
Switch(config)#hostname C3850
C3850(config)#vlan 10
C3850(config-vlan)#exit
C3850(config)#vlan 20
C3850(config-vlan)#exit
C3850(config)#vlan 30
C3850(config-vlan)#exit
C3850(config)#vlan 100
C3850(config-vlan)#exit
C3850(config)#interface vlan 10
C3850(config-if)#ip address 192.168.10.254 255.255.255.0
C3850(config-if)#no shut
C3850(config-if)#exit
C3850(config)#interface vlan 20
C3850(config-if)#ip address 192.168.20.254 255.255.255.0
C3850(config-if)#no shut
C3850(config-if)#exit
C3850(config)#interface vlan 30
C3850(config-if)#ip address 192.168.30.254 255.255.255.0
C3850(config-if)#no shut
C3850(config-if)#exit
C3850(config)#interface vlan 100
C3850(config-if)#ip address 192.168.100.254 255.255.255.0
C3850(config-if)#no shut
C3850(config-if)#exit
C3850(config)#interface range gigabitEthernet 1/0/1-5
C3850(config-if-range)#switchport mode access
C3850(config-if-range)#switchport access vlan 10
C3850(config-if-range)#no shut
C3850(config-if-range)#exit
C3850(config)#interface range gigabitEthernet 1/0/6-10
C3850(config-if-range)#switchport mode access
C3850(config-if-range)#switchport access vlan 20
C3850(config-if-range)#no shut
C3850(config-if-range)#exit
C3850(config)#interface range gigabitEthernet 1/0/11-15
C3850(config-if-range)#switchport mode access
C3850(config-if-range)#switchport access vlan 30
C3850(config-if-range)#no shut
C3850(config-if-range)#exit
C3850(config)#interface range gigabitEthernet 1/0/16-20
C3850(config-if-range)#switchport mode access
C3850(config-if-range)#switchport access vlan 100
C3850(config-if-range)#no shut
C3850(config-if-range)#exit
C3850(config)#interface gigabitEthernet 1/0/23
C3850(config-if)#switchport mode trunk
C3850(config-if)#switchport trunk allowed vlan 10,20,30,100
C3850(config-if)#no shut
C3850(config-if)#exit
C3850(config)#ip routing
C3850(config)#ip default-gateway 192.168.100.1
C3850(config)#ip route 0.0.0.0 0.0.0.0 192.168.100.1
C3850(config)#ip name-server 8.8.8.8 1.1.1.1
C3850(config)#ntp server time.navy.mi.th
C3850(config-if)#do wr

How To Install MariaDB on CentOS 7
[root@voice teee]# yum -y install mariadb-server mariadb.x86_64 mariadb-devel.x86_64 mariadb-libs.x86_64
[root@voice teee]# systemctl restart mariadb
[root@voice teee]# netstat -lntup
Active Internet connections (only servers)
Proto Recv-Q Send-Q Local Address Foreign Address State PID/Program name
tcp 0 0 0.0.0.0:3306 0.0.0.0:* LISTEN 31899/mysqld
[root@voice teee]# mysql_secure_installation
Enter current password for root (enter for none):
Set root password? [Y/n] y
New password:
Re-enter new password:
Remove anonymous users? [Y/n] y
Disallow root login remotely? [Y/n] y
Remove test database and access to it? [Y/n] y
Reload privilege tables now? [Y/n] y
[root@voice teee]# mysql -u root -p
Enter password:
Welcome to the MariaDB monitor. Commands end with ; or \g.
Your MariaDB connection id is 10
Server version: 5.5.60-MariaDB MariaDB Server
Copyright (c) 2000, 2018, Oracle, MariaDB Corporation Ab and others.
Type ‘help;’ or ‘\h’ for help. Type ‘\c’ to clear the current input statement.
MariaDB [(none)]> show databases;
+——————–+
| Database |
+——————–+
| information_schema |
| mysql |
| performance_schema |
+——————–+
3 rows in set (0.00 sec)
[root@voice teee]# systemctl enable mariadb
[root@voice teee]# systemctl status mariadb