วิธีแชร์การใช้งาน Microsoft 365 Family (O365 Family)
Microsoft 365 Family (O365 Family) เป็นแพ็กเกจสมาชิก Microsoft Office แบบครอบครัวที่เน้นให้ ใช้งานได้หลายคนและหลายอุปกรณ์ โดยจ่ายค่าสมาชิกเพียงครั้งเดียวต่อปี/ต่อเดือน
จุดประสงค์หลักในการใช้งาน
1. ใช้โปรแกรม Office เต็มรูปแบบ
-
Word, Excel, PowerPoint, Outlook, OneNote, Access* และ Publisher* (*เฉพาะ Windows)
-
ไม่ใช่แค่เวอร์ชันเว็บ แต่เป็นเวอร์ชันติดตั้งเต็ม (Full desktop app) ที่ฟีเจอร์ครบกว่า
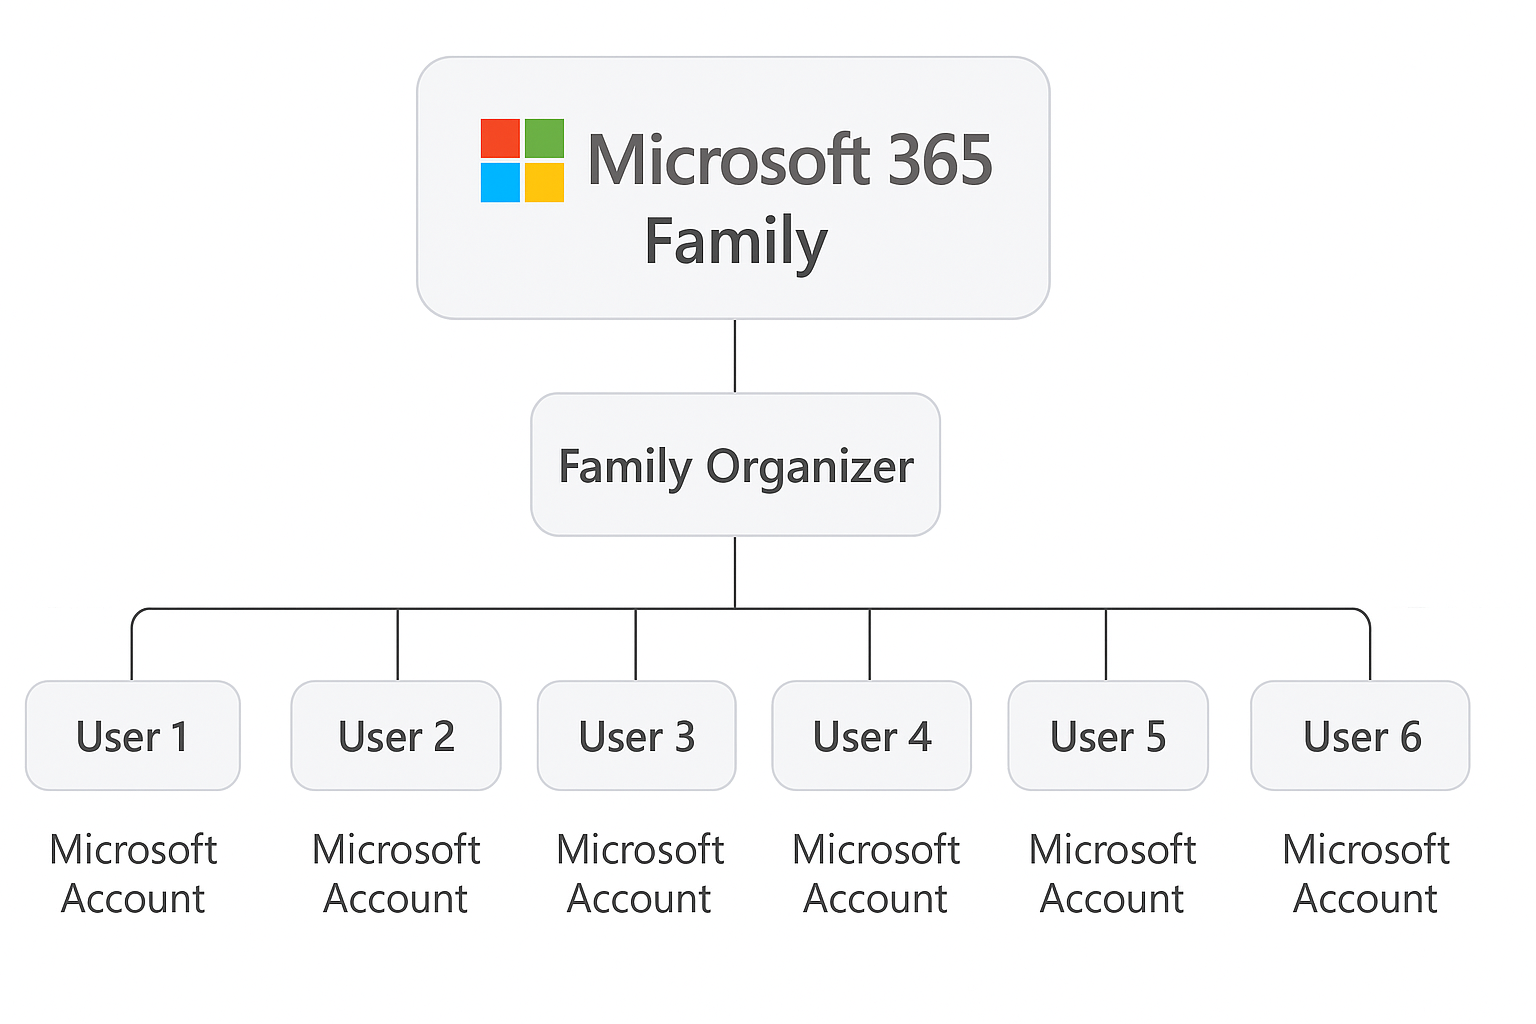
2. ใช้ได้หลายคนในครอบครัว
-
ใช้ได้สูงสุด 6 คน ต่อหนึ่งสมาชิก
-
แต่ละคนมี บัญชี Microsoft ส่วนตัว แยกกัน (ไม่ปะปนข้อมูล)
3. ใช้ได้หลายอุปกรณ์พร้อมกัน
-
Windows PC, Mac, iPad, iPhone, Android
-
1 คนสามารถลงได้ สูงสุด 5 เครื่อง พร้อมใช้งานได้พร้อมกัน
4. พื้นที่จัดเก็บข้อมูลบนคลาวด์ OneDrive
-
1TB ต่อคน (รวมสูงสุด 6TB ถ้าใช้ครบ 6 คน)
-
เก็บไฟล์, รูป, วิดีโอ และซิงค์ข้ามอุปกรณ์
-
มีฟีเจอร์ Personal Vault (โฟลเดอร์เข้ารหัส) สำหรับเก็บไฟล์สำคัญ
5. ฟีเจอร์เสริมด้านความปลอดภัย
-
OneDrive Ransomware detection & recovery (กู้คืนไฟล์ได้ถ้าโดนมัลแวร์)
-
Password-protected sharing สำหรับไฟล์ที่แชร์ให้คนอื่น
6. ใช้ Outlook Premium features
-
ไม่มีโฆษณาใน Outlook.com
-
สามารถสร้างโดเมนอีเมลส่วนตัว (เช่น yourname@yourdomain.com) ถ้าผูกกับ Microsoft 365
7. อัปเดตฟีเจอร์ใหม่ตลอดเวลา
-
ได้รับการอัปเดตและเวอร์ชันใหม่ล่าสุดของ Office โดยไม่ต้องซื้อใหม่ทุกครั้ง
O365 Family คือแพ็กเกจที่ออกแบบมาเพื่อให้ ครอบครัวหรือกลุ่มเล็กๆ ใช้ Office แบบเต็ม, มีพื้นที่ OneDrive ส่วนตัว, และฟีเจอร์ความปลอดภัย พร้อมใช้ได้หลายอุปกรณ์โดยไม่ต้องซื้อหลายไลเซนส์
ถ้าซื้อ Microsoft 365 Family 1 แพ็กเกจ แล้วชวนคนในครอบครัวมาใช้ด้วย แต่ละคนจะได้บัญชี Microsoft ของตัวเอง ไม่ต้องแชร์รหัสกัน และข้อมูลทุกอย่างจะแยกออกจากกันชัดเจน
ตัวอย่างให้เห็นภาพง่าย ๆ
ถ้าใช้บัญชีเดียวกัน (ไม่แยกบัญชี)
-
ทุกคนจะล็อกอินด้วยอีเมลเดียว เช่น tee@outlook.com
-
ไฟล์ใน OneDrive, ประวัติใน Word, Excel, Outlook จะรวมกันหมด
-
ถ้าคนหนึ่งลบไฟล์ ไฟล์นั้นจะหายของทุกคน
ถ้าใช้แบบแยกบัญชี (ที่ Family ให้มา)
-
แต่ละคนจะมีบัญชีของตัวเอง เช่น
-
tee@outlook.com
-
mom@outlook.com
-
dad@outlook.com
-
-
แต่ละคนได้ 1TB OneDrive ส่วนตัว
-
ไฟล์, อีเมล, ปฏิทิน, การตั้งค่า จะอยู่แยกกัน
-
คนอื่นในครอบครัว ไม่สามารถเห็นหรือแก้ไขไฟล์ของเราได้ เว้นแต่เราแชร์ให้
สรุปคือ Microsoft 365 Family ไม่ได้ให้ทุกคนแชร์บัญชีเดียวกัน แต่ให้สิทธิ์ ใช้งานแพ็กเกจ Office และ OneDrive ในบัญชี Microsoft ส่วนตัวของแต่ละคน ซึ่งปลอดภัยกว่าและเป็นส่วนตัวมากกว่า
ถ้าซื้อ Microsoft 365 Family แล้วอยากให้ แต่ละคนในครอบครัวมีบัญชี Microsoft แยกกัน (ไม่รวมกันเป็น Account เดียว) ต้องทำแบบนี้
ขั้นตอน
-
ทุกคนต้องมีบัญชี Microsoft ของตัวเอง
-
ถ้ายังไม่มี ให้สมัครฟรีที่ https://signup.live.com
-
อีเมลที่สมัครสามารถใช้ @outlook.com, @hotmail.com หรืออีเมลส่วนตัว (@gmail.com, @yahoo.com) ก็ได้
-
-
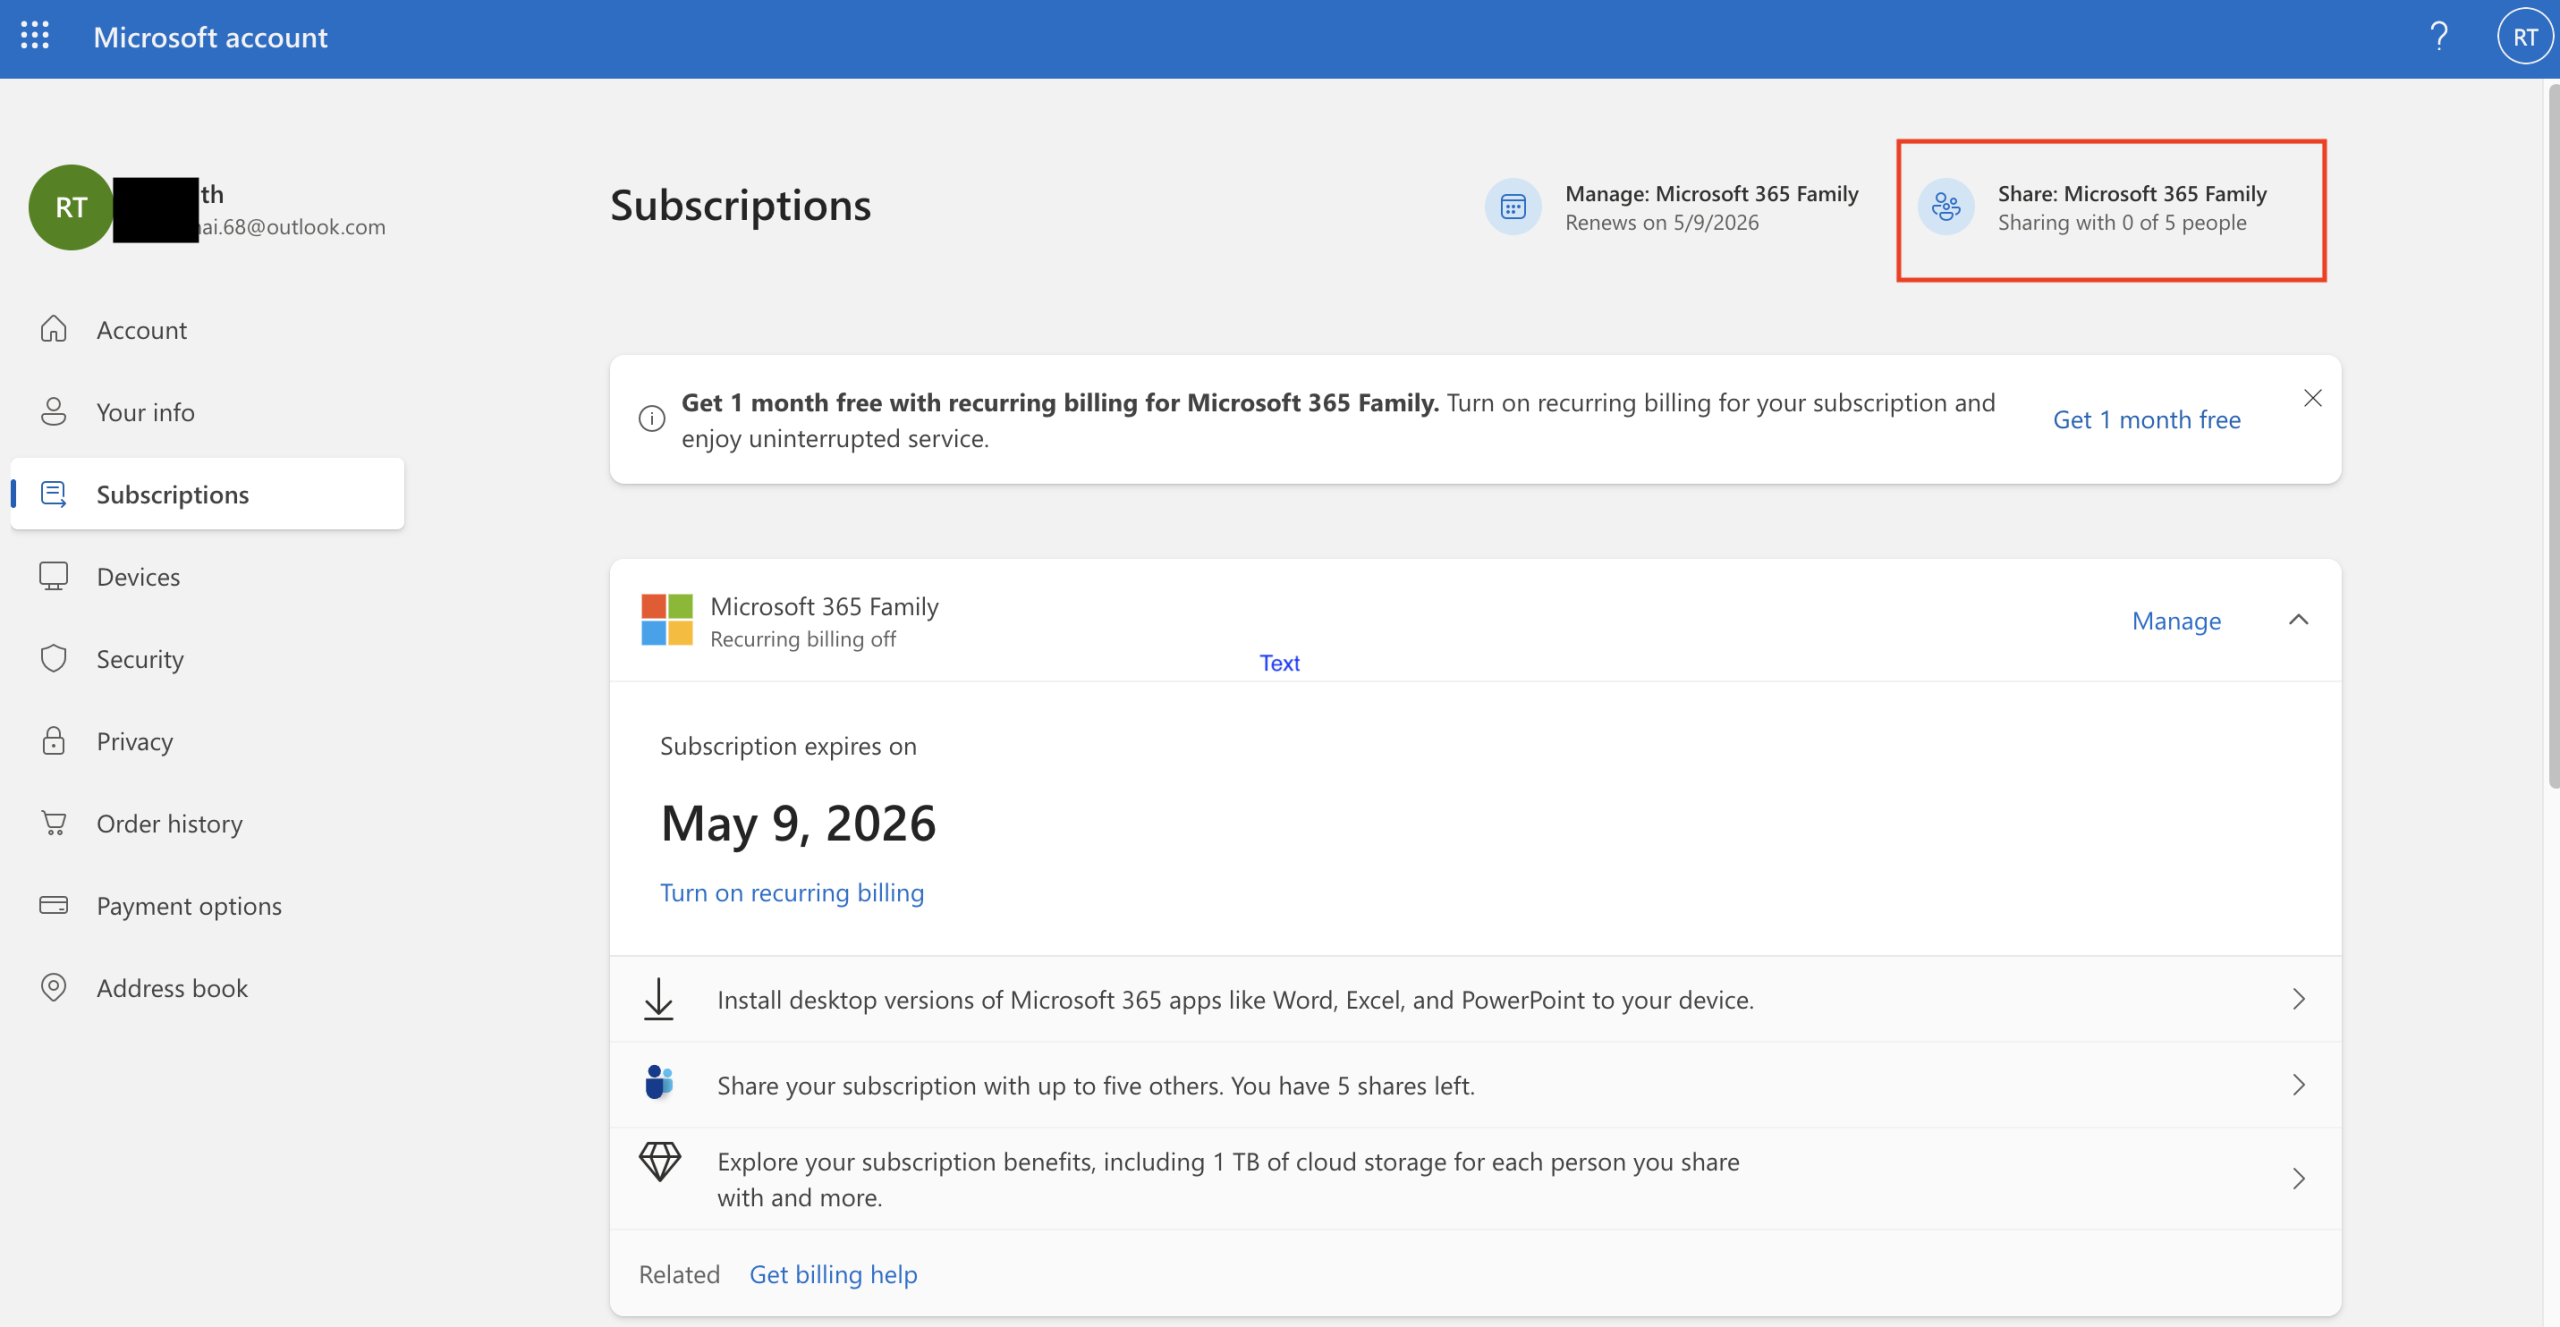
เจ้าของแพ็กเกจ (Admin) ล็อกอินเข้า Microsoft Account
-
ไปที่หน้า การแชร์สมาชิก: https://account.microsoft.com/services/microsoft365/share
-
-
ส่งคำเชิญให้คนในครอบครัว
-
กด “เริ่มการแชร์” / “Start sharing”
-
เลือก ส่งคำเชิญทางอีเมล แล้วใส่อีเมลของคนที่ต้องการเชิญ (ต้องเป็นอีเมลที่ผูกกับบัญชี Microsoft ของเขา)
-
-
คนที่ถูกเชิญ จะได้รับอีเมลเชิญ
-
กดปุ่ม “ยอมรับ” / “Accept”
-
ล็อกอินด้วยบัญชี Microsoft ของตัวเอง
-
หลังจากนั้น บัญชีของเขาก็จะมีสิทธิ์ใช้ Microsoft 365 เต็มฟีเจอร์ และได้ OneDrive 1TB ส่วนตัว
-
-
ทุกคนจะได้สิทธิ์เหมือนกัน
-
ใช้ Word, Excel, PowerPoint, Outlook แบบเต็ม
-
พื้นที่ OneDrive 1TB แยกกัน
-
ข้อมูลไม่ปะปนกัน เว้นแต่ตั้งใจแชร์ไฟล์
📌 ข้อดีของการแยกบัญชีแบบนี้
- แต่ละคนจัดการไฟล์และอีเมลตัวเองได้อิสระ
- ปลอดภัยกว่าเพราะไม่ต้องแชร์รหัสผ่านกัน
- ลบหรือแก้ไฟล์ของใครก็ไม่กระทบคนอื่น
-
Microsoft O365 อนุญาตการใช้งาน IMAP
1. Login เข้า O365 Microsoft
Microsoft 365 Admin Center portal
เลือกตรง > แสดงข้อมูลทั้งหมด > ข้อมูลประจำตัว
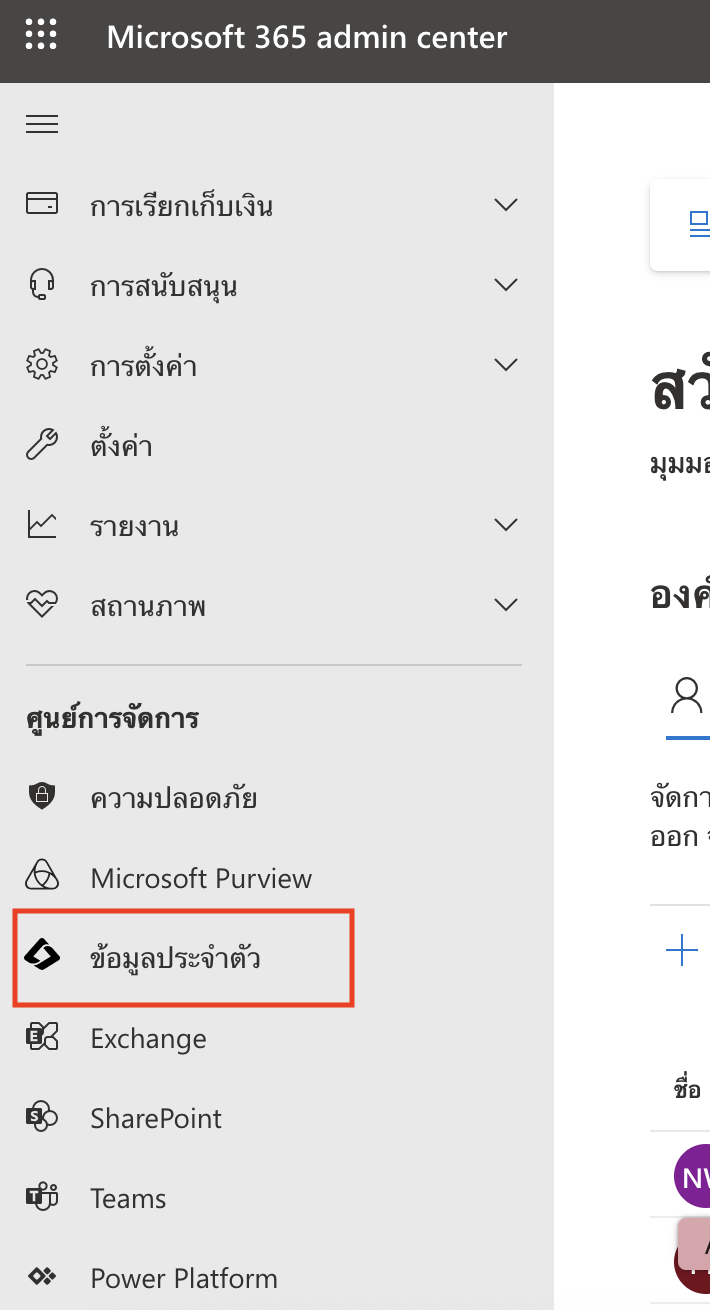
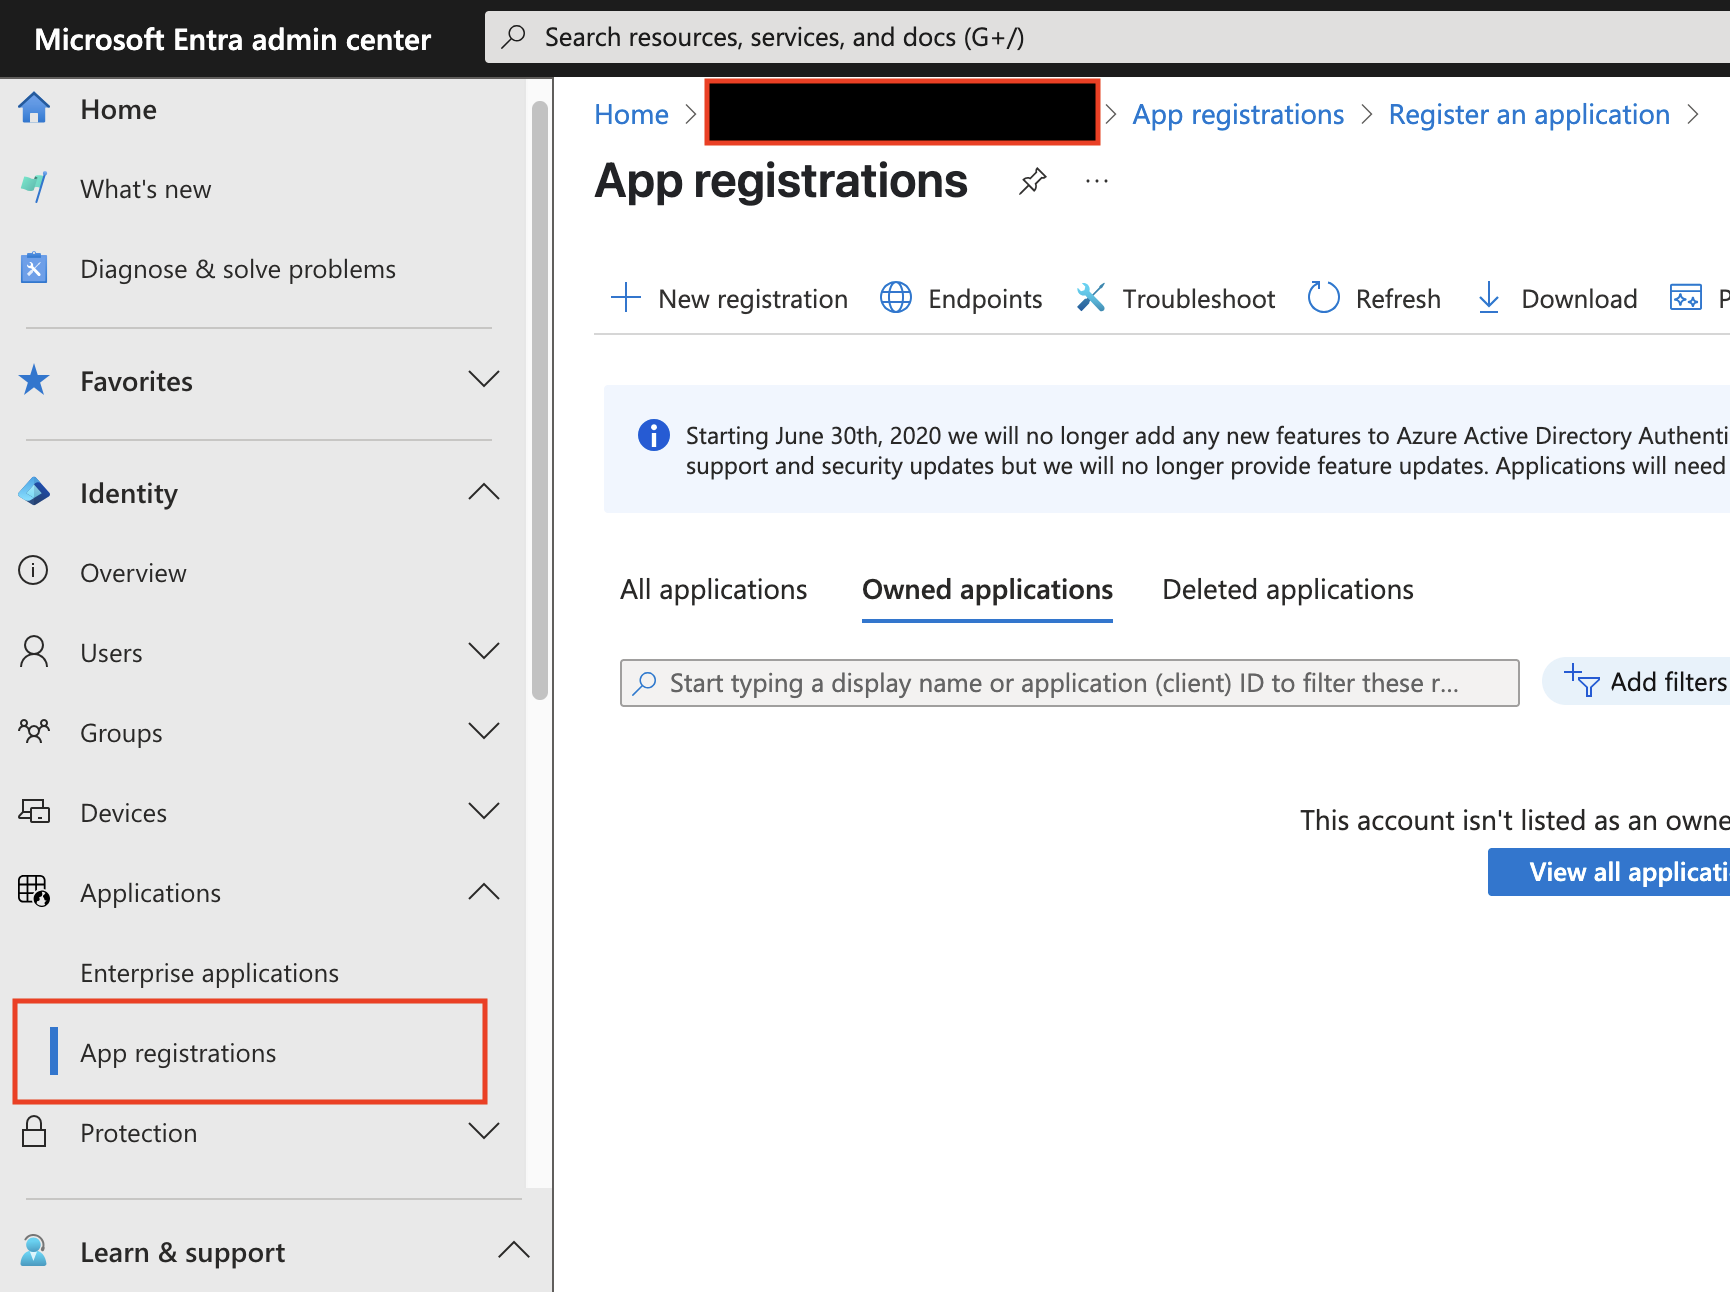
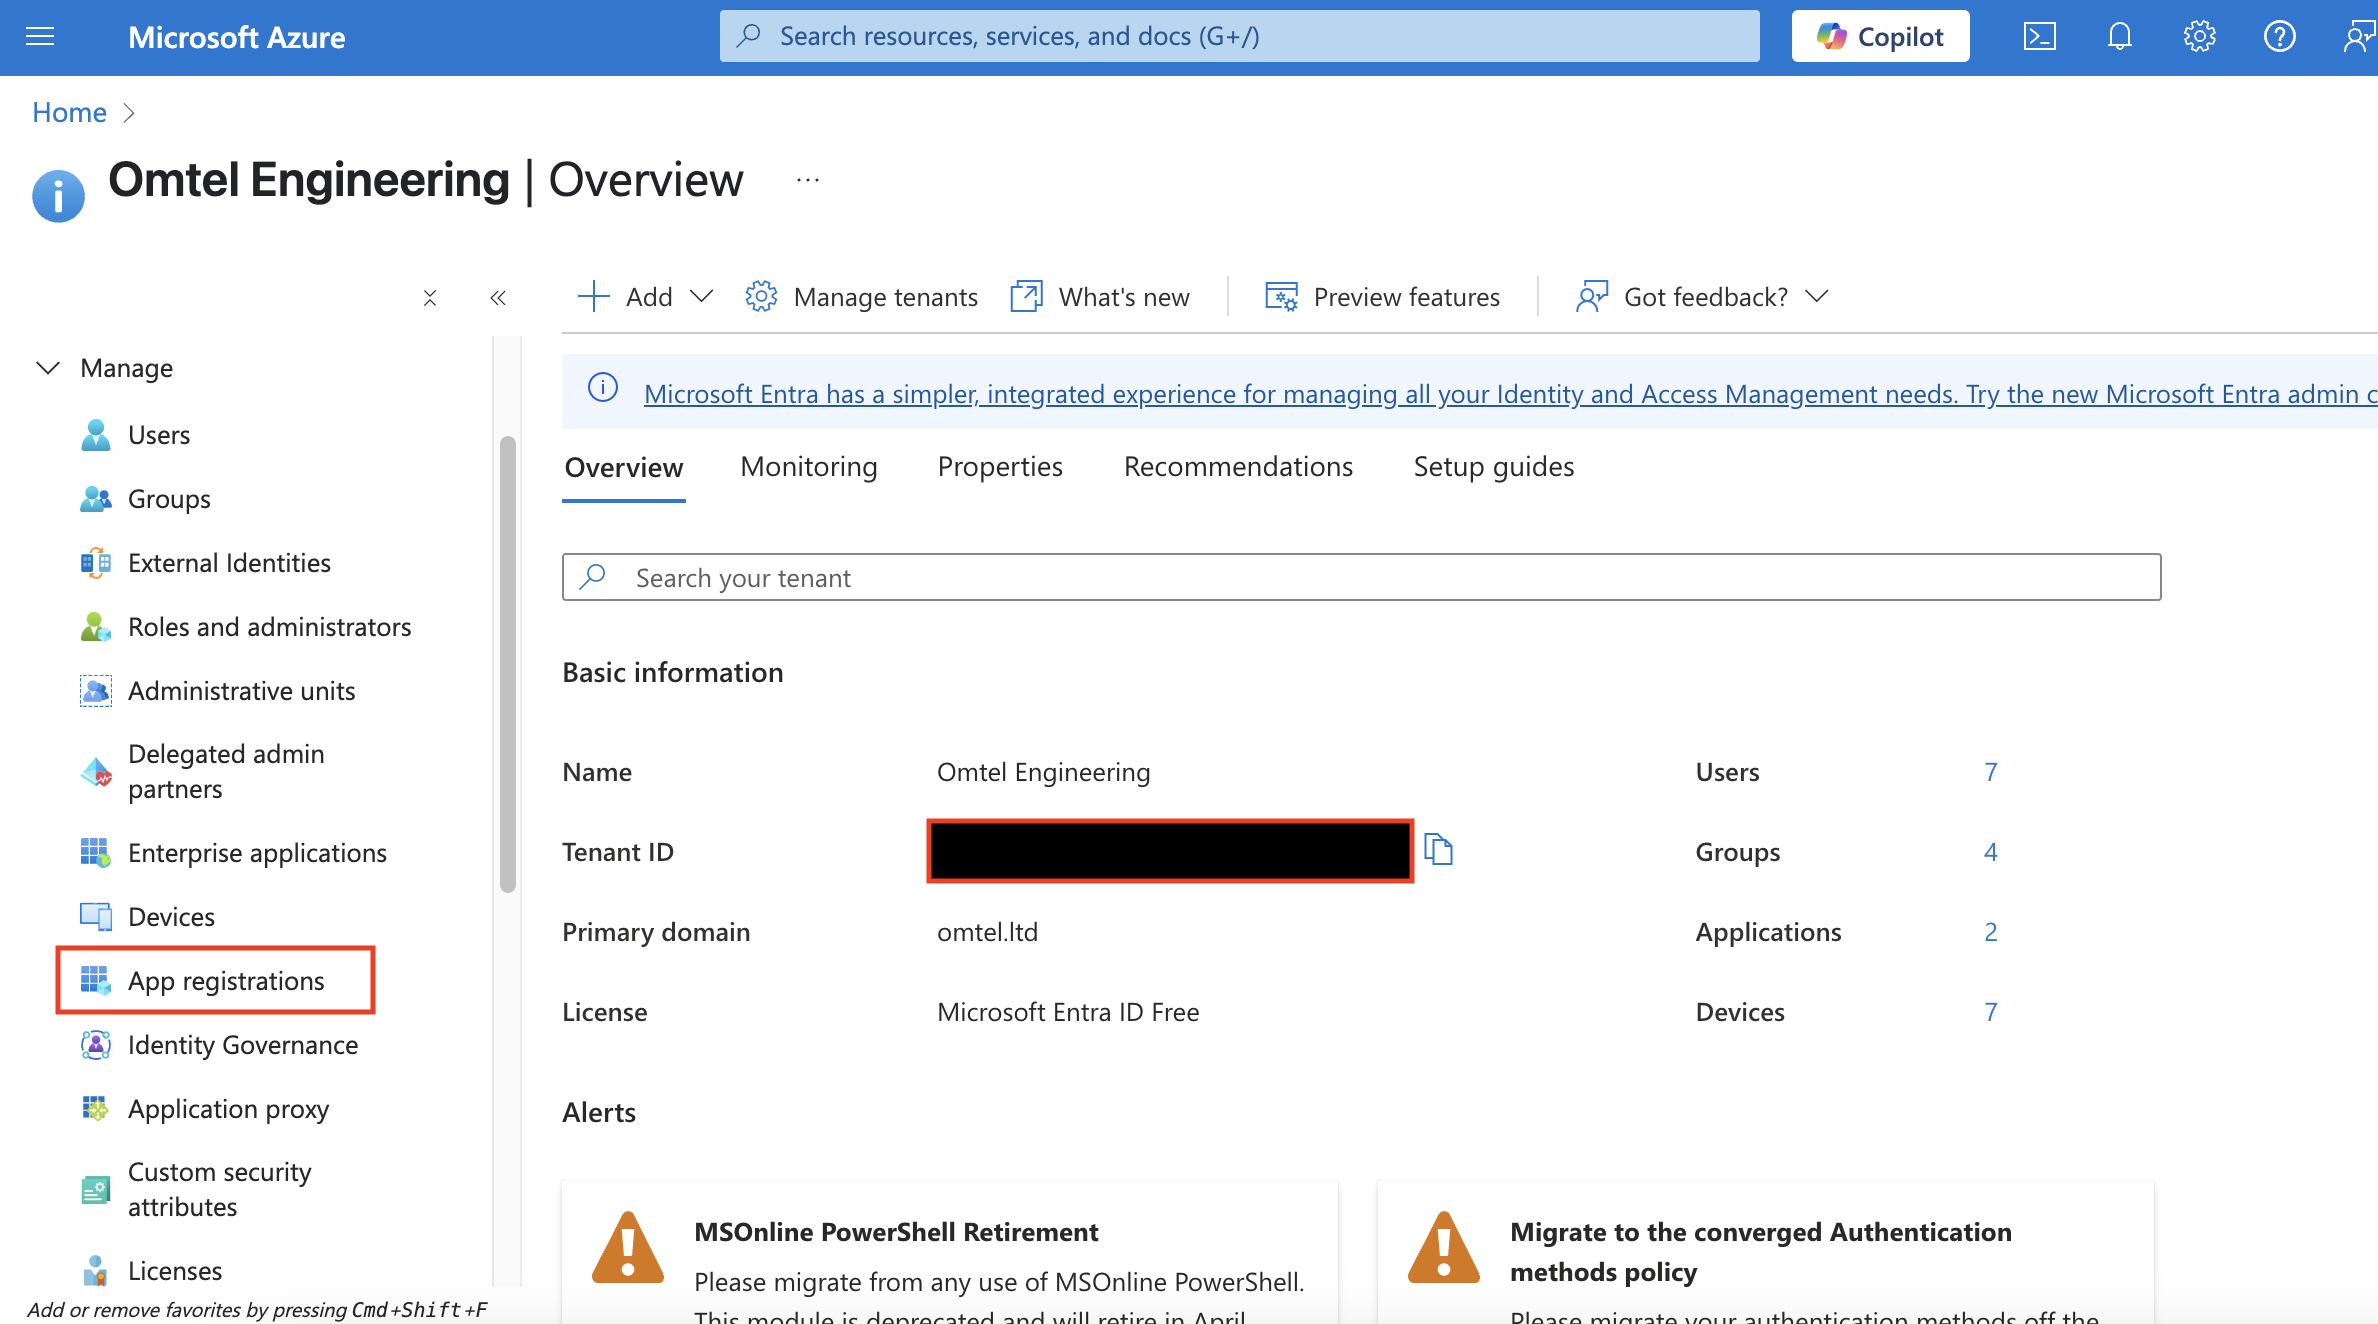
เพิ่มชื่อ App Registration
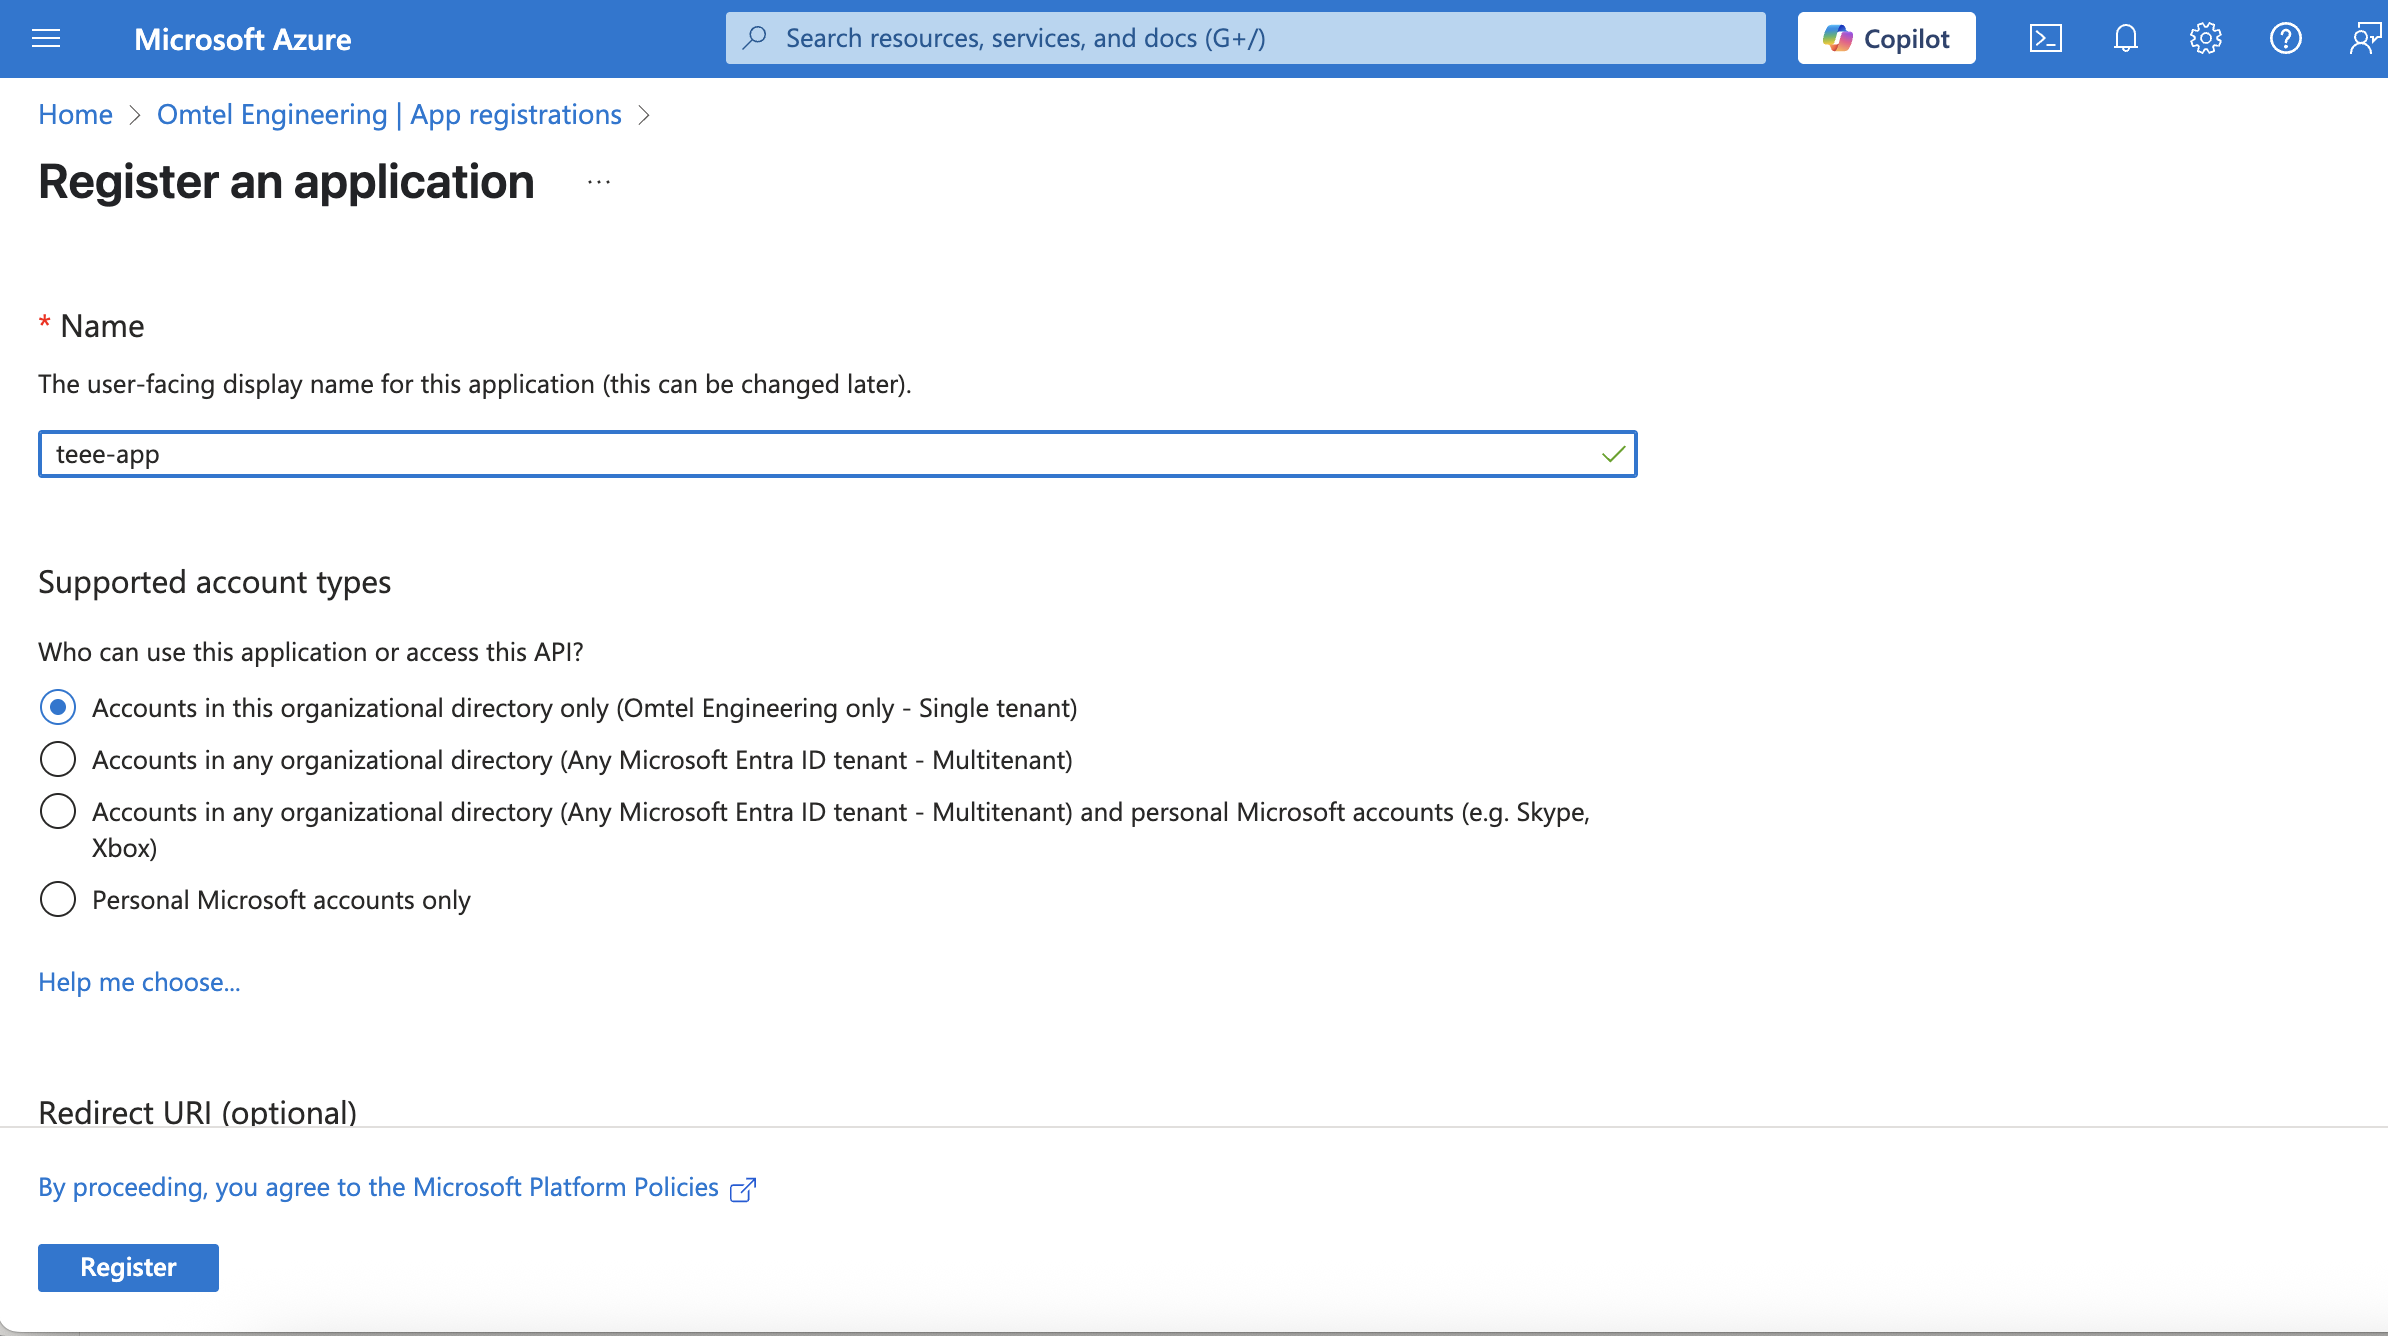
กด Register > สร้าง Client Credentials
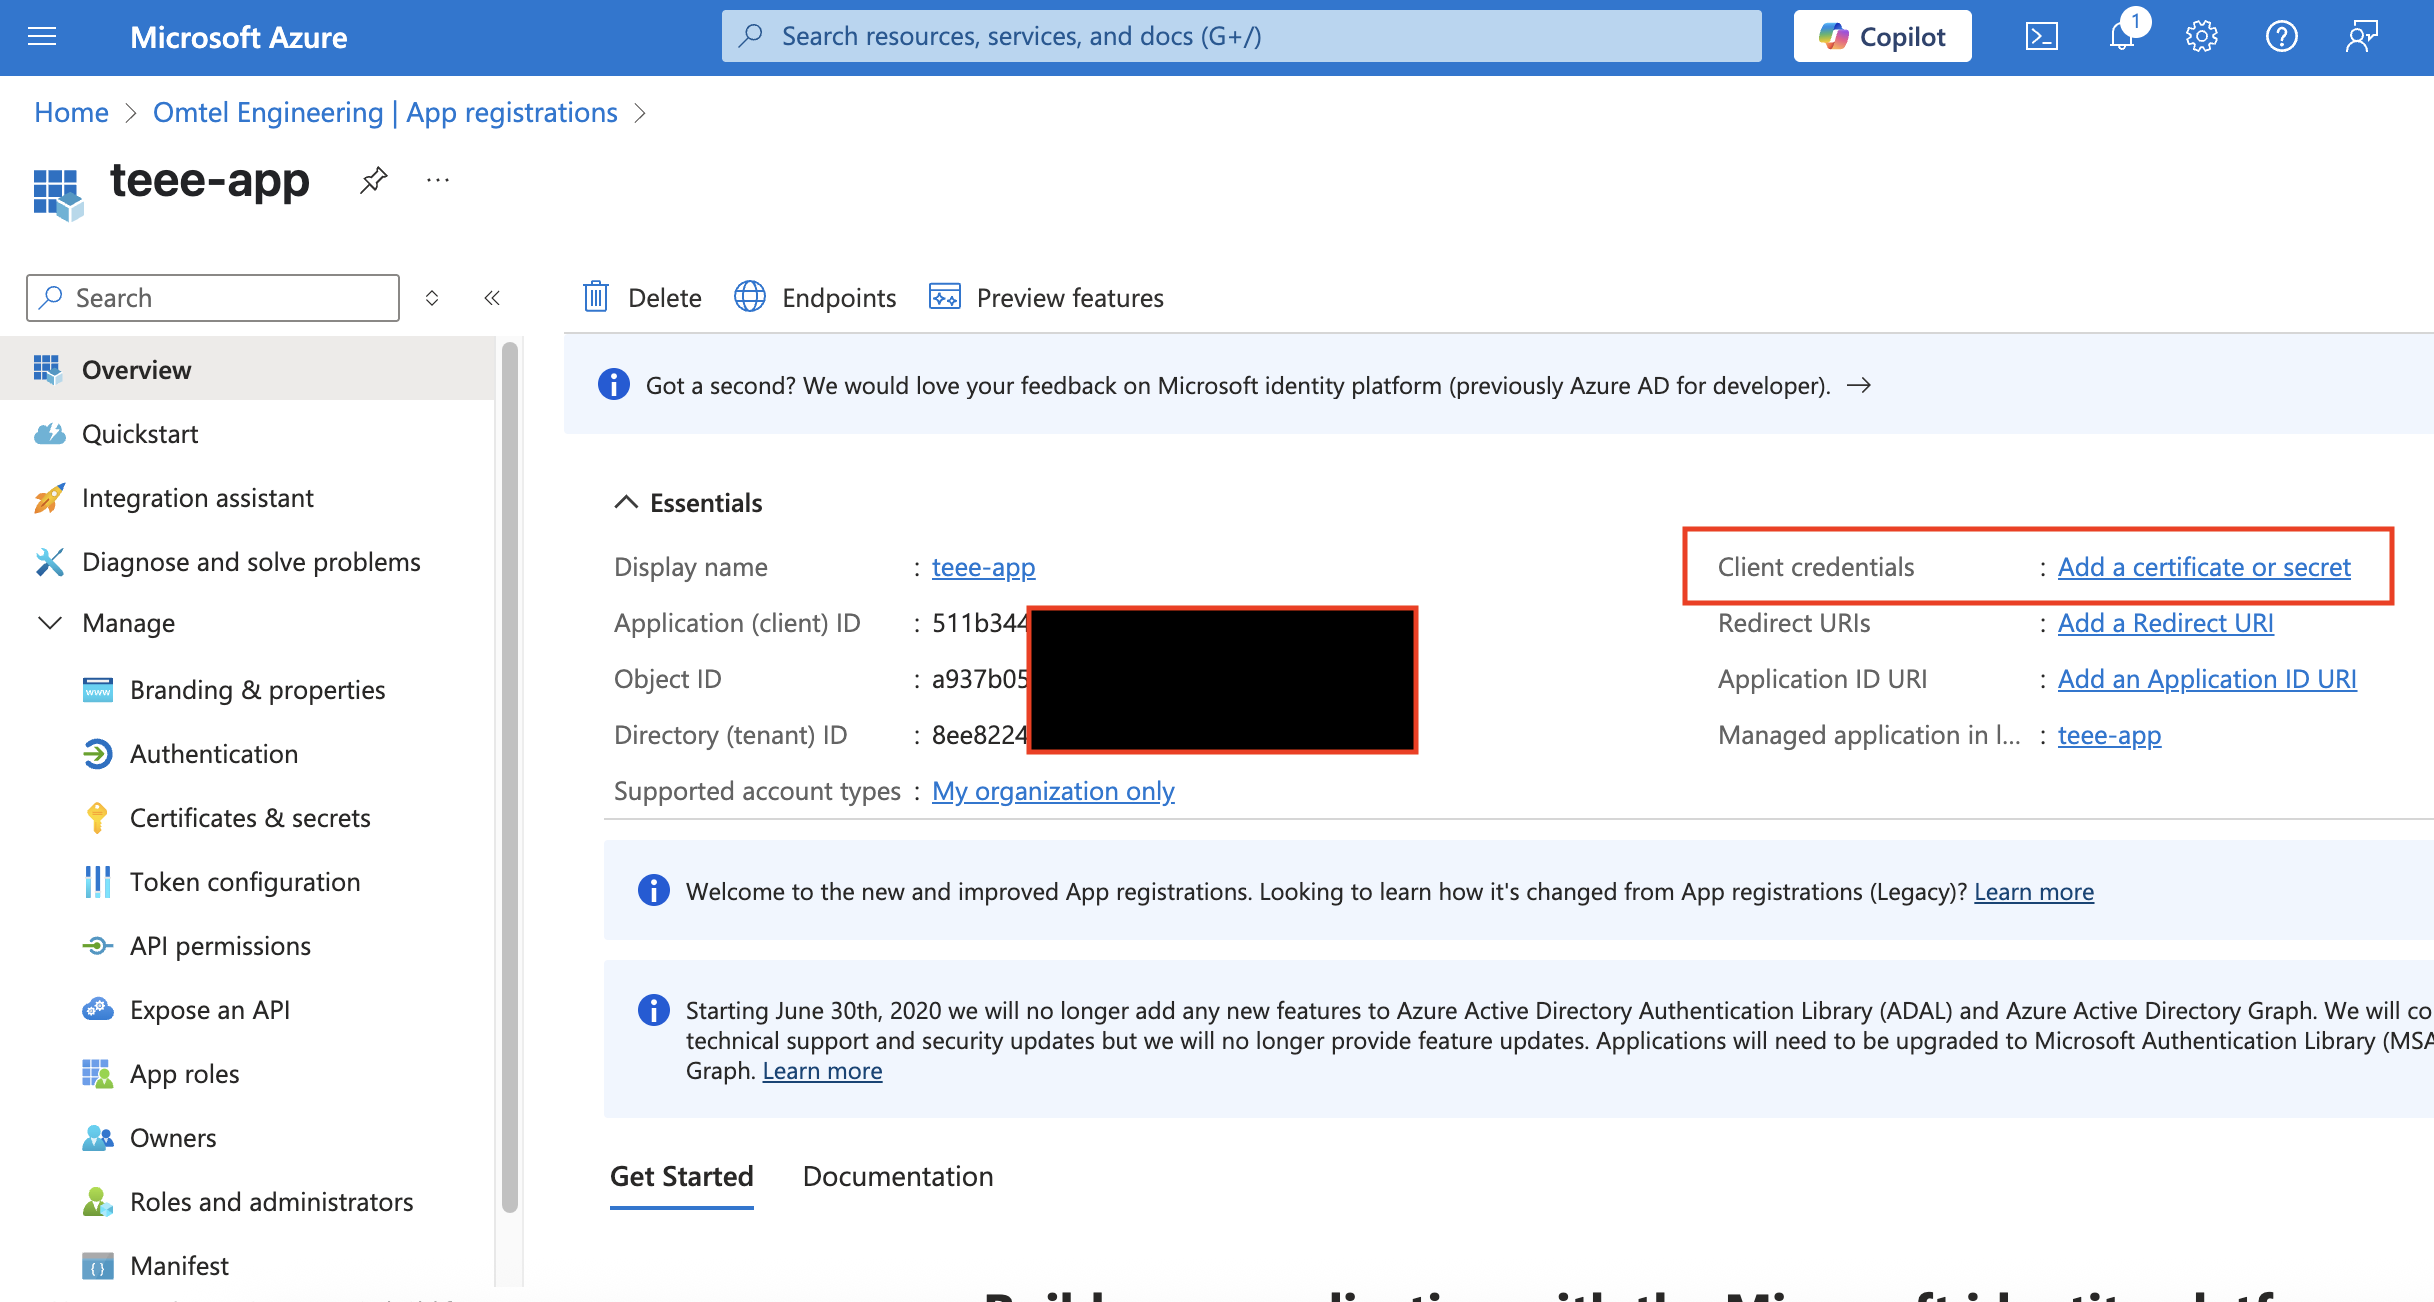
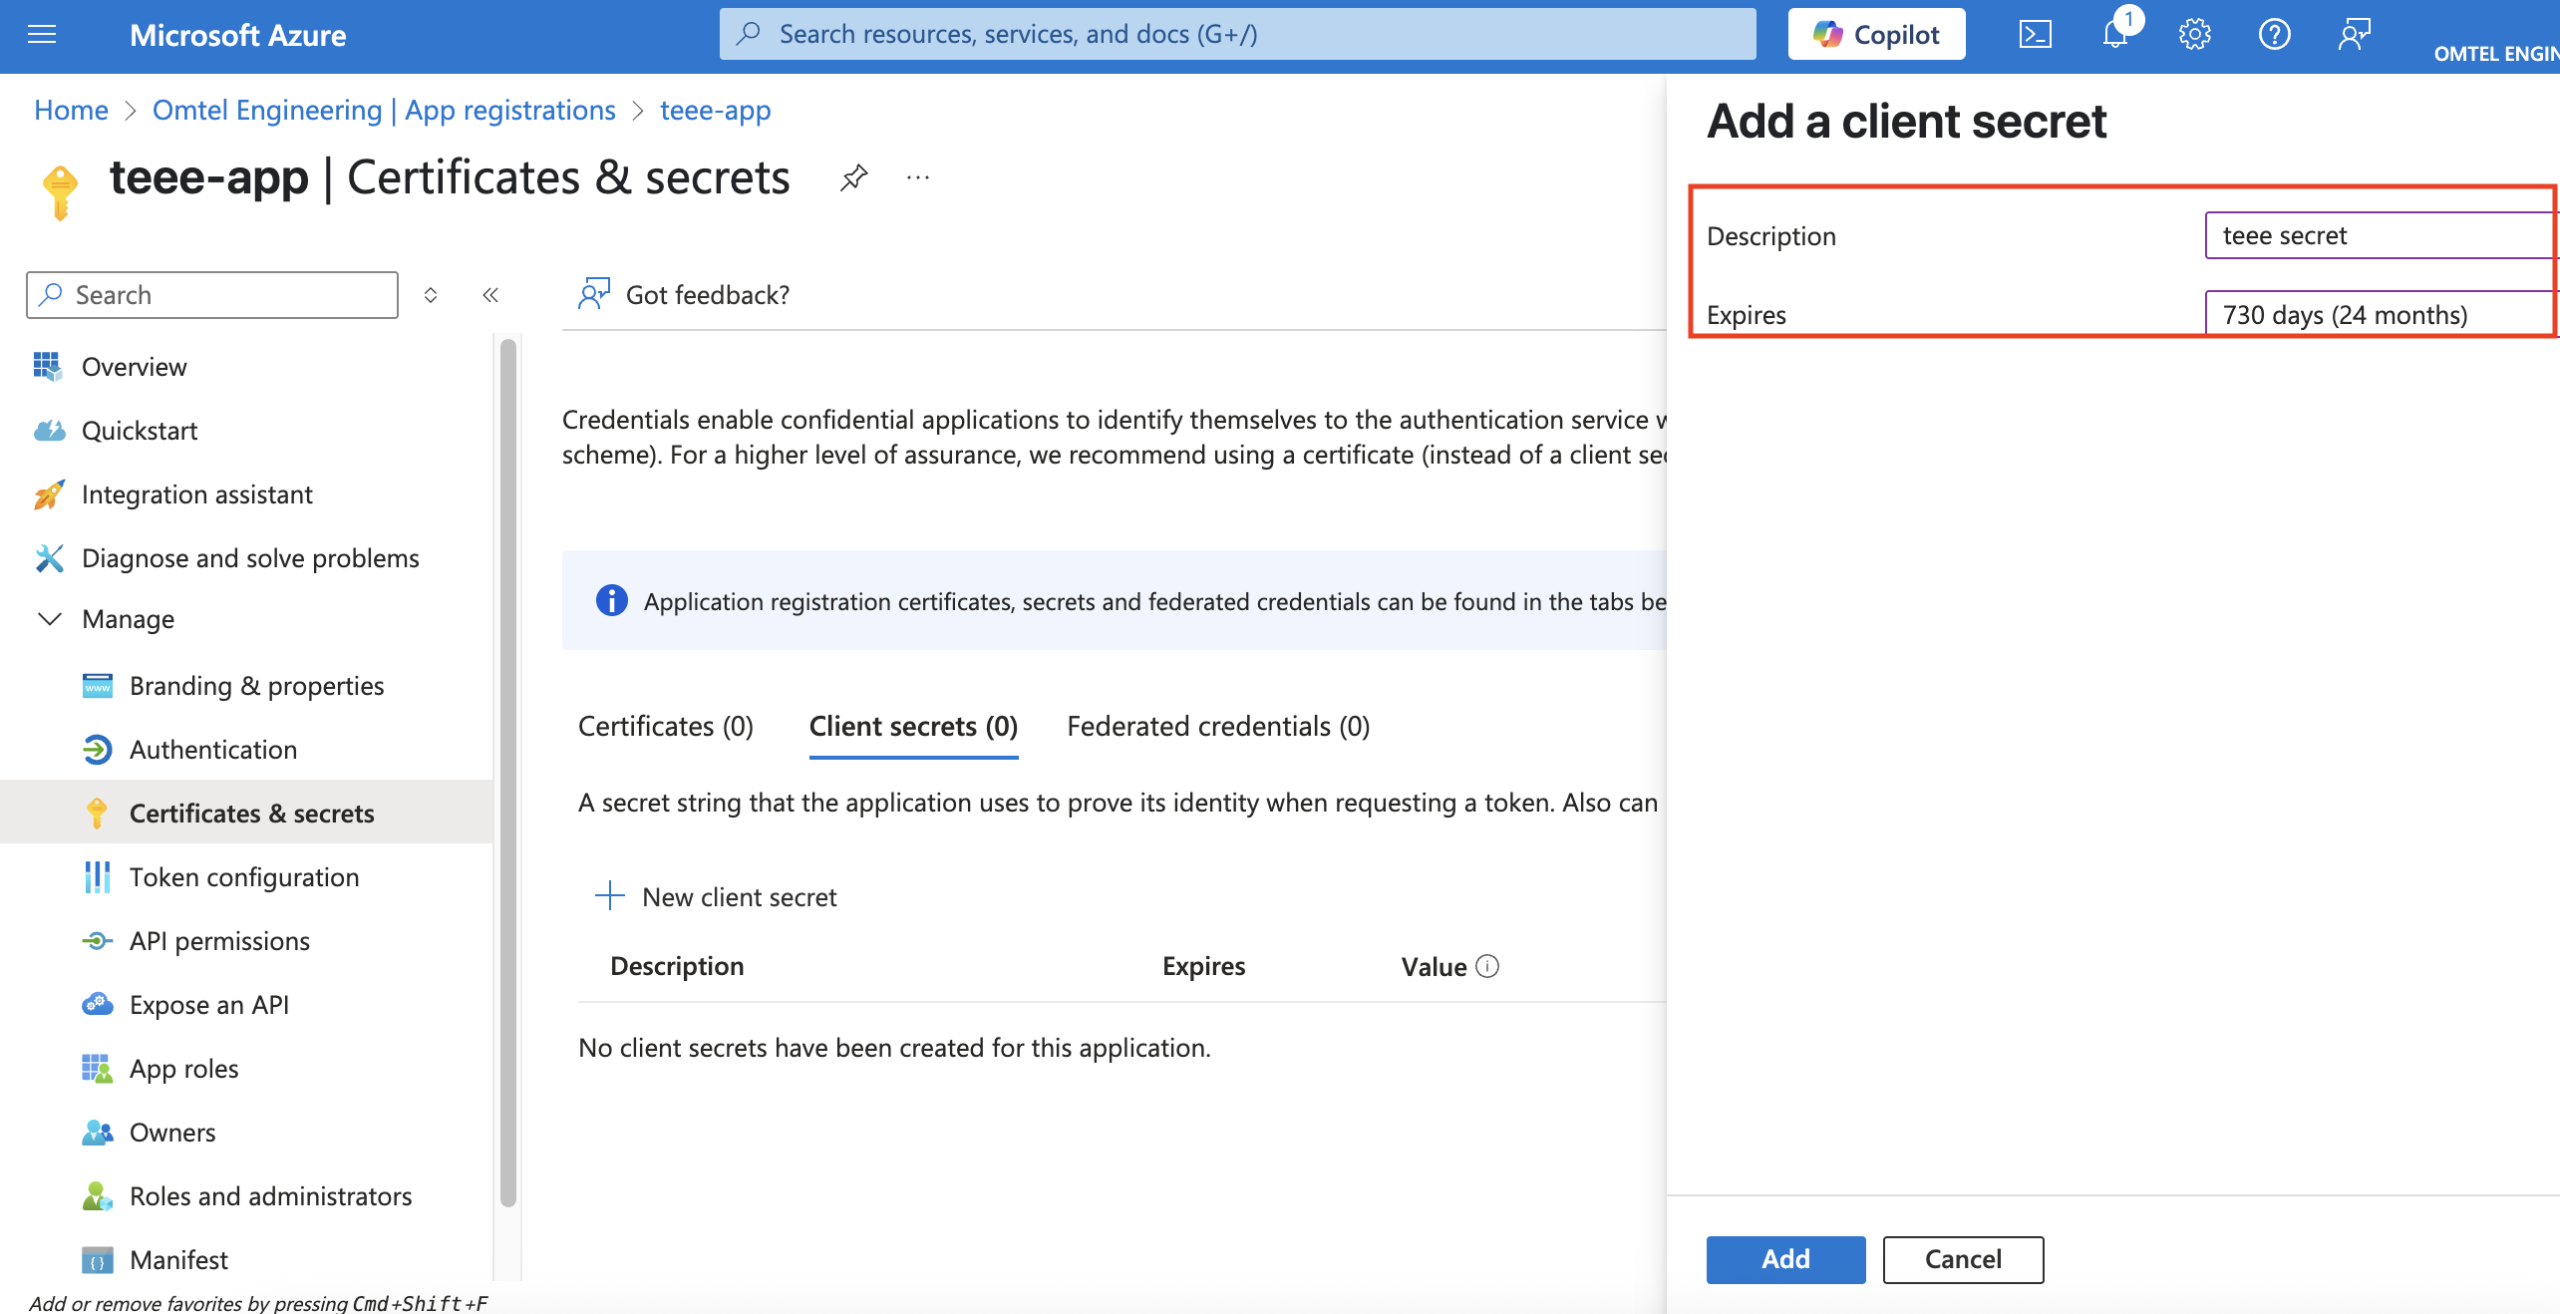
กำหนดระยะเวลาวันหมดอายุของ App Secret. และอย่าลืม Copy เก็บไว้บน Notepad ทั้ง value และ Secret ด้วย
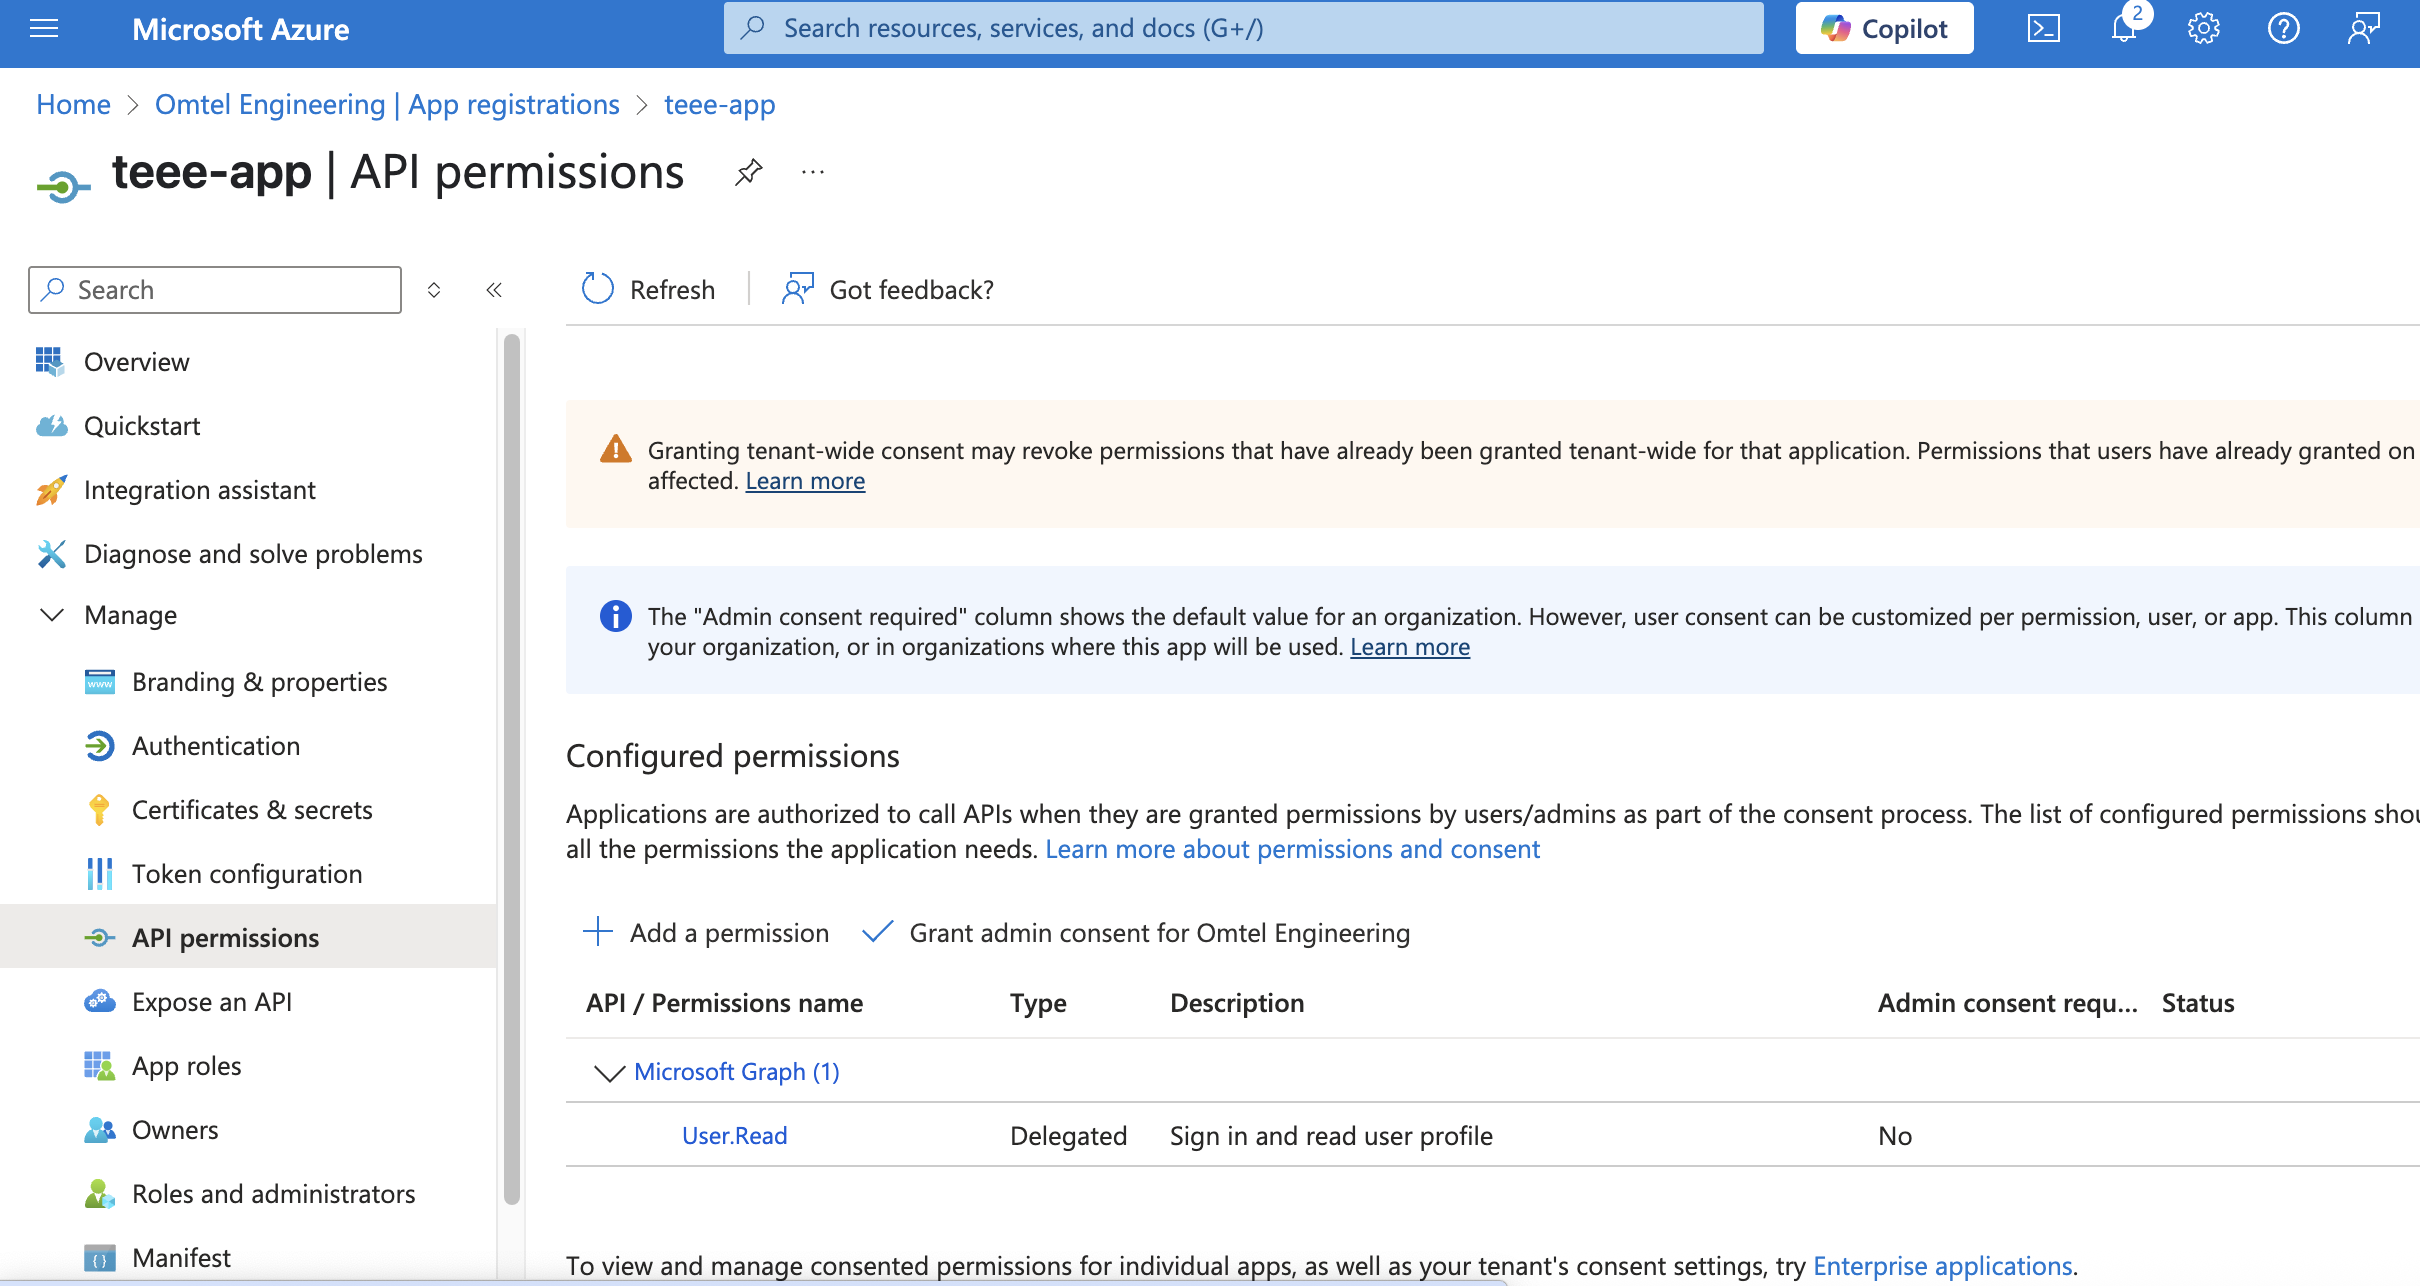
ต่อมาให้ไปเพิ่ม API Permissions ให้กับ App. > Add a permission

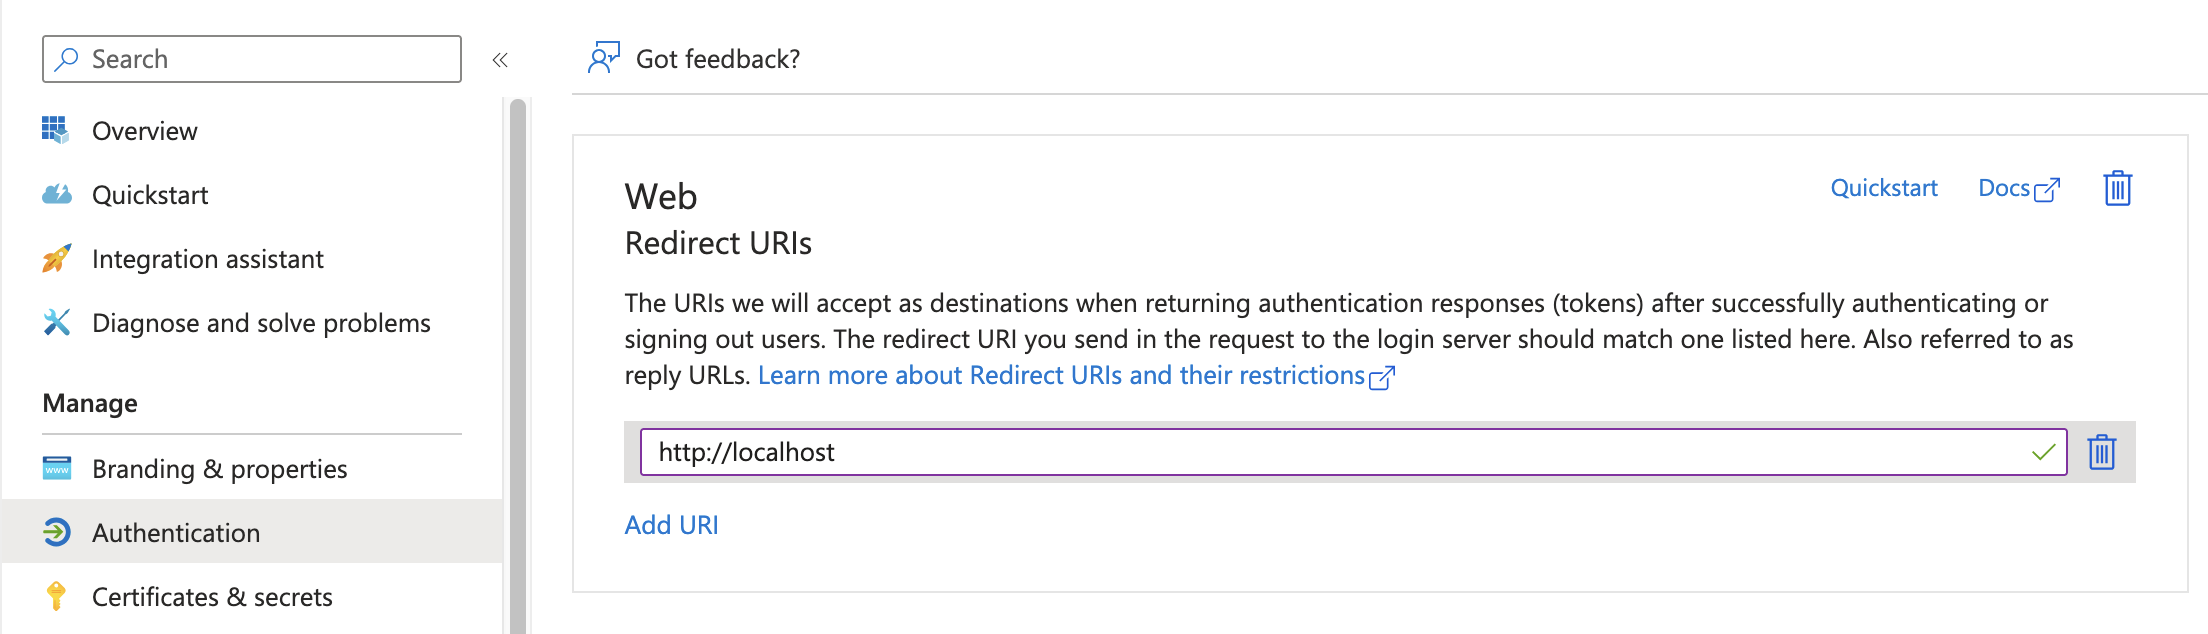
อย่าลืมไปเพิ่ม Authentication ว่าต้องการติดต่อกับ IMAP เป็นแบบไหน
ตรง menu Authentication > http://localhost
ในที่นี้จะใช้เป็น Web Auth เปิดไว้สำหรับเขียน App Node.Js เข้าไปติดต่อ
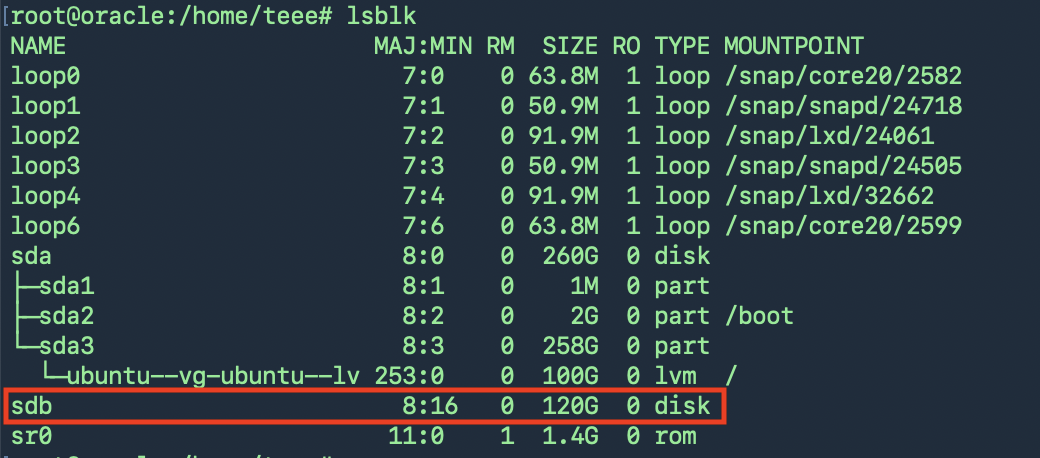
วิธีเพิ่ม Harddisk ให้กับ Linux Guest บน VmWare
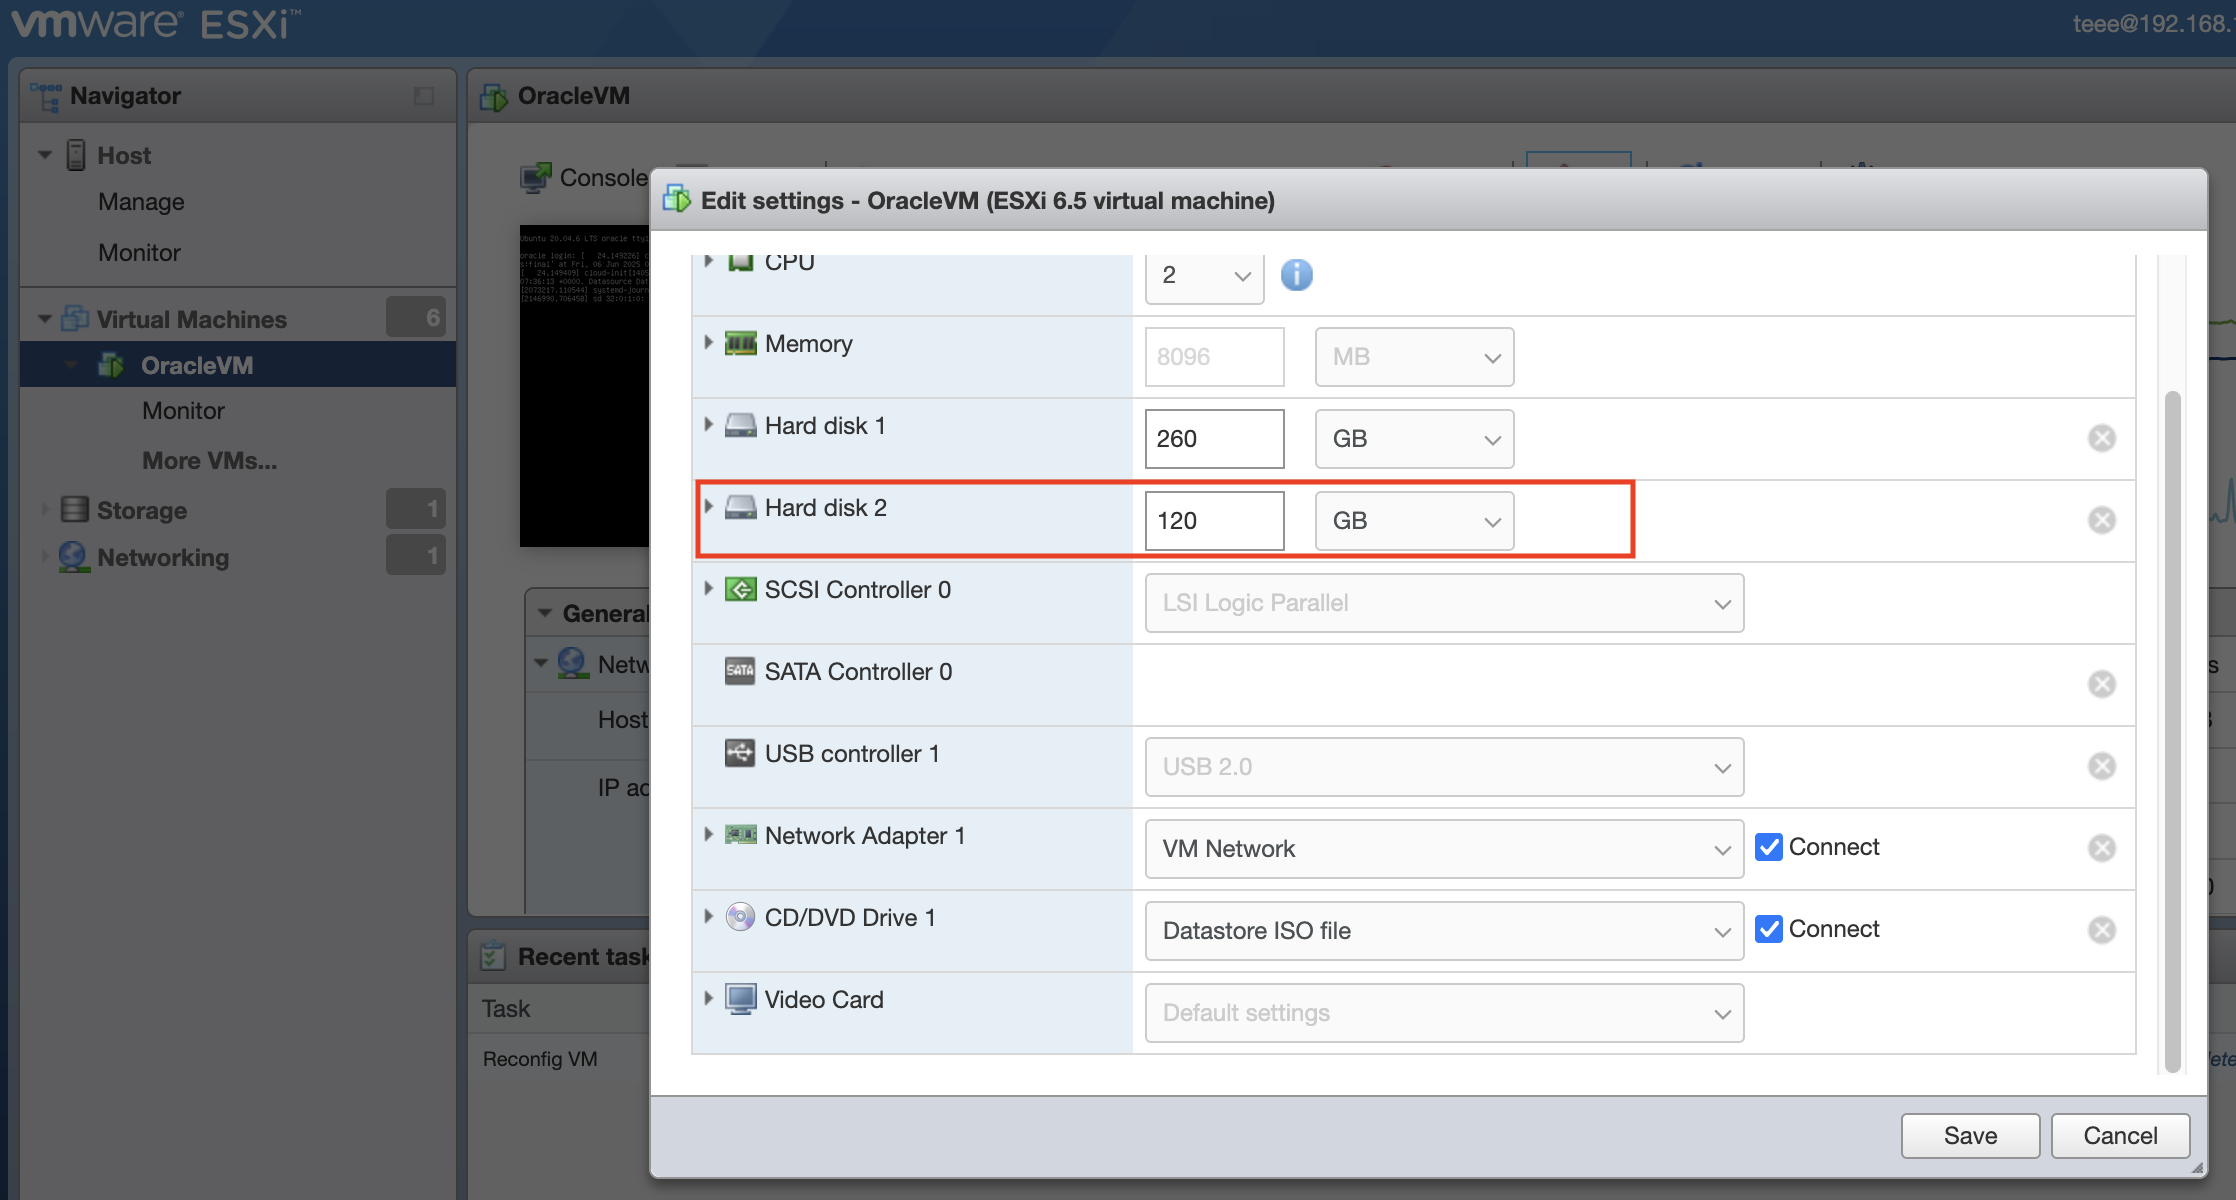
วิธีเพิ่ม Harddisk ให้กับ Linux Guest บน VmWare
> Vmware Guest และได้ Edit เพื่อเพิ่ม Harddisk
และตรวจสอบ Harddisk ที่เพิ่มเข้าไปใหม่เจอในระบบหรือไม่ด้วยคำสั่ง lsblk
หากไม่เจอ Harddisk ใหม่ที่เพิ่มเข้ามาให้ใช้คำสั่ง
for host in /sys/class/scsi_host/host*; do
echo “- – -” | sudo tee $host/scan
done
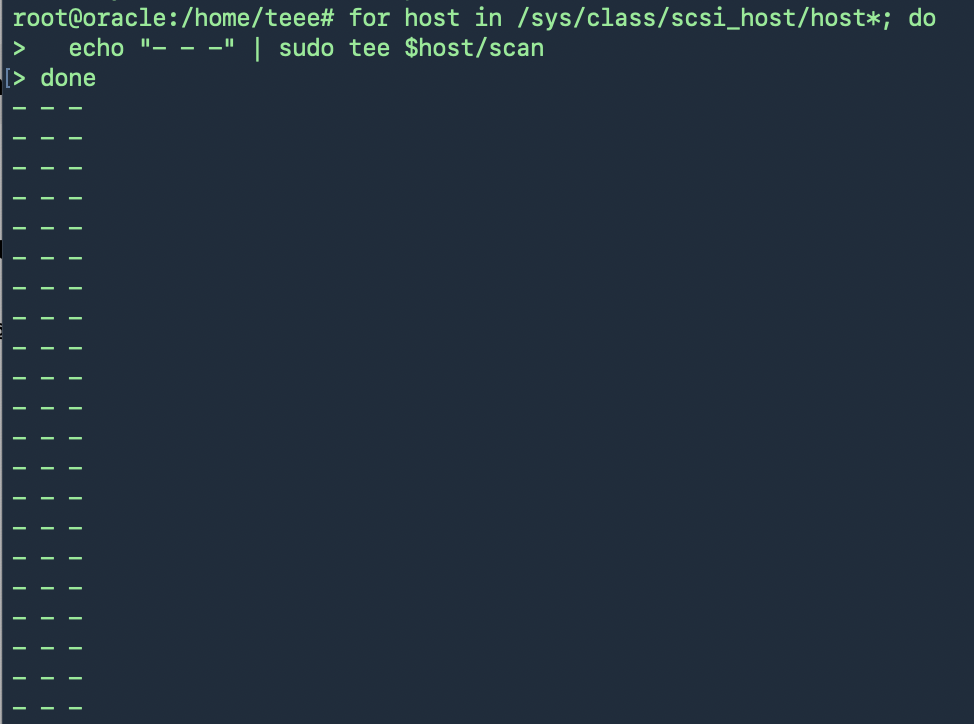
และตรวจสอบใหม่ก็จะเจอ Harddisk ใหม่ที่เพิ่มเข้ามา
นำไปใช้งาน สร้าง Physical Volume (PV) ใหม่
root@oracle:/home/teee# pvcreate /dev/sdb
Physical volume “/dev/sdb” successfully created.
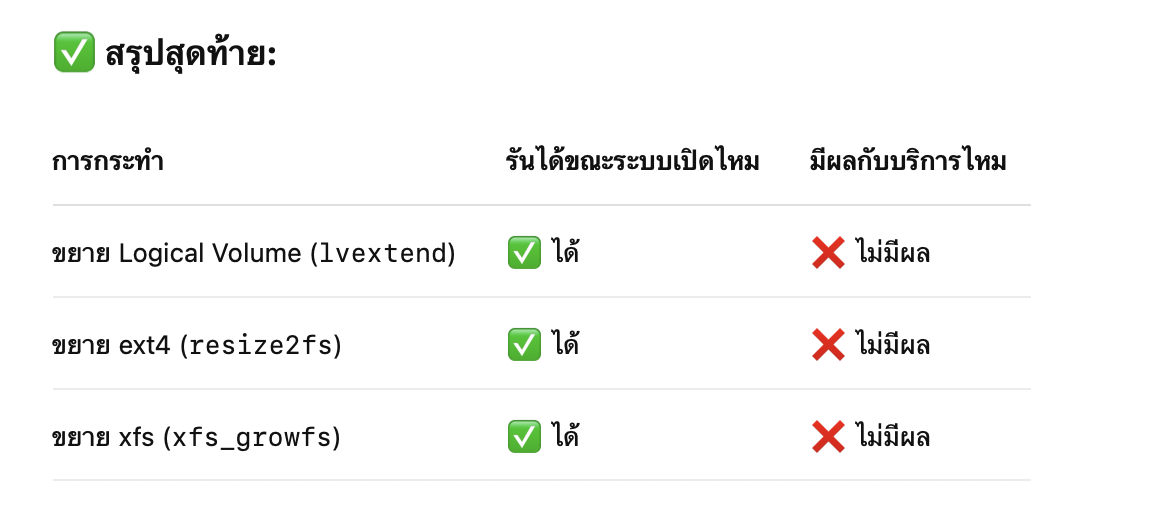
ขยาย Volume Group (VG)
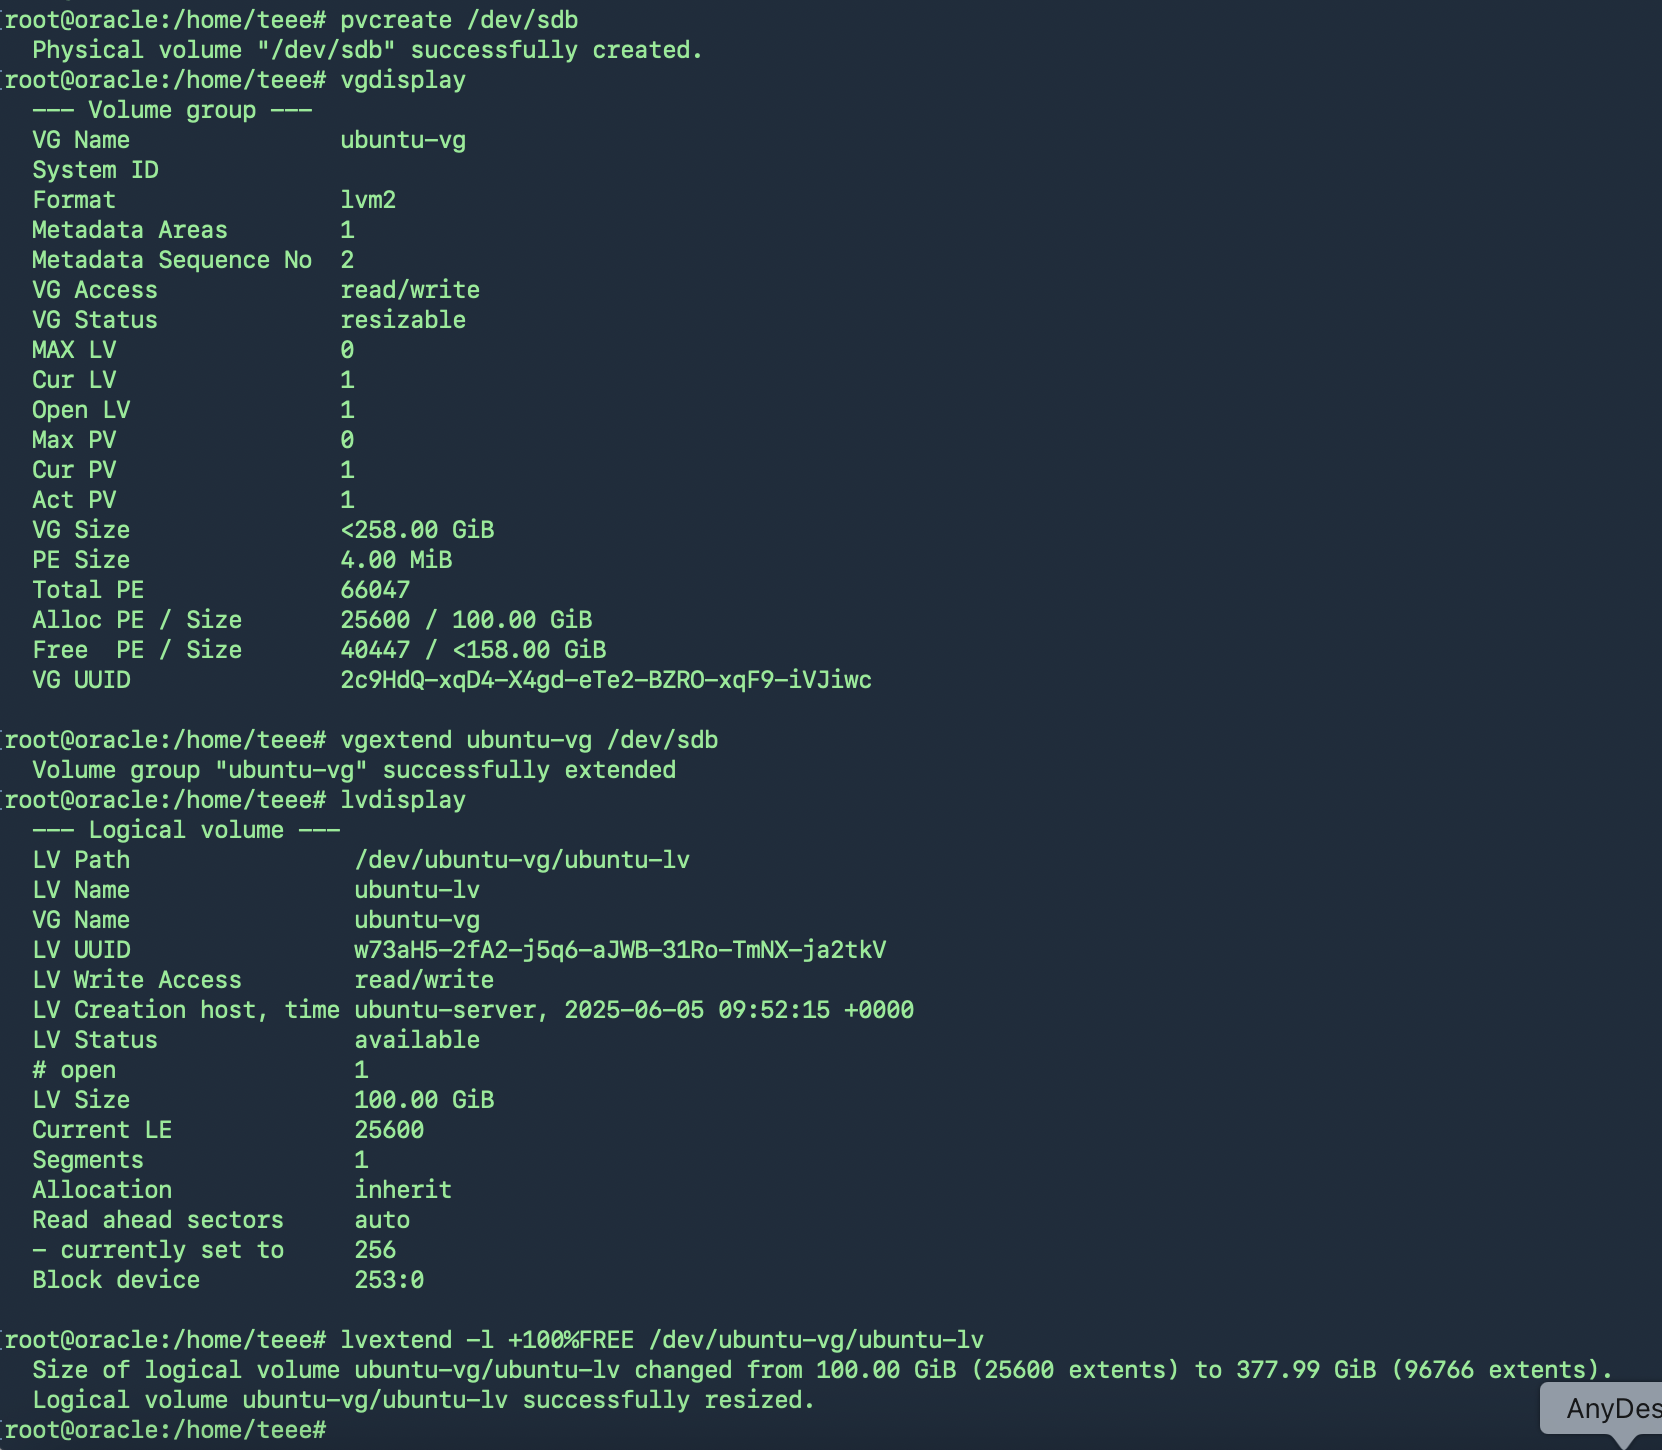
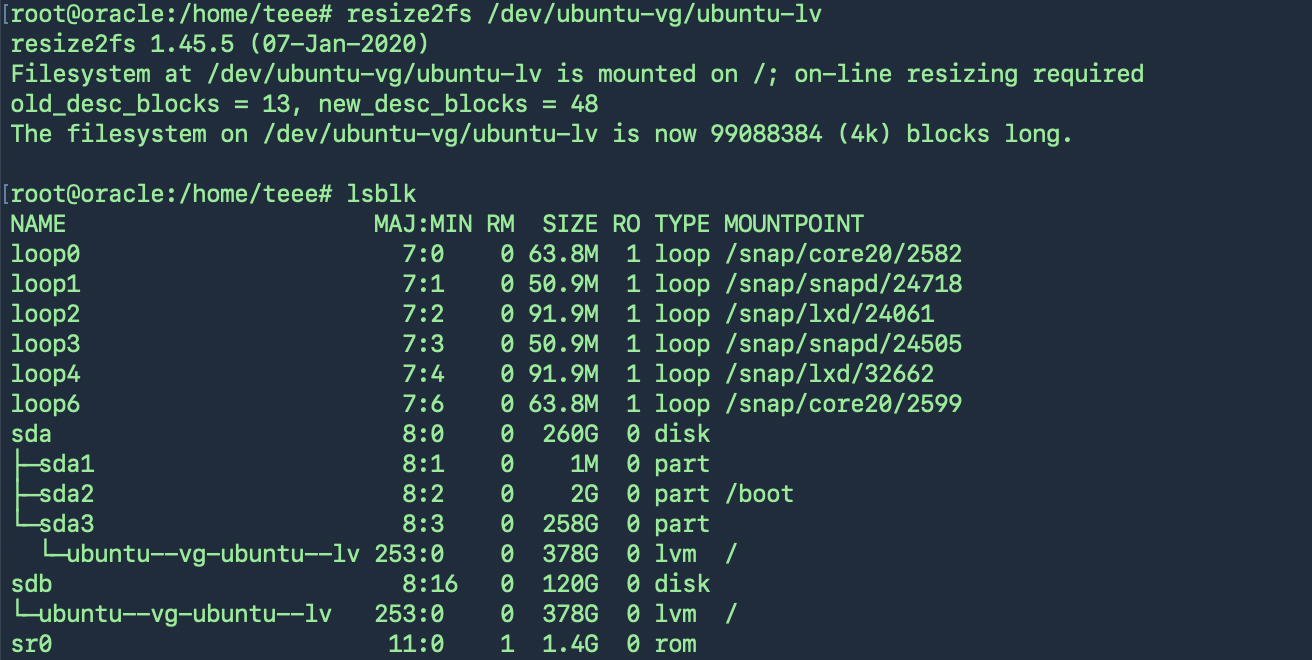
ตรวจสอบก่อนว่าใช้ File System ชนิดไหน
resize2fs(สำหรับ ext4) หรือ xfs_growfs(สำหรับ xfs)
-
ext4: resize2fs สามารถทำแบบ online ได้ ถ้า mount อยู่แล้ว
ติดตั้ง openldap บน ubuntu 24.04
ติดตั้ง OpenLDAP บน Ubuntu 24.04
1: อัปเดตระบบ
root@ldapserv:~# apt update && sudo apt upgrade -y
2: ติดตั้ง OpenLDAP และเครื่องมือที่เกี่ยวข้อง
root@ldapserv:~# apt install slapd ldap-utils -y
ระบบจะติดตั้ง slapd (OpenLDAP server) และ ldap-utils (เครื่องมือ CLI)
>> ใน Ubuntu 24.04 อาจไม่มี prompt ให้กำหนดรหัสผ่านของ admin (cn=admin) ในระหว่างติดตั้ง
Configuring slapd
Please enter the password for the admin entry in your LDAP directory.
Administrator password: xxxxx
Auto Start Service ตอนเปิดเครื่อง
#sudo systemctl enable slapd
3: ตั้งค่ารหัสผ่านสำหรับ LDAP admin ด้วย dpkg-reconfigure
ตั้งค่า config สำหรับ OPENLDAP ใหม่
root@ldapserv:~# dpkg-reconfigure slapd
คำถามที่คุณจะเจอ:
1. Omit OpenLDAP server configuration? → เลือก No
2. DNS domain name: → เช่น example.com
3. Organization name: → เช่น Example Inc
4. Administrator password: → ตั้งรหัสผ่าน
5. Database backend to use: → เลือก MDB (ค่าเริ่มต้น)
6. Remove the database when slapd is purged? → No
7. Move old database? → Yes
หลังจากนั้นระบบจะตั้งค่าฐานข้อมูลให้ใหม่ทั้งหมด
root@ldapserv:~# netstat -lntp
Active Internet connections (only servers)
tcp 0 0 0.0.0.0:389 0.0.0.0:* LISTEN 17736/slapd <–OPENLDAP
tcp6 0 0 :::22 :::* LISTEN 823/sshd: /usr/sbin
tcp6 0 0 :::389 :::* LISTEN 17736/slapd
4: ทดสอบ LDAP ด้วย ldapsearch ตัวอย่าง omtel.co.th
การ search ข้อมูลจาก LDAP server เช่น omtelldap.omtel.co.th จำเป็นต้องทราบ:
1.Base DN (จุดเริ่มต้นของ directory tree ที่จะค้นหา เช่น dc=omtel,dc=co,dc=th)
2.Credentials (ถ้าต้อง bind ด้วย user/password)
3.Port ที่ใช้ (ปกติ 389 สำหรับ LDAP หรือ 636 สำหรับ LDAPS)
4.Filter ที่ต้องการค้นหา เช่น (objectClass=person) หรือ (uid=someone)
ldapsearch -x -H ldap://localhost -D “cn=admin,dc=omtel,dc=ltd” -w ‘รหัสผ่าน’ -b “dc=omtel,dc=ltd”
# extended LDIF
#
# LDAPv3
# base <dc=omtel,dc=co,dc=th> with scope subtree
# filter: (objectclass=*)
# requesting: ALL
#
# omtel.co.th
dn: dc=omtel,dc=co,dc=th
objectClass: top
objectClass: dcObject
objectClass: organization
o: omptelldap
dc: omtel
# search result
search: 2
result: 0 Success
# numResponses: 2
# numEntries: 1
แบบนี้ถือว่าสำเร็จแล้ว!
การตอบกลับจาก ldapsearch ของคุณ:
•แสดงว่าเชื่อมต่อกับ LDAP server ได้สำเร็จ (result: 0 Success)
•มีการคืนค่า entry ของ dc=omtel,dc=co,dc=th ได้ 1 รายการ (root entry ของ directory tree)
•ไม่มี error ใด ๆ เช่น invalid credentials หรือ no such object
ขั้นตอนถัดไป (หากต้องการ):
5. หากต้องการ:
•สร้าง OU (organizationalUnit) เช่น People, Groups
•เพิ่มผู้ใช้ เช่น uid=tee,ou=People,…
ให้ใช้ไฟล์ .ldif เช่น:
ตัวอย่าง: add_base.ldif
dn: ou=People,dc=omtel,dc=co,dc=th
objectClass: organizationalUnit
ou: People
dn: uid=tee,ou=People,dc=omtel,dc=co,dc=th
objectClass: inetOrgPerson
cn: Naitinoi Sak
sn: Sak
uid: tee
userPassword: {SSHA} password
root@ldapserv:~# ldapadd -x -D “cn=admin,dc=omtel,dc=co,dc=th” -w ‘LDAP Password’ -f add_base.ldif
adding new entry “ou=People,dc=omtel,dc=co,dc=th”
adding new entry “uid=tee,ou=People,dc=omtel,dc=co,dc=th”
root@ldapserv:/home/teee# cat add_people_ou.ldif
dn: ou=People,dc=omtel,dc=co,dc=th
objectClass: organizationalUnit
ou: People
#ldapadd -x -D “cn=admin,dc=omtel,dc=co,dc=th” -w ‘xxxxPassxxxxx’ -f add_people_ou.ldif
root@ldapserv:/home/teee# cat gen-user.sh
#!/bin/bash
# BASE DN
BASE_DN=”dc=worldinfinity,dc=co,dc=th”
echo “==== สร้าง LDIF สำหรับเพิ่มผู้ใช้ LDAP ====”
read -p “Login (uid): ” LOGIN
read -p “Full Name (ชื่อ-นามสกุล): ” FULLNAME
# แยกชื่อกับนามสกุล
FIRSTNAME=$(echo “$FULLNAME” | cut -d’ ‘ -f1)
LASTNAME=$(echo “$FULLNAME” | cut -d’ ‘ -f2)
read -s -p “Password: ” PASSWORD
echo
# เข้ารหัสรหัสผ่าน
ENCRYPTED_PASS=$(slappasswd -s “$PASSWORD”)
# สร้าง LDIF
LDIF_FILE=”user_${LOGIN}.ldif”
cat < “$LDIF_FILE”
dn: uid=$LOGIN,ou=People,$BASE_DN
objectClass: inetOrgPerson
uid: $LOGIN
cn: $FULLNAME
sn: $LASTNAME
givenName: $FIRSTNAME
userPassword: $ENCRYPTED_PASS
EOF
echo “✅ ไฟล์ LDIF ถูกสร้างแล้ว: $LDIF_FILE”
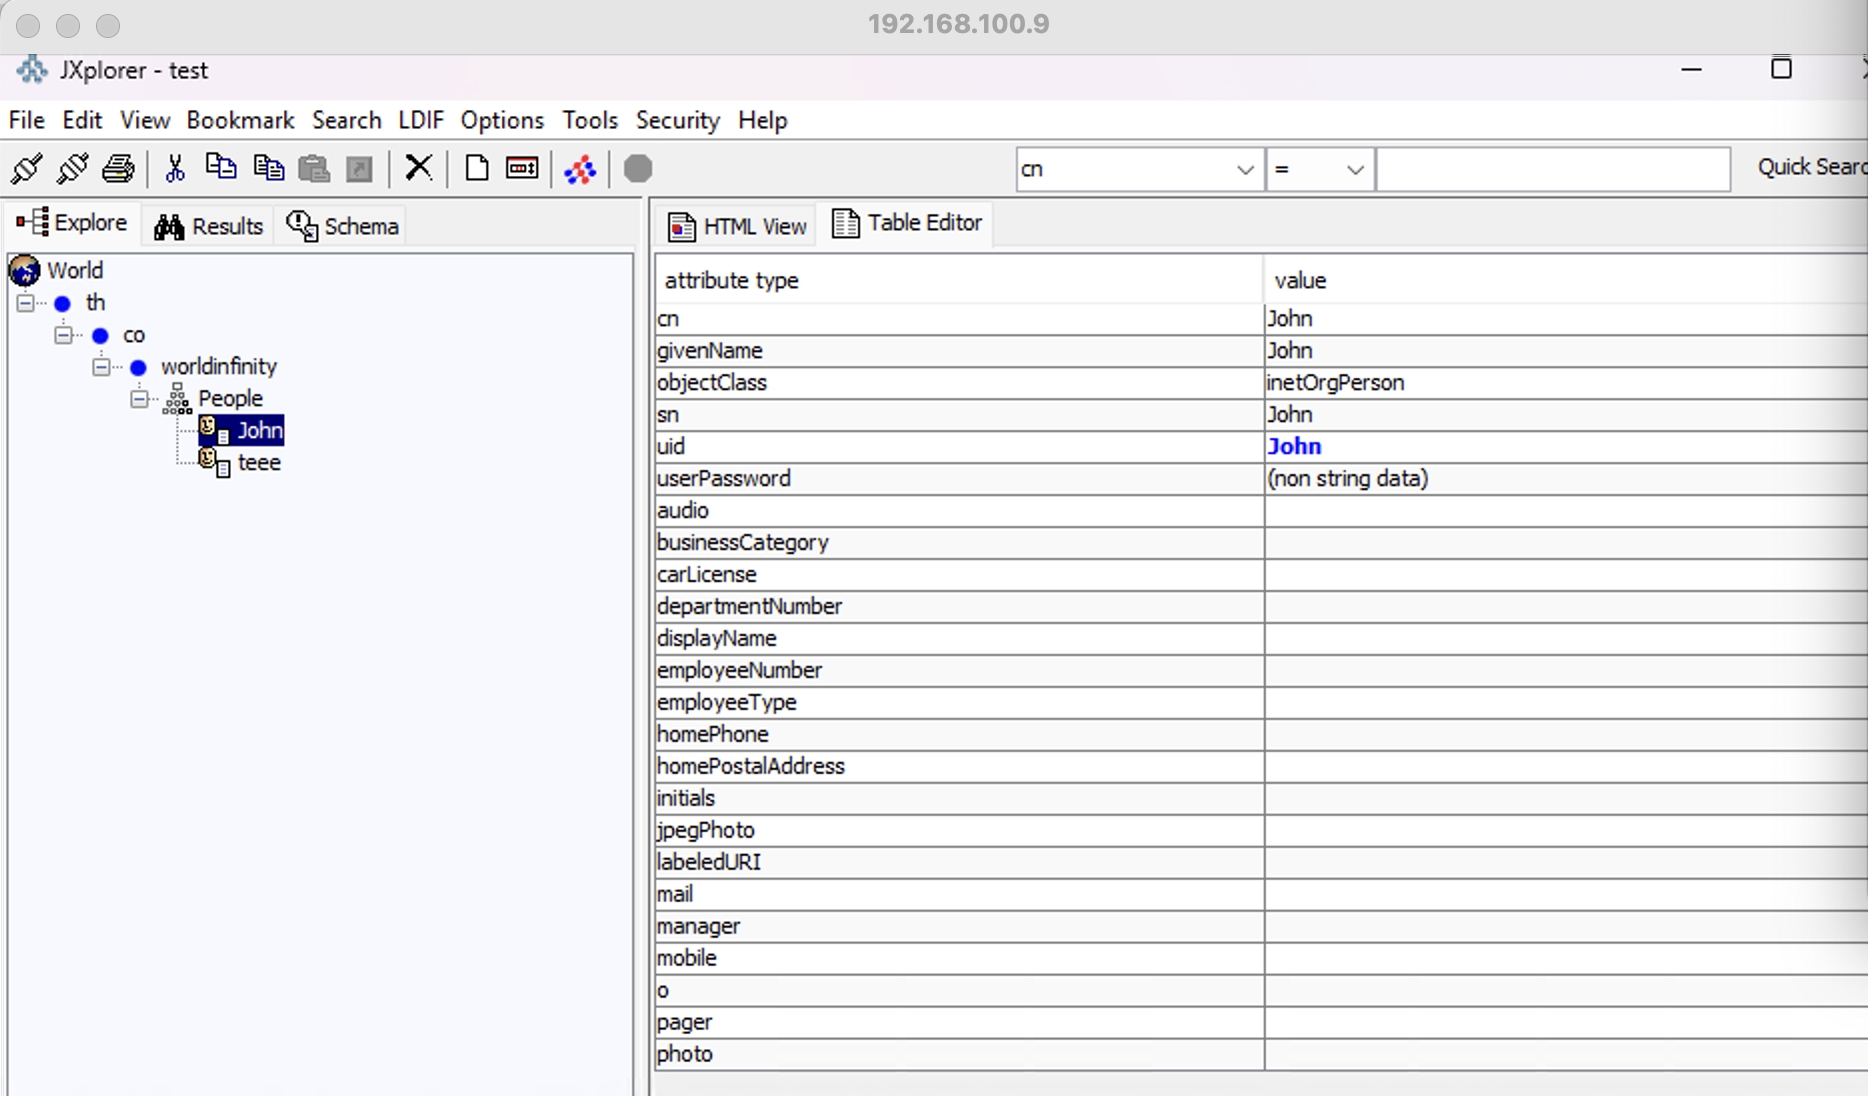
root@ldapserv:/home/teee# cat list_ldap_users.sh
#!/bin/bash
# LDAP base และข้อมูลการล็อกอิน
BASE_DN=”ou=People,dc=worldinfinity,dc=co,dc=th”
BIND_DN=”cn=admin,dc=worldinfinity,dc=co,dc=th”
read -s -p “กรุณาใส่รหัสผ่านของ LDAP admin: ” LDAP_PASS
echo
echo “📋 รายชื่อผู้ใช้ใน $BASE_DN:”
echo “——————————-”
ldapsearch -x -D “$BIND_DN” -w “$LDAP_PASS” -b “$BASE_DN” “(objectClass=inetOrgPerson)” uid cn sn dn | \
awk ‘
BEGIN { user = “” }
/^dn:/ { if (user != “”) print user; user = $0 }
/^uid:/ { user = user “\n ” $0 }
/^cn:/ { user = user “\n ” $0 }
/^sn:/ { user = user “\n ” $0 }
END { if (user != “”) print user }
‘ | less
root@ldapserv:/home/teee# cat delete_ldap_user.sh
#!/bin/bash
# ฐานข้อมูล LDAP
BASE_DN=”dc=worldinfinity,dc=co,dc=th”
OU=”People”
# Admin DN และรหัสผ่าน
LDAP_ADMIN_DN=”cn=admin,$BASE_DN”
read -s -p “กรุณาใส่รหัสผ่านของ LDAP admin: ” LDAP_ADMIN_PASS
echo
# รับ UID จากผู้ใช้
read -p “กรอก UID ของผู้ใช้ที่ต้องการลบ: ” UID
# DN ที่จะลบ
USER_DN=”uid=$UID,ou=$OU,$BASE_DN”
# ยืนยันการลบ
read -p “คุณแน่ใจหรือไม่ว่าต้องการลบผู้ใช้ $USER_DN ? (y/n): ” CONFIRM
if [[ “$CONFIRM” != “y” ]]; then
echo “❌ ยกเลิกการลบ”
exit 1
fi
# ลบด้วย ldapdelete
ldapdelete -x -D “$LDAP_ADMIN_DN” -w “$LDAP_ADMIN_PASS” “$USER_DN”
# ตรวจสอบสถานะ
if [ $? -eq 0 ]; then
echo “✅ ลบผู้ใช้ $UID สำเร็จแล้ว”
else
echo “❌ ล้มเหลวในการลบผู้ใช้ $UID (อาจไม่มีอยู่จริงหรือรหัสผ่านผิด)”
fi
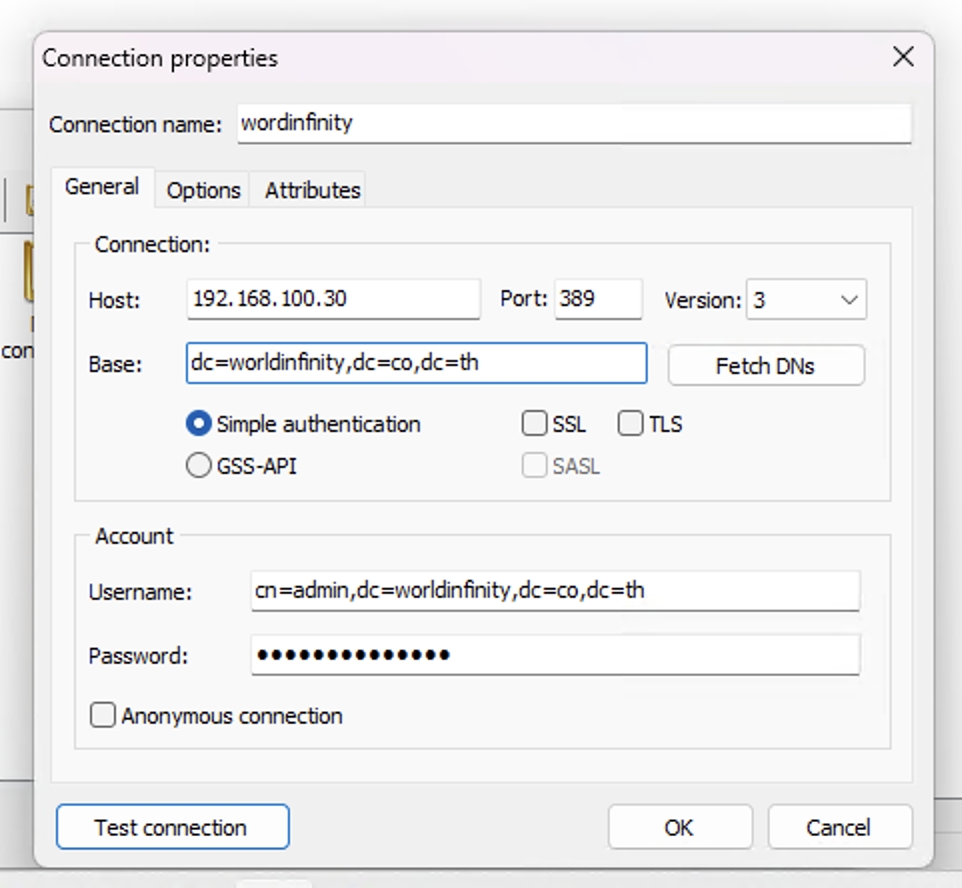
สามารถ Connect Test จากโปรแกรม LDAP Client Test เช่น
https://jxplorer.org/downloads/users.html
https://sourceforge.net/projects/ldapadmin/files/ldapadmin/1.8.3/
ตัวอย่าง

Ubuntu Netplan 24.04 Example- Proxmox
root@ldapserv:/etc/netplan# nano 50-cloud-init.yaml
network:
version: 2
ethernets:
ens18:
dhcp4: no
addresses:
– 192.168.100.30/24
routes:
– to: default
via: 192.168.100.1
nameservers:
addresses: [8.8.8.8, 1.1.1.1]
root@ldapserv:/etc/netplan# netplan apply
WARNING:root:Cannot call Open vSwitch: ovsdb-server.service is not running.
root@ldapserv:/etc/netplan# sudo systemctl status openvswitch-switch
Unit openvswitch-switch.service could not be found.
root@ldapserv:/etc/netplan# apt install openvswitch-switch -y
[*] systemd-logind.service
ตั้งให้เริ่มทำงานอัตโนมัติทุกครั้งที่บูต:
root@ldapserv:/etc/netplan# systemctl enable openvswitch-switch
Synchronizing state of openvswitch-switch.service with SysV service script with /lib/systemd/systemd-sysv-install.
Executing: /lib/systemd/systemd-sysv-install enable openvswitch-switch
ติดตั้ง Kea DHCP Server บนเครื่อง Mac M1 (Apple Silicon) เพื่อแจก DHCP สำหรับเครือข่าย 192.168.1.0/24
teee@NP ~ % brew install kea
ตรวจสอบตำแหน่งไฟล์ config
teee@NP ~ % cd /opt/homebrew/etc/kea/
teee@NP kea % ls
kea-ctrl-agent.conf kea-dhcp-ddns.conf kea-dhcp4.conf kea-dhcp6.conf keactrl.conf
แก้ไขไฟล์ kea-dhcp4.conf
ให้กำหนดการแจก IP สำหรับ subnet 192.168.1.0/24 แบบนี้:
sudo nano /opt/homebrew/etc/kea/kea-dhcp4.conf
ใส่ config (หรือแก้ไขบล็อก subnet4 ให้เหมือนด้านล่าง):
{
“Dhcp4”: {
“interfaces-config”: {
“interfaces”: [ “en0” ] // หรือใส่ชื่อ interface ที่ต้องการ
},
“lease-database”: {
“type”: “memfile”,
“persist”: true,
“name”: “/opt/homebrew/var/kea/kea-leases4.csv”
},
“subnet4”: [
{
“id”: 1,
“subnet”: “192.168.1.0/24”,
“pools”: [
{
“pool”: “192.168.1.100 – 192.168.1.200”
}
],
“option-data”: [
{
“name”: “routers”,
“data”: “192.168.1.1”
},
{
“name”: “subnet-mask”,
“data”: “255.255.255.0”
},
{
“name”: “domain-name-servers”,
“data”: “8.8.8.8, 1.1.1.1”
}
]
}
],
“loggers”: [
{
“name”: “kea-dhcp4”,
“output_options”: [
{
“output”: “/opt/homebrew/var/log/kea/kea-dhcp4.log”
}
],
“severity”: “INFO”
“debuglevel”: 0
}
]
}
}
แก้ “interfaces”: [ “en0” ] ให้ตรงกับชื่อ network interface ของคุณ (รัน ifconfig เพื่อเช็ค เช่น en0, bridge100, หรือ utun0)
สร้างโฟลเดอร์สำหรับ log และ leases ถ้ายังไม่มี
teee@NP kea % sudo mkdir -p /opt/homebrew/var/log/kea
teee@NP kea % sudo mkdir -p /opt/homebrew/var/kea
teee@NP kea % sudo mkdir -p /opt/homebrew/var/kea
teee@NP kea % sudo touch /opt/homebrew/var/kea/kea-leases4.csv
teee@NP kea % sudo chown $(whoami) /opt/homebrew/var/kea/kea-leases4.csv
กำหนด Static IP ให้ Mac (เช่น 192.168.1.1)
ไปที่ System Settings > Network > เลือก interface ที่คุณจะใช้ (เช่น Wi-Fi หรือ USB Ethernet) แล้วตั้งเป็น Manual IP: 192.168.1.1 Subnet: 255.255.255.0
รัน Kea DHCP Server
teee@NP kea % /opt/homebrew/sbin/kea-dhcp4 -c /opt/homebrew/etc/kea/kea-dhcp4.conf
ตรวจสอบ log
teee@NP /opt % tail -f /opt/homebrew/var/log/kea/kea-dhcp4.log
ทดสอบจากอุปกรณ์ลูกข่าย
เชื่อมต่อสาย LAN จาก Mac ไปยังเครื่องลูกข่าย หรือผ่าน Ethernet adapter แล้วให้เครื่องลูกข่ายขอ IP ผ่าน DHCP — จะได้รับ IP ในช่วง 192.168.1.100 – 192.168.1.200
teee@NP kea % sudo /opt/homebrew/sbin/kea-dhcp4 -c /opt/homebrew/etc/kea/kea-dhcp4.conf
2025-05-19 13:13:04.137 INFO [kea-dhcp4.dhcp4/8221.0x208ce1f00] DHCP4_STARTING Kea DHCPv4 server version 2.6.2 (stable) starting
2025-05-19 13:13:04.140 INFO [kea-dhcp4.commands/8221.0x208ce1f00] COMMAND_RECEIVED Received command ‘config-set’
แปลว่า Kea DHCPv4 server ได้เริ่มต้นทำงานเรียบร้อยแล้วโดยไม่มี error
teee@NP /opt % sudo lsof -iUDP:67
Password:
COMMAND PID USER FD TYPE DEVICE SIZE/OFF NODE NAME
kea-dhcp4 8221 root 12u IPv4 0x76203903121f674e 0t0 UDP 10.10.1.113:bootps
bootps = UDP/67 (DHCP Server)
วิธีการ STOP KEA
teee@NP /opt % ps aux | grep kea-dhcp4
teee 8652 0.0 0.0 410732512 1488 s000 S+ 1:20PM 0:00.01 grep kea-dhcp4
root 8221 0.0 0.1 410778736 6144 ?? S 1:13PM 0:00.09 /opt/homebrew/sbin/kea-dhcp4 -c /opt/homebrew/etc/kea/kea-dhcp4.conf
root 8220 0.0 0.0 410886720 3664 ?? S 1:13PM 0:00.02 sudo /opt/homebrew/sbin/kea-dhcp4 -c /opt/homebrew/etc/kea/kea-dhcp4.conf
Kill ด้วย PID:
teee@NP /opt % sudo kill 8221
teee@NP /opt % ps aux | grep kea-dhcp4
teee 8682 0.0 0.0 410724320 1392 s000 S+ 1:22PM 0:00.00 grep kea-dhcp4
tftpd on macbook m1
Check tftpd running
teee@NP ~ % netstat -na |grep \*.69
teee@NP ~ % apropos tftp
makewhatis: /opt/local/man: Not a directory
tftp(1) – trivial file transfer program
tftpd(8) – Internet Trivial File Transfer Protocol server
CURLOPT_TFTP_BLKSIZE(3) – TFTP block size
CURLOPT_TFTP_NO_OPTIONS(3) – send no TFTP options requests
tftp(1) – trivial file transfer program
tftpd(8) – Internet Trivial File Transfer Protocol server
Start tftpd
teee@NP ~ % sudo launchctl load -F /System/Library/LaunchDaemons/tftp.plist
Check tftpd start
teee@NP ~ % netstat -na |grep \*.69
udp4 0 0 *.69 *.*
udp6 0 0 *.69 *.*
Symlink the tftpboot folder
teee@NP ~ % cd /private
teee@NP /private % sudo rm -rf tftpboot
teee@NP / % mkdir /Users/teee/tftpboot
teee@NP / % sudo ln -s /Users/teee/tftpboot tftpboot
teee@NP / % sudo launchctl unload -F /System/Library/LaunchDaemons/tftp.plist
teee@NP / % sudo launchctl load -F /System/Library/LaunchDaemons/tftp.plist
Copy file into position
teee@NP / % cd /Users/teee/tftpboot
Stop tftpd
teee@NP ~ % sudo launchctl unload -F /System/Library/LaunchDaemons/tftp.plist
teee@NP ~ % netstat -na |grep \*.69
Linux ค้นหาไฟล์ที่เก่ากว่า 30 วันให้ลบออก
ใน Linux สามารถใช้คำสั่ง find เพื่อค้นหาและลบไฟล์ที่ เก่ากว่า 1 เดือน ได้ตามนี้
คำสั่ง:-
#find /path/to/folder -type f -mtime +30 -exec rm -f {} \;
/path/to/folder = โฟลเดอร์ที่คุณต้องการค้นหา (เช่น /var/log หรือ /mnt/backup)
-type f = เลือกเฉพาะไฟล์ (ไม่รวมโฟลเดอร์)
-mtime +30 = ไฟล์ที่ ถูกแก้ไขครั้งสุดท้ายมากกว่า 30 วัน (ประมาณ 1 เดือน)
-exec rm -f {} \; = ลบไฟล์ที่เจอทันที
ถ้าต้องการแค่ดูรายการไฟล์ (ไม่ลบ):
#find /path/to/folder -type f -mtime +30
Xsession: unable to start x session
Xsession: unable to start x session — “no /home/teee/.xsession” file no session manager , no windows manager ,and no terminal emulator found, abourting
ข้อความผิดพลาดนี้บอกว่า X ไม่สามารถเริ่มเซสชันได้เพราะ:
-
ไม่มีไฟล์
~/.xsession -
ไม่มี session manager
-
ไม่มี window manager
-
ไม่มี terminal emulator
สาเหตุที่เป็นไปได้:
-
XFCE ยังไม่ได้ติดตั้งครบ
-
ไม่มี display manager หรือถูกตั้งค่าผิด
-
X11 พยายามเริ่มต้นจาก
.xsessionแต่ไม่มีการกำหนดค่า
วิธีแก้ไข
วิธีที่ 1: ตรวจสอบและติดตั้ง XFCE พร้อม X11 อย่างถูกต้อง
sudo apt update
sudo apt install xfce4 xfce4-goodies xorg lightdm
ระหว่างการติดตั้ง ถ้ามีคำถามเรื่อง Display Manager ให้เลือก lightdm
วิธีที่ 2: ตรวจสอบว่ามี session ของ XFCE ใน /usr/share/xsessions
ls /usr/share/xsessions
ควรเห็นไฟล์ชื่อประมาณ:
-
xfce.desktop
วิธีที่ 3:ตรวจสอบว่าติดตั้ง terminal emulator ด้วย
เช่น xfce4-terminal หรือ xterm:
sudo apt install xfce4-terminal xterm
เสร็จแล้วลอง Reboot ดู
Debian แก้ไขคำสั่งบูต GRUB ชั่วคราวเพื่อเข้าผ่าน shell
เลือกบรรทัดแรก (Debian GNU/Linux) แล้วกด e เพื่อ “edit”
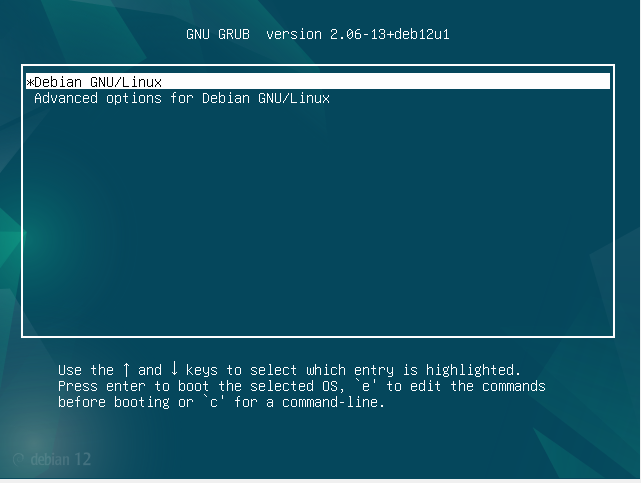
หาบรรทัดที่ขึ้นต้นว่า:
linux /boot/vmlinuz-… root=UUID=… ro quiet
ลบ quiet ออก และ เพิ่ม:
linux /boot/vmlinuz-… root=UUID=… ro systemd.unit=multi-user.target
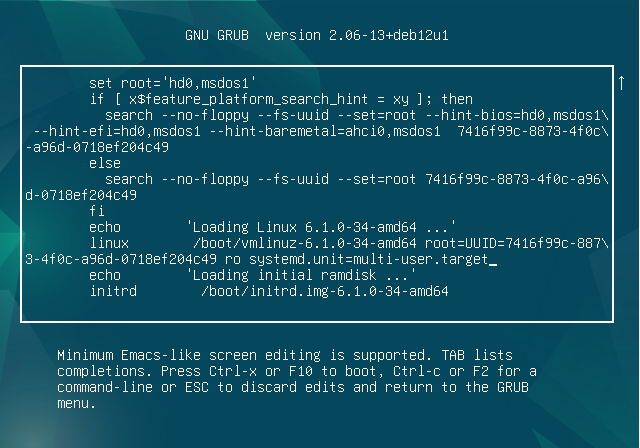
กด Ctrl + X หรือ F10 เพื่อบูตด้วยค่าที่คุณแก้ไข