ติดตั้ง OpenVPN ให้รองรับ 1000 Client
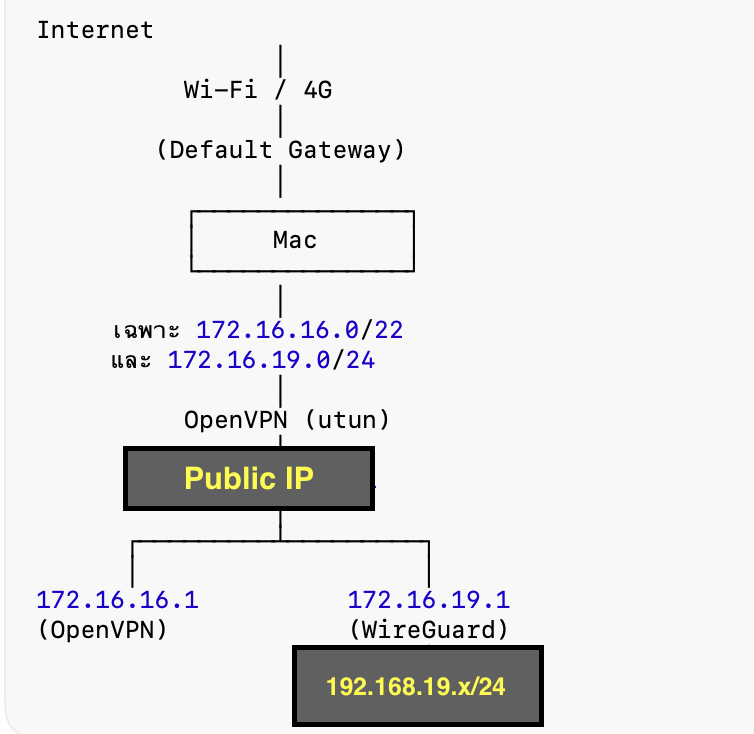
OpenVPN
172.16.16.0/22
Network
172.16.16.0
Mask
255.255.252.0
Range
172.16.16.2-172.16.19.254
1022 IP
**** เพียงพอสำหรับ 1000 Client ****
1. Install
root@np:/home/teee# apt install openvpn easy-rsa openssl ca-certificates -y
2. EasyRSA
root@np:/home/teee# make-cadir /etc/openvpn/easy-rsa
root@np:/home/teee# cd /etc/openvpn/easy-rsa
root@np:/etc/openvpn/easy-rsa# ./easyrsa init-pki
Using Easy-RSA ‘vars’ configuration:
* /etc/openvpn/easy-rsa/vars
Notice
——
‘init-pki’ complete; you may now create a CA or requests.
Your newly created PKI dir is:
* /etc/openvpn/easy-rsa/pki
Using Easy-RSA configuration:
* /etc/openvpn/easy-rsa/vars
root@np:/etc/openvpn/easy-rsa# ./easyrsa build-ca nopass
Using Easy-RSA ‘vars’ configuration:
* /etc/openvpn/easy-rsa/vars
…+++++++++++++++++++++++++++++++++++++++*…………+.+…..+…+…………………….+..+…….+..+…+.+..+…….+++++++++++++++++++++++++++++++++++++++*………..+……….+………..+………+.+…+……+…..+….+………+…..+…..+……….+..+……………+….+…+……..+…+……+.+………+…..+.++++++
You are about to be asked to enter information that will be incorporated
into your certificate request.
What you are about to enter is what is called a Distinguished Name or a DN.
There are quite a few fields but you can leave some blank
For some fields there will be a default value,
If you enter ‘.’, the field will be left blank.
—–
Common Name (eg: your user, host, or server name) [Easy-RSA CA]:(Your Server-Name)
Notice
——
CA creation complete. Your new CA certificate is at:
* /etc/openvpn/easy-rsa/pki/ca.crt
Create an OpenVPN TLS-AUTH|TLS-CRYPT-V1 key now: See ‘help gen-tls’
Build-ca completed successfully.
——
ตั้งชื่อ CA เช่น. Your Server-Name-CA
สร้าง Server Certificate
root@np:/etc/openvpn/easy-rsa# ./easyrsa build-server-full server nopass
Using Easy-RSA ‘vars’ configuration:
* /etc/openvpn/easy-rsa/vars
.+…+..+++++++++++++++++++++++++++++++++++++++*….+…….+…+…..+++++++++++++++++++++++++++++++++++++++*….+….+……+…+..+…+…………+….+…+..+……+………+.+..+…+….+…+………..+…….+……..+.++++++
—–
Notice
——
Private-Key and Public-Certificate-Request files created.
Your files are:
* req: /etc/openvpn/easy-rsa/pki/reqs/server.req
* key: /etc/openvpn/easy-rsa/pki/private/server.key
You are about to sign the following certificate:
Requested CN: ‘server’
Requested type: ‘server’
Valid for: ‘825’ days
subject=
commonName = server
Type the word ‘yes’ to continue, or any other input to abort.
Confirm requested details: yes (ตอบ yes)
Using configuration from /etc/openvpn/easy-rsa/pki/634563e8/temp.6.1
Check that the request matches the signature
Signature ok
The Subject’s Distinguished Name is as follows
commonName :ASN.1 12:’server’
Certificate is to be certified until Oct 9 09:52:01 2028 GMT (825 days)
Write out database with 1 new entries
Database updated
Notice
——
Inline file created:
* /etc/openvpn/easy-rsa/pki/inline/private/server.inline
Notice
——
Certificate created at:
* /etc/openvpn/easy-rsa/pki/issued/server.crt
DH
root@np:/etc/openvpn/easy-rsa# ./easyrsa gen-dh
Using Easy-RSA ‘vars’ configuration:
* /etc/openvpn/easy-rsa/vars
Generating DH parameters, 2048 bit long safe prime
……………………………………………………………………………………………………………………………………………………………………………….++*++*++*++*++*++*++*++*++*++*++*++*++*++*++*++*++*++*++*++*++*++*++*++*++*++*++*++*++*++*++*++*++*++*++*++*++*++*++*++*++*++*++*++*++*++*++*++*++*++*++*++*++*++*++*++*++*++*++*++*++*++*++*++*
DH parameters appear to be ok.
Notice
——
DH parameters of size 2048 created at:
* /etc/openvpn/easy-rsa/pki/dh.pem
TLS Key
root@np:/etc/openvpn/easy-rsa# openvpn –genkey secret ta.key
Client
root@np:/etc/openvpn/easy-rsa# ./easyrsa build-client-full client01 nopass<—ทดลองสร้าง Client01
Using Easy-RSA ‘vars’ configuration:
* /etc/openvpn/easy-rsa/vars
.+……………+..+.+..+….+…..+++++++++++++++++++++++++++++++++++++++*…..+.+…+…..+…………….+…+..+…+…………+.+..+…+…….+…+…..+.+……+…+……………………+…+..+…………+……………+…+.+..+….+…++++++
—–
Notice
——
Private-Key and Public-Certificate-Request files created.
Your files are:
* req: /etc/openvpn/easy-rsa/pki/reqs/client01.req
* key: /etc/openvpn/easy-rsa/pki/private/client01.key
You are about to sign the following certificate:
Requested CN: ‘client01’
Requested type: ‘client’
Valid for: ‘825’ days
subject=
commonName = client01
Type the word ‘yes’ to continue, or any other input to abort.
Confirm requested details: yes
Using configuration from /etc/openvpn/easy-rsa/pki/3020d3d9/temp.6.1
Check that the request matches the signature
Signature ok
The Subject’s Distinguished Name is as follows
commonName :ASN.1 12:’client01′
Certificate is to be certified until Oct 9 09:55:58 2028 GMT (825 days)
Write out database with 1 new entries
Database updated
Notice
——
Inline file created:
* /etc/openvpn/easy-rsa/pki/inline/private/client01.inline
Notice
——
Certificate created at:
* /etc/openvpn/easy-rsa/pki/issued/client01.crt
3.Copy Files
root@np:/etc/openvpn/easy-rsa# mkdir /etc/openvpn/server
mkdir: cannot create directory ‘/etc/openvpn/server’: File exists
root@np:/etc/openvpn/easy-rsa# ls -l /etc/openvpn/server/
total 0
root@np:/etc/openvpn/easy-rsa# cp pki/ca.crt pki/dh.pem ta.key pki/issued/server.crt pki/private/server.key /etc/openvpn/server/
root@np:/etc/openvpn/easy-rsa# ls -l /etc/openvpn/server/
total 24
-rw——- 1 root root 1196 Jul 7 16:58 ca.crt
-rw——- 1 root root 428 Jul 7 16:58 dh.pem
-rw——- 1 root root 4499 Jul 7 16:58 server.crt
-rw——- 1 root root 1704 Jul 7 16:58 server.key
-rw——- 1 root root 636 Jul 7 16:58 ta.key
4. Server Config
root@np:/etc/openvpn/easy-rsa# nano /etc/openvpn/server/server.conf
port 1194
proto udp
dev tun
user nobody
group nogroup
persist-key
persist-tun
topology subnet
server 172.16.16.0 255.255.252.0
ifconfig-pool-persist ipp.txt
push “route 172.16.19.0 255.255.255.0”
#push “redirect-gateway def1” <— ปิดไว้
push “dhcp-option DNS 1.1.1.1”
push “dhcp-option DNS 8.8.8.8”
keepalive 10 120
cipher AES-256-GCM
data-ciphers AES-256-GCM:AES-128-GCM
auth SHA256
tls-version-min 1.2
tls-crypt ta.key
ca ca.crt
cert server.crt
key server.key
dh dh.pem
verb 3
explicit-exit-notify 1
=== SAVE ===
#push “redirect-gateway def1” <— ปิดไว้
ผู้ใช้ OpenVPN จะเข้าเฉพาะเครือข่ายภายใน แต่ Internet ยังออกผ่าน Wi-Fi/4G ของเครื่องเอง ซึ่งจะไม่เปลืองแบนด์วิดท์ของ VPS
Push Route เฉพาะ Network ภายใน ให้เหลือประมาณนี้
push “route 172.16.16.0 255.255.252.0”
push “route 172.16.19.0 255.255.255.0”
push “dhcp-option DNS 1.1.1.1”
push “dhcp-option DNS 8.8.8.8”
5. Enable Routing
nano /etc/sysctl.conf
net.ipv4.ip_forward=1 <- เพิ่ม
sysctl -p <–Apply
6. IP Tables
root@np:/home/teee# iptables -A INPUT -p udp –dport 1194 -j ACCEPT
iptables -I INPUT 1 -i tun0 -j ACCEPT
iptables -A INPUT -p udp –dport 1194 -j ACCEPT
iptables -A FORWARD -i tun0 -o wg0 -j ACCEPT
iptables -A FORWARD -i wg0 -o tun0 -m conntrack –ctstate RELATED,ESTABLISHED -j ACCEPT
iptables-save > /etc/iptables/rules.v4
ถ้าจะออก Internet ผ่าน OpenVPN ต้องเพิ่ม
iptables -t nat -A POSTROUTING -s 172.16.16.0/22 -o eth0 -j MASQUERADE
แต่ถ้าจะใช้เฉพาะเข้าหา FreeSwitch ไม่จำเป็น
7. Start OPENVPN
root@np:/home/teee# systemctl enable openvpn-server@server
Created symlink ‘/etc/systemd/system/multi-user.target.wants/openvpn-server@server.service’ → ‘/usr/lib/systemd/system/openvpn-server@.service’.
root@np:/home/teee# systemctl start openvpn-server@server
8. Check Status
root@np:/home/teee# netstat -lntup
Active Internet connections (only servers)
Proto Recv-Q Send-Q Local Address Foreign Address State PID/Program name
udp 0 0 0.0.0.0:1194 0.0.0.0:* 423784/openvpn
root@np:/home/teee# ifconfig
tun0: flags=4305<UP,POINTOPOINT,RUNNING,NOARP,MULTICAST> mtu 1500
inet 172.16.16.1 netmask 255.255.252.0 destination 172.16.16.1
unspec 00-00-00-00-00-00-00-00-00-00-00-00-00-00-00-00 txqueuelen 500 (UNSPEC)
RX packets 0 bytes 0 (0.0 B)
RX errors 0 dropped 0 overruns 0 frame 0
TX packets 0 bytes 0 (0.0 B)
TX errors 0 dropped 0 overruns 0 carrier 0 collisions 0
==== ทดสอบ ควรได้ผลดังนี้. ======
# เข้า OpenVPN Server
ping 172.16.16.1
# เข้า WireGuard / FreeSWITCH
ping 172.16.19.1
# เข้า FreeSWITCH ถ้ามี IP อื่น
ping 172.16.19.x
# Internet
ping 8.8.8.8
# DNS
ping google.com
=== แก้ไขเพิ่มเติม ===
root@np:/etc/systemd/system# nano /usr/lib/systemd/system/openvpn-server@.service
GNU nano 8.4 /usr/lib/systemd/system/openvpn-server@.service *
[Unit]
Description=OpenVPN service for %I
After=network-online.target
Wants=network-online.target
Documentation=man:openvpn(8)
Documentation=https://openvpn.net/community-resources/reference-manual-for-openvpn-2-6/
Documentation=https://community.openvpn.net/openvpn/wiki/HOWTO
[Service]
Type=notify
PrivateTmp=true
WorkingDirectory=/etc/openvpn/server
ExecStart=/usr/sbin/openvpn –status %t/openvpn-server/status-%i.log –status-version 2 –suppress-timestamps –config %i.conf
CapabilityBoundingSet=CAP_IPC_LOCK CAP_NET_ADMIN CAP_NET_BIND_SERVICE CAP_NET_RAW CAP_SETGID CAP_SETUID CAP_SETPCAP CAP_SYS_CHROOT CAP_DAC_OVERRIDE CAP_AU>
LimitNOFILE=65535 <—- เพิ่มบรรทัดนี้
TasksMax=infinity <—- เพิ่มบรรทัดนี้
OOMScoreAdjust=-900 <—- เพิ่มบรรทัดนี้
LimitNPROC=10 <– เปลี่ยนเป็น 4096
DeviceAllow=/dev/null rw
DeviceAllow=/dev/net/tun rw
ProtectSystem=true
ProtectHome=true
KillMode=process
RestartSec=5s
Restart=on-failure
[Install]
WantedBy=multi-user.target
===SAVE===
nano /etc/sysctl.conf
net.ipv4.ip_forward = 1
# Connection Queue
net.core.somaxconn=4096
# Socket Buffer
net.core.rmem_max=16777216
net.core.wmem_max=16777216
# Local Port Range
net.ipv4.ip_local_port_range=10240 65535
===SAVE===
มีอีกชุดที่แนะนำเพิ่ม
เนื่องจากคุณตั้งเป้า OpenVPN + WireGuard + FreeSWITCH รองรับประมาณ 1000 Users แนะนำใช้ชุดนี้แทน เพราะครบกว่า
#######################################################
# OpenVPN / WireGuard / FreeSWITCH Performance
#######################################################
# Enable Routing
net.ipv4.ip_forward=1
# TCP Queue
net.core.somaxconn=4096
# Socket Buffers
net.core.rmem_default=1048576
net.core.wmem_default=1048576
net.core.rmem_max=16777216
net.core.wmem_max=16777216
# UDP Memory
net.ipv4.udp_mem=3145728 4194304 6291456
# Port Range
net.ipv4.ip_local_port_range=10240 65535
# Reverse Path Filter
net.ipv4.conf.all.rp_filter=0
net.ipv4.conf.default.rp_filter=0
# SYN Queue
net.ipv4.tcp_max_syn_backlog=4096
# TIME_WAIT
net.ipv4.tcp_fin_timeout=15
===SAVE===
root@np:/etc/systemd/system# systemctl daemon-reload
root@np:/etc/systemd/system# systemctl restart openvpn-server@server
9. สคริต์สร้าง Client เชื่อมต่อ OpenVPN.
#nano make-ovpn.sh
===============================
#!/bin/bash
set -e
EASYRSA=”/etc/openvpn/easy-rsa”
if [ $# -ne 1 ]; then
echo “Usage: $0 ”
exit 1
fi
CLIENT=”$1″
CA=”$EASYRSA/pki/ca.crt”
CERT=”$EASYRSA/pki/issued/${CLIENT}.crt”
KEY=”$EASYRSA/pki/private/${CLIENT}.key”
TLSKEY=”$EASYRSA/ta.key”
OUT=”/root/${CLIENT}.ovpn”
SERVER_IP=”xxx.xxx.xxx.xxx” <—(Your Public IP) SERVER_PORT=”1194″ # ตรวจสอบไฟล์ for FILE in “$CA” “$CERT” “$KEY” “$TLSKEY” do if [ ! -f “$FILE” ]; then echo “Missing file:” echo “$FILE” exit 1 fi done echo “Creating $OUT” cat > “$OUT” <<EOF
client
dev tun
proto udp
remote ${SERVER_IP} ${SERVER_PORT}
resolv-retry infinite
nobind
persist-key
persist-tun
remote-cert-tls server
cipher AES-256-GCM
data-ciphers AES-256-GCM:AES-128-GCM
auth SHA256
auth-nocache
tls-version-min 1.2
verb 3
EOF
cat “$CA” >> “$OUT”
cat >> “$OUT” <<EOF
EOF
awk ‘
/BEGIN CERTIFICATE/ {p=1}
p
/END CERTIFICATE/ {exit}
‘ “$CERT” >> “$OUT”
cat >> “$OUT” <<EOF
EOF
cat “$KEY” >> “$OUT”
cat >> “$OUT” <<EOF
EOF
cat “$TLSKEY” >> “$OUT”
cat >> “$OUT” <<EOF
EOF
chmod 600 “$OUT”
echo
echo “=======================================”
echo “Created:”
echo “$OUT”
echo “=======================================”
ใช้ได้กับ OpenVPN 2.6+, macOS, Windows, Linux, Android, iPhone โดยฝัง Certificate และ Key ทั้งหมดไว้ในไฟล์ .ovpn เพียงไฟล์เดียว
chmod +x /root/make-ovpn.sh
สร้าง Client
เช่น
root@np:# /root/make-ovpn.sh macbook
จะได้ไฟล์
/root/macbook.ovpn
ตรวจสอบ รัน
root@np:#grep tls /root/macbook.ovpn
remote-cert-tls server
tls-version-min 1.2
<tls-crypt>
</tls-crypt>
ต้องไม่มี
tls-crypt ta.key
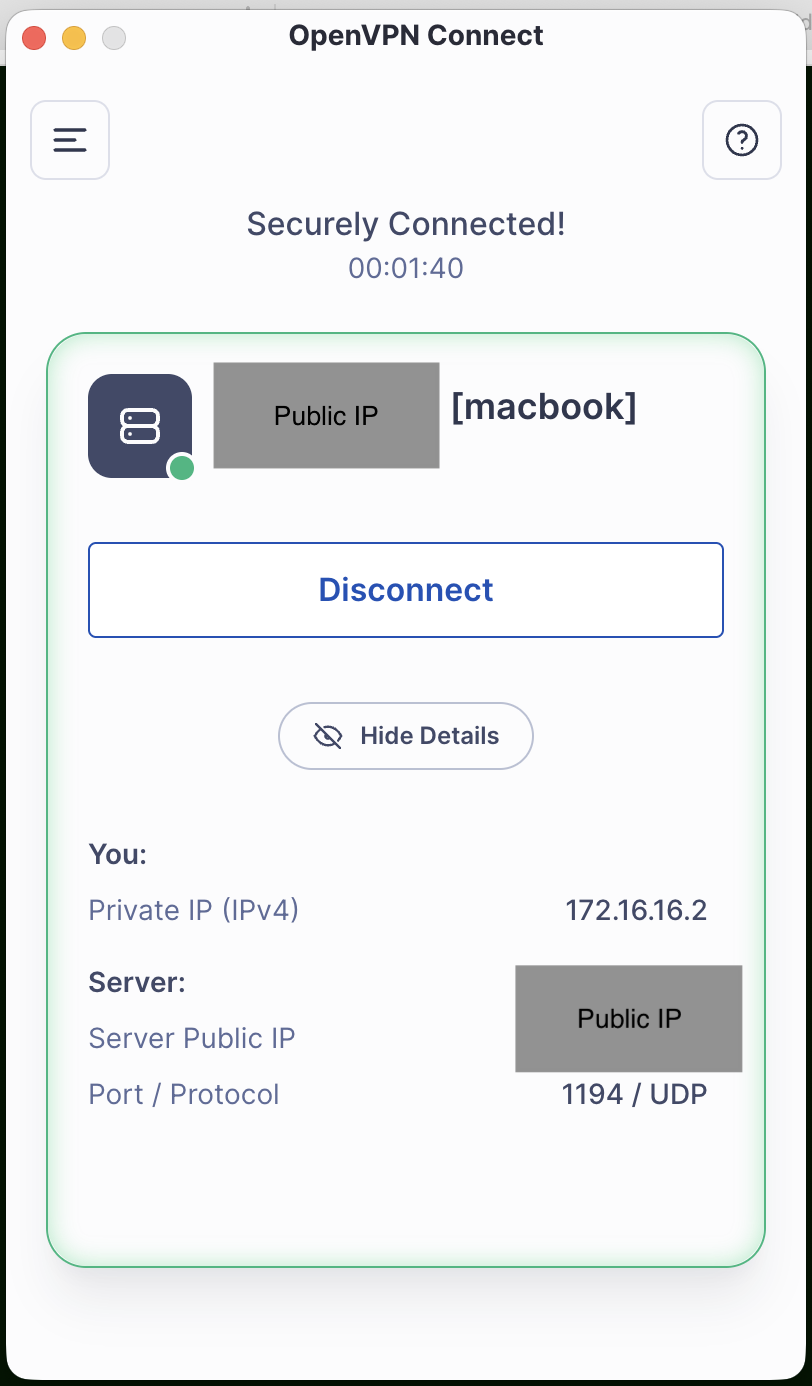
เสร็จแล้ว Copy ไฟล์นี้ไปที่เครื่อง Clinet MAC
ที่เครื่อง MAC ติดตั้งโปรแกรม. OpenVPN Connect for macOS
https://openvpn.net/client/
เสร็จแล้วลอง Import. macbook.ovpn > openvpn Client และลองเชื่อมต่อดู
10. เปิด Status File
root@np:/etc/openvpn/server# nano server.conf
status /var/log/openvpn/openvpn-status.log <—-เพิ่มบรรทัดนี้
status-version 3 <—-เพิ่มบรรทัดนี้
===SAVE===
สร้างโฟลเดอร์
root@np:/etc/openvpn/server# mkdir -p /var/log/openvpn
root@np:/etc/openvpn/server# chown nobody:nogroup /var/log/openvpn
root@np:/etc/systemd/system# systemctl daemon-reload
root@np:/etc/systemd/system# systemctl restart openvpn-server@server
ดู status การเชื่อมต่อแบบ Realtime
root@np:/var/log/openvpn# ls -l
total 4
-rw——- 1 root root 507 Jul 13 12:36 openvpn-status.log
root@np:/var/log/openvpn# tail -f openvpn-status.log
TITLE OpenVPN 2.6.14 x86_64-pc-linux-gnu [SSL (OpenSSL)] [LZO] [LZ4] [EPOLL] [PKCS11] [MH/PKTINFO] [AEAD] [DCO]
TIME 2026-07-13 12:36:13 1783920973
HEADER CLIENT_LIST Common Name Real Address Virtual Address Virtual IPv6 Address Bytes Received Bytes Sent Connected Since Connected Since (time_t) Username Client ID Peer ID Data Channel Cipher
HEADER ROUTING_TABLE Virtual Address Common Name Real Address Last Ref Last Ref (time_t)
GLOBAL_STATS Max bcast/mcast queue length 0
GLOBAL_STATS dco_enabled 0
END
e Real Address Last Ref Last Ref (time_t)
ROUTING_TABLE 172.16.16.2 macbook 171.100.89.168:63863 2026-07-13 12:36:41 1783921001
GLOBAL_STATS Max bcast/mcast queue length 0
GLOBAL_STATS dco_enabled 0
END
11. Logrotate
สร้างไฟล์
root@np:~# nano /etc/logrotate.d/openvpn
root@np:~# cat /etc/logrotate.d/openvpn
/var/log/openvpn/*.log {
daily
rotate 30
compress
missingok
notifempty
create 640 nobody nogroup
copytruncate
}
12. เปิด CRL (สำคัญมาก)
เวลาพนักงานลาออก ไม่ต้องเปลี่ยน CA
เพียง
./easyrsa revoke username
./easyrsa gen-crl
แล้ว
crl-verify crl.pem
13. Backup PKI
สิ่งที่ต้อง Backup
/etc/openvpn/easy-rsa/pki
โดยเฉพาะ
private/ca.key <— เก็บไว้ Offline
root@np:/etc/openvpn/easy-rsa/pki/private# ls -l
total 16
-rw——- 1 root root 1704 Jul 7 16:49 ca.key
-rw——- 1 root root 1704 Jul 7 16:55 client01.key
-rw——- 1 root root 1704 Jul 13 11:09 macbook.key
-rw——- 1 root root 1704 Jul 7 16:51 server.key
root@np:/etc/openvpn/easy-rsa/pki/private# cp ca.key /root
root@np:/etc/openvpn/easy-rsa/pki/private#
ติดตั้ง WireGuard บน Debian 13 (Trixie)
เช็คก่อนนะว่า ใช้ Linux Kernel Version อะไร
# ดู kernel version
uname -r
WireGuard ต้องการ 5.6+ และ module ถ้าไม่มี ต้อง upgrade kernel ก่อน
# ตรวจสอบ kernel ที่มีให้ติดตั้ง
apt search linux-image | grep amd64
# ติดตั้ง kernel ใหม่
apt install -y linux-image-amd64 linux-headers-amd64
# ตรวจสอบว่าติดตั้งสำเร็จ
dpkg -l | grep linux-image
แล้ว reboot:
หลัง reboot ตรวจสอบ kernel version ใหม่:
uname -r
# ควรได้ 6.x.x หรืออย่างน้อย 5.x.x
# ทดสอบ load module
modprobe wireguard
echo $? # ถ้าได้ 0 = สำเร็จ
ถ้า modprobe wireguard ผ่านแล้ว ค่อย:
systemctl enable –now wg-quick@wg0
Step 1: ติดตั้ง
apt update && apt install -y wireguard wireguard-tools
Step 2: สร้าง Key Pair บน Server
cd /etc/wireguard
umask 077
# Server keys
wg genkey | tee server_private.key | wg pubkey > server_public.key
# Client key (ทำซ้ำต่อ client)
wg genkey | tee client1_private.key | wg pubkey > client1_public.key
cat server_public.key # เก็บไว้ใส่ใน client config
cat client1_public.key # เก็บไว้ใส่ใน server config
ตรวจเช็คไฟล์ที่สร้าง
root@np:/etc/wireguard# ls
client1_private.key client1_public.key server_private.key server_public.key
root@np:/etc/wireguard# cat server_private.key
xxxxxxxxxxx(Server_Private Key)xxxxxxxxxxxxx
root@np:/etc/wireguard# cat client1_public.key
xxxxxxxxxxx(Client Public Key)xxxxxxxxxxxxx
GNU nano 8.x สร้างไฟล์ใหม่ /etc/wireguard/wg0.conf *
root@np:/etc/wireguard# cat wg0.conf
#EXAMPLE
#[Interface]
#Address = 10.10.10.11/24
#ListenPort = 51820
#PrivateKey = <server_private.key content>
# เปิด IP Forwarding (ถ้าต้องการ route traffic)
#PostUp = sysctl -w net.ipv4.ip_forward=1
#PostUp = iptables -A FORWARD -i wg0 -j ACCEPT
#PostDown = iptables -D FORWARD -i wg0 -j ACCEPT
# Client 1 – Laptop
#[Peer]
#PublicKey = <client1_public.key content>
#AllowedIPs = 10.10.10.111/32
# Client 2 – Phone
#[Peer]
#PublicKey = <client2_public.key content>
#AllowedIPs = 10.10.10.112/32
[Interface]
Address = 172.16.19.1/24
ListenPort = 51820
PrivateKey = xxxxxxxxxxx(Server_Private Key)xxxxxxxxxxxxx
PostUp = sysctl -w net.ipv4.ip_forward=1
PostUp = iptables -A FORWARD -i wg0 -j ACCEPT
PostDown = iptables -D FORWARD -i wg0 -j ACCEPT
# Client 1 – Laptop
[Peer]
PublicKey = xxxxxxxxxxx(Client Public Key)xxxxxxxxxxxxx
AllowedIPs = 172.16.19.10/32
ที่โปรแกรม WireGuard บน Client ให้ใส่ค่า Config นี้
[Interface]
Address = 172.16.19.10/24
PrivateKey = client1_private.key
[Peer]
PublicKey = server_public.key
Endpoint = public_ip:51820
AllowedIPs = 172.16.19.0/24
PersistentKeepalive = 25
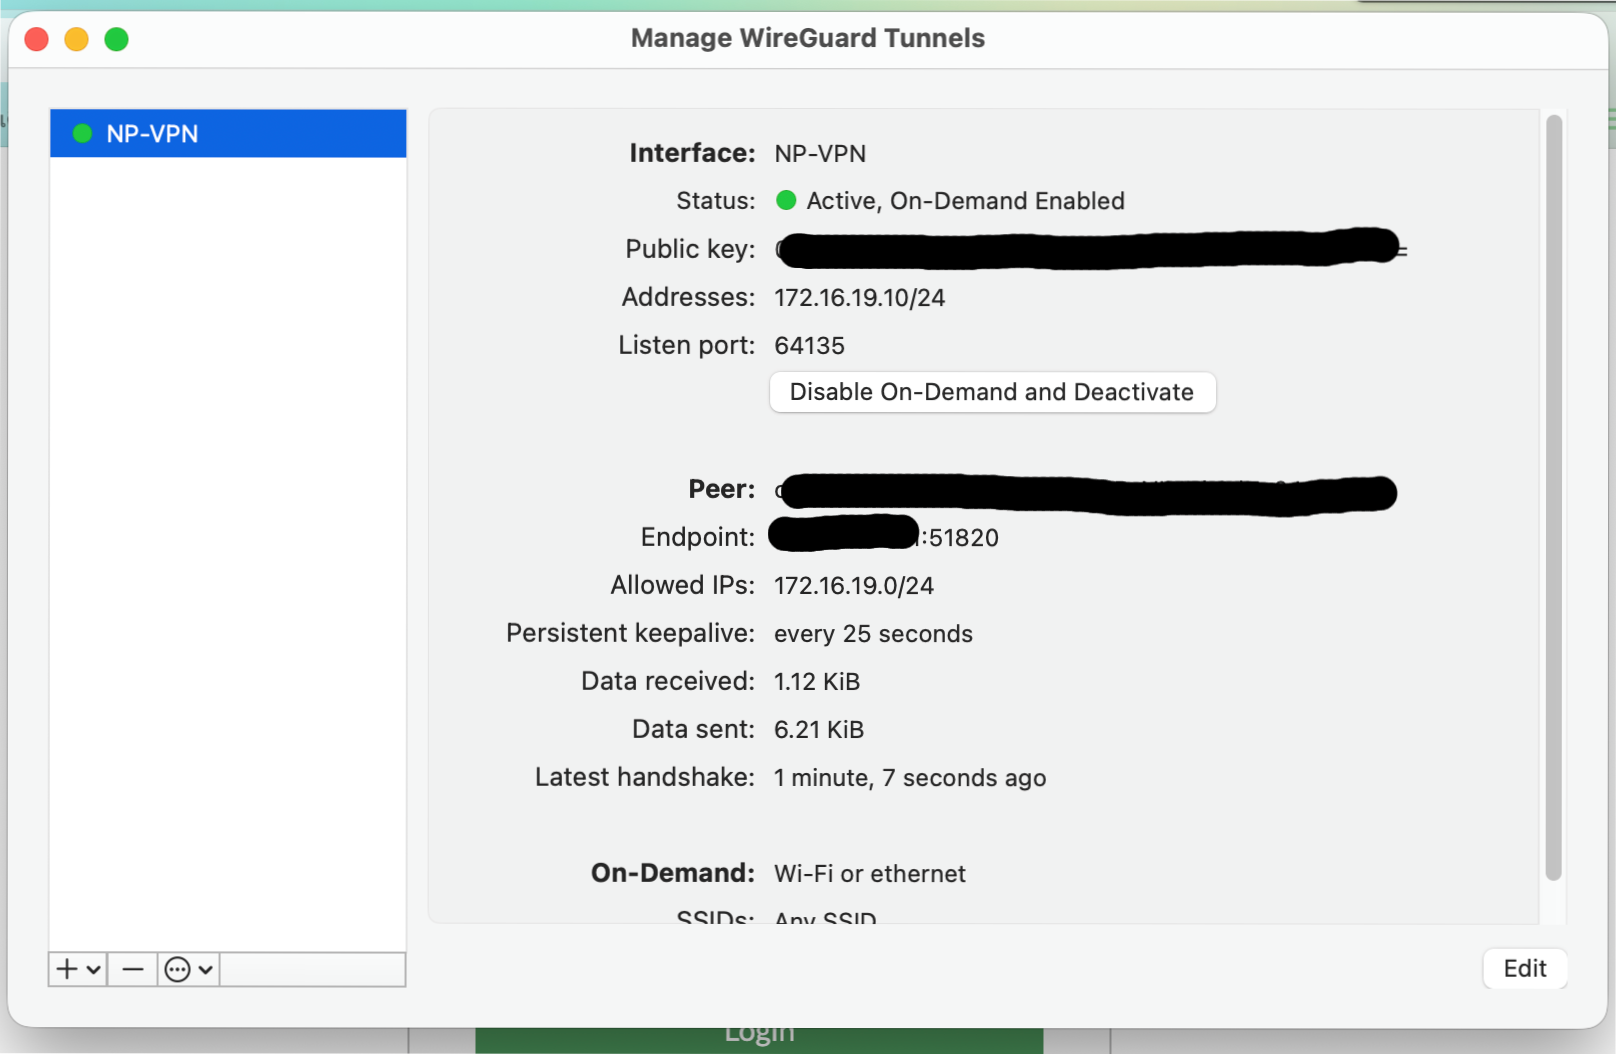
ลองกดเชื่อมต่อ (on) จะต้องต่อไปที่ Server ได้
จะเช็คได้ยังไงว่ามี Client เชื่อมต่อเข้ามา
ดู Client ที่ connect อยู่ทั้งหมด
ตัวอย่าง output ที่ควรเห็น:
root@np:/etc/wireguard# wg show
interface: wg0
public key: xxxxxx
private key: (hidden)
listening port: 51820
peer: xxxxx
endpoint: x.x.x.x:64135 ← IP จริงของ client
allowed ips: 172.16.19.10/32
latest handshake: 2 minutes ago ← ถ้าเห็นนี้ = connected
transfer: 12.38 KiB received, 3.65 KiB sent
ถ้า ไม่เห็น latest handshake = client ยังไม่ได้ connect
เช็ค ping ไปหา client
# ping ไปที่ VPN IP ของ client
ping 172.16.19.10
root@np:/etc/wireguard# iptables -I INPUT 1 -i wg0 -j ACCEPT (เพิ่มกฏนี้ให้สามารถ ping จาก Client ไปยัง Server ได้)
ลอง Netstat -lntup ควรที่จะเห็น
root@np:/etc/wireguard# netstat -lntup
Active Internet connections (only servers)
Proto Recv-Q Send-Q Local Address Foreign Address State PID/Program name
udp 0 0 0.0.0.0:51820 0.0.0.0:* –
สาเหตุที่ netstat แสดง – เพราะ WireGuard ใช้ kernel module โดยตรง (wireguard.ko) ไม่มี userspace daemon ที่จะโชว์ใน process list เหมือน Program อื่น ถือว่าปกติ 100%
สร้าง Key หลาย Client พร้อมกันเลย
cd /etc/wireguard
# สร้างทีเดียว 5 client
for i in 1 2 3 4 5; do
wg genkey | tee client${i}_private.key | wg pubkey > client${i}_public.key
echo “Client $i Public Key: $(cat client${i}_public.key)”
done
เพิ่ม Peer ใน wg0.conf
cat >> /etc/wireguard/wg0.conf << EOF
# Client 2 – Phone
[Peer]
PublicKey = $(cat /etc/wireguard/client2_public.key)
AllowedIPs = 172.16.19.11/32
# Client 3 – Office PC
[Peer]
PublicKey = $(cat /etc/wireguard/client3_public.key)
AllowedIPs = 172.16.19.12/32
# Client 4
[Peer]
PublicKey = $(cat /etc/wireguard/client4_public.key)
AllowedIPs = 172.16.19.13/32
# Client 5
[Peer]
PublicKey = $(cat /etc/wireguard/client5_public.key)
AllowedIPs = 172.16.19.14/32
EOF
reload โดยไม่ต้อง restart:
# หรือ
systemctl reload wg-quick@wg0
ย้ายเครื่องจาก VMWARE ESXI -> Proxmox
1. เช็คไฟล์ VM Guest ที่จะต้องย้าย นามสกุล *.vmdk
[teee@localhost:~] cd vmfs/
[teee@localhost:/vmfs] ls
devices volumes
[teee@localhost:/vmfs] cd volumes/
[teee@localhost:/vmfs/volumes] ls
11406870-47d1d00d-7d43-5e77c5881669 60f42150-f34e061e-5126-b8cb29a73d0c 81683070-2aaffa8e-91f8-d999fb12eebc
60f4212b-9ac26bf6-1a7d-b8cb29a73d0c 60f42159-83cd1070-e23d-b8cb29a73d0c datastore1
[teee@localhost:/vmfs/volumes] cd datastore1/
[teee@localhost:/vmfs/volumes/60f42150-f34e061e-5126-b8cb29a73d0c] ls -l
total 40
drwxr-xr-x 1 root root 1120 Apr 27 06:16 APPS_AI_Tableau
drwxr-xr-x 1 root root 2800 Jan 26 08:52 OracleVM
drwxr-xr-x 1 root root 420 Mar 31 02:10 iso
drwxr-xr-x 1 root root 560 Apr 1 2025 wiorcl19c
drwxr-xr-x 1 root root 2940 Mar 30 09:01 wishare
[teee@localhost:/vmfs/volumes/60f42150-f34e061e-5126-b8cb29a73d0c] cd APPS_AI_Tableau/
[teee@localhost:/vmfs/volumes/60f42150-f34e061e-5126-b8cb29a73d0c/APPS_AI_Tableau] ls -l
total 524290056
-rw——- 1 root root 536870912000 Apr 27 06:16 APPS_AI_Tableau-flat.vmdk
-rw——- 1 root root 8684 Apr 27 06:16 APPS_AI_Tableau.nvram
-rw——- 1 root root 534 Mar 31 06:46 APPS_AI_Tableau.vmdk
-rw-r–r– 1 root root 0 Mar 31 06:36 APPS_AI_Tableau.vmsd
-rwxr-xr-x 1 root root 3023 Apr 27 06:16 APPS_AI_Tableau.vmx
-rw-r–r– 1 root root 302242 Apr 27 06:16 vmware.log
[teee@localhost:/vmfs/volumes/60f42150-f34e061e-5126-b8cb29a73d0c/APPS_AI_Tableau]
2. ssh เข้าไปที่เครื่อง Proxmox และ scp เพื่อ Copy ข้ามเครื่องมาจาก VmWare
root@server2:/mnt/sda1/images/TableAU-APPS-AI# scp teee@192.168.100.101:/vmfs/volumes/datastore1/APPS_AI_Tableau/*.vmdk .
(teee@192.168.100.101) Password:
APPS_AI_Tableau-flat.vmdk 12% 63GB 102.1MB/s 1:13:00 ETA
3.เช็คข้อมูลว่า Harddisk Data ที่ Copy มาเป็น Thick หรือ Thin Provisioning ถ้าเป็น Thick ควรแปลงให้เป็น Thin ก่อน(ใช้เท่าที่ใช้จริง)
ใช้ qemu-img convert (ดีที่สุด)
วิธีนี้จะ “บีบขนาดตาม data จริง” ให้เลย
qemu-img convert -f vmdk APPS_AI_Tableau.vmdk -O qcow2 disk.qcow2
📌 ผลลัพธ์:
จาก 563GB → เหลือเท่าที่ใช้จริง เช่น 80GB
ได้ไฟล์แบบ thin
root@server2:/mnt/sda1/images/TableAU-APPS-AI# qemu-img convert -f vmdk APPS_AI_Tableau.vmdk -O qcow2 disk.qcow2
การ Convert แบบนี้อาจจะใช้เวลานานตามขนาด Harddisk เราสามารถ Import .vmdk เข้าไปที่ Proxmox ได้เลย
Import เข้า local-lvm
แม้จะ “ไม่ convert เอง” แต่ Proxmox จะจัดการให้ตอน import
#qm importdisk 200 APPS_AI_Tableau.vmdk local-lvm
Proxmox จะอ่าน .vmdk
แล้วเขียนเข้า LVM (เป็น raw)
ใช้งานได้ทันที
✔ ไม่ต้อง convert เอง
✔ ใช้กับ local-lvm ได้ดีที่สุด
❗ แต่ใช้เวลา “พอ ๆ กับ convert” (เพราะต้อง copy 500GB อยู่ดี)
root@server2:/mnt/sda1/images/TableAU-APPS-AI# qm importdisk 200 APPS_AI_Tableau.vmdk local-lvm Configuration file ‘nodes/server2/qemu-server/200.conf’ does not exist
หมายถึง ยังไม่ได้สร้าง VM ID 200 ใน Proxmox VE
วิธีแก้ (ทำก่อน import)สร้าง VM เปล่า
#qm create 200 –name tableau –memory 8192 –cores 4 –net0 virtio,bridge=vmbr0
แค่ create เฉย ๆ ยังไม่ต้องมี disk
แล้วค่อย import ใหม่
#qm importdisk 200 APPS_AI_Tableau.vmdk local-lvm
เสร็จแล้วเพิ่ม Disk
#qm set 200 –scsihw virtio-scsi-pci –scsi0 local-lvm:vm-200-disk-0
#qm set 200 –boot order=scsi0
สังเกตถ้ามีขึ้นข้อความ
update VM 200: -scsi0 local-lvm:vm-200-disk-0 -scsihw virtio-scsi-pci
update VM 200: -boot order=scsi0
ถือว่าเรียบร้อยแล้ว 100%
Disk ถูก attach + ตั้ง boot ถูกต้องใน Proxmox VE แล้ว
สิ่งที่ต้องระวัง
1. MAC ซ้ำใน network
👉 ถ้ามีเครื่องอื่นใช้ MAC นี้อยู่ → network พังทันที
2. OS ภายในอาจจำ MAC เก่า
Windows:
อาจมองเป็น “network ใหม่”
IP หาย / profile เปลี่ยน
Linux:เช็ค:
#ip a
3. ต้องการใช้ MAC เดิม. BC:24:xx:96:xx:9D
ใช้คำสั่ง
#qm set 200 –net0 virtio=BC:24:xx:96:xx:9D,bridge=vmbr0
สรุป
> ใช้ qm set เปลี่ยนได้ทันที
> restart แล้วใช้งานได้เลย
> ตรวจสอบ IP / network ในเครื่องอีกที
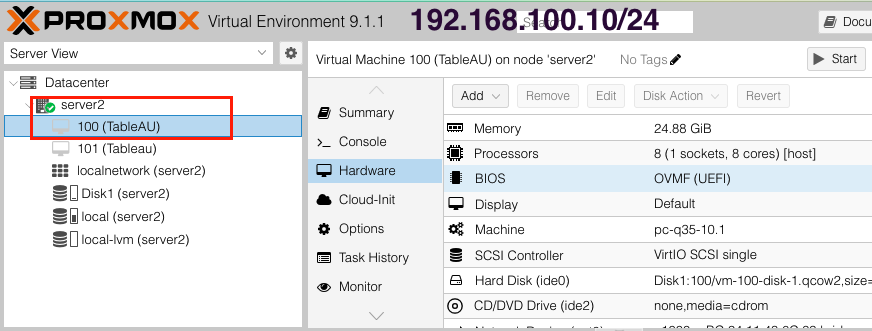
ย้ายเครื่อง VM Guest Proxmox ข้าม Server
Server ต้นทาง
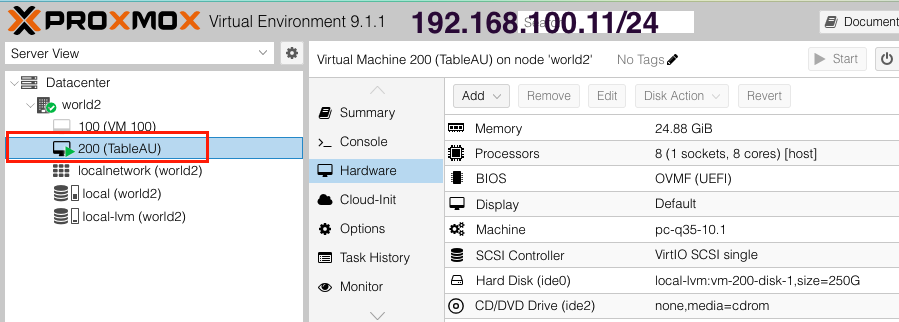
Server ปลายทาง
ที่ Server ต้นทางเช็คเครื่องที่จะย้ายก่อนว่าเครื่องไหน

root@server2:~# qm list
VMID NAME STATUS MEM(MB) BOOTDISK(GB) PID
100 TableAU running 25480 250.00 1374 <– ย้ายเครื่อง VMID 100
101 Tableau stopped 25480 250.00 0
STEP 1: Backup
root@server2:~# vzdump 100 –mode stop –compress zstd
กันพลาด ใส่ storage ให้ชัดเจน:
root@server2:~# vzdump 100 –mode stop –compress zstd –storage local
จะเก็บไว้ที่ local แน่นอน
มันทำอะไรบ้าง
⛔ หยุด VM 100 ชั่วคราว
💾 backup disk ทั้งหมด (รวม EFI + TPM)
📦 บีบอัดเป็นไฟล์ .vma.zst
▶️ เสร็จแล้ว VM จะ กลับมารันต่อ
root@server2:~# vzdump 100 –mode stop –compress zstd –storage local
INFO: starting new backup job: vzdump 100 –storage local –mode stop –compress zstd
INFO: Starting Backup of VM 100 (qemu)
INFO: Backup started at 2026-04-27 10:03:56
INFO: status = stopped
INFO: backup mode: stop
INFO: ionice priority: 7
INFO: VM Name: TableAU
INFO: include disk ‘ide0’ ‘Disk1:100/vm-100-disk-1.qcow2’ 250G
INFO: include disk ‘efidisk0’ ‘Disk1:100/vm-100-disk-0.qcow2’ 528K
INFO: include disk ‘tpmstate0’ ‘Disk1:100/vm-100-disk-2.qcow2’ 4M
INFO: creating vzdump archive ‘/var/lib/vz/dump/vzdump-qemu-100-2026_04_27-10_03_56.vma.zst’
INFO: starting kvm to execute backup task
swtpm_setup: Not overwriting existing state file.
INFO: attaching TPM drive to QEMU for backup
INFO: started backup task ‘7e9bf25f-9c27-4947-97bc-2f9c950569e1’
INFO: 0% (147.2 MiB of 250.0 GiB) in 3s, read: 49.1 MiB/s, write: 16.9 MiB/s
INFO: 1% (2.5 GiB of 250.0 GiB) in 1m 58s, read: 21.2 MiB/s, write: 20.4 MiB/s
INFO: 2% (5.0 GiB of 250.0 GiB) in 3m 56s, read: 21.6 MiB/s, write: 21.5 MiB/s
INFO: 3% (7.5 GiB of 250.0 GiB) in 5m 24s, read: 29.2 MiB/s, write: 29.1 MiB/s
INFO: 4% (10.0 GiB of 250.0 GiB) in 6m 41s, read: 33.3 MiB/s, write: 33.2 MiB/s
INFO: 5% (12.6 GiB of 250.0 GiB) in 8m 23s, read: 25.7 MiB/s, write: 24.8 MiB/s
……..
INFO: 73% (183.0 GiB of 250.0 GiB) in 1h 12m 44s, read: 8.8 GiB/s, write: 0 B/s
INFO: 84% (210.0 GiB of 250.0 GiB) in 1h 12m 47s, read: 9.0 GiB/s, write: 0 B/s
INFO: 94% (237.0 GiB of 250.0 GiB) in 1h 12m 50s, read: 9.0 GiB/s, write: 0 B/s
INFO: 99% (249.6 GiB of 250.0 GiB) in 1h 12m 53s, read: 4.2 GiB/s, write: 44.2 MiB/s
INFO: 100% (250.0 GiB of 250.0 GiB) in 1h 13m 5s, read: 34.1 MiB/s, write: 27.7 MiB/s
INFO: backup is sparse: 163.40 GiB (65%) total zero data
INFO: transferred 250.00 GiB in 4385 seconds (58.4 MiB/s)
INFO: stopping kvm after backup task
INFO: archive file size: 36.49GB
INFO: Finished Backup of VM 100 (01:13:06)
INFO: Backup finished at 2026-04-27 11:17:02
INFO: Backup job finished successfully
INFO: notified via target `mail-to-root`
ไฟล์ที่ได้
จะอยู่ที่: /var/lib/vz/dump/
root@server2:~# cd /var/lib/vz/dump/
root@server2:/var/lib/vz/dump# ls -l
total 46025300
-rw-r–r– 1 root root 2132 Apr 27 09:36 vzdump-qemu-100-2026_04_27-09_19_05.log
-rw-r–r– 1 root root 743 Apr 27 09:57 vzdump-qemu-100-2026_04_27-09_47_41.log
-rw-r–r– 1 root root 5863 Apr 27 11:17 vzdump-qemu-100-2026_04_27-10_03_56.log
-rw-r–r– 1 root root 39180988248 Apr 27 11:17 vzdump-qemu-100-2026_04_27-10_03_56.vma.zst
⏱️ หมายเหตุ
VM จะ ดับระหว่าง backup (ระยะเวลาขึ้นกับขนาด disk)
ของคุณ 250GB → ประมาณ 20–60 นาที (แล้วแต่ disk)
STEP 2: ส่งไฟล์ไปเครื่องปลายทาง
บนเครื่องต้นทาง (server2) รัน:
root@server2:/var/lib/vz/dump# scp /var/lib/vz/dump/vzdump-qemu-100-*.vma.zst root@192.168.100.11:/var/lib/vz/dump/
The authenticity of host ‘192.168.100.11 (192.168.100.11)’ can’t be established.
👉 จะให้ใส่ password ของ root ฝั่งปลายทาง
root@192.168.100.11’s password:
vzdump-qemu-100-2026_04_27-10_03_56.vma.zst 100% 36GB 112.0MB/s 05:33
STEP 3: Restore ที่เครื่อง 192.168.100.11
SSH เข้าเครื่องปลายทาง:
ssh root@192.168.100.11
แล้วรัน:
root@world2:/var/lib/vz/dump# ls -l
total 38262688
-rw-r–r– 1 root root 39180988248 Apr 27 11:26 vzdump-qemu-100-2026_04_27-10_03_56.vma.zst
root@world2:/var/lib/vz/dump# qmrestore /var/lib/vz/dump/vzdump-qemu-100-*.vma.zst 100 –storage local-lvm
unable to restore VM 100 – VM 100 already exists on node ‘world2’. <–VMID (จากที่ Copy มาจากเครื่องเก่าหมายเลข 100 มีอยู่แล้วต้องเปลี่ยนชื่อใหม่เพื่อ Restore)
root@world2:/var/lib/vz/dump# qmrestore /var/lib/vz/dump/vzdump-qemu-100-*.vma.zst 200 –storage local-lvm
restore vma archive: zstd -q -d -c /var/lib/vz/dump/vzdump-qemu-100-2026_04_27-10_03_56.vma.zst | vma extract -v -r /var/tmp/vzdumptmp649754.fifo – /var/tmp/vzdumptmp649754
CFG: size: 745 name: qemu-server.conf
DEV: dev_id=1 size: 540672 devname: drive-efidisk0
DEV: dev_id=2 size: 268435456000 devname: drive-ide0
DEV: dev_id=3 size: 4194304 devname: drive-tpmstate0-backup
CTIME: Mon Apr 27 10:03:57 2026
Rounding up size to full physical extent 4.00 MiB
Logical volume “vm-200-disk-0” created.
Logical volume pve/vm-200-disk-0 changed.
new volume ID is ‘local-lvm:vm-200-disk-0’
Logical volume “vm-200-disk-1” created.
Logical volume pve/vm-200-disk-1 changed.
new volume ID is ‘local-lvm:vm-200-disk-1’
Logical volume “vm-200-disk-2” created.
Logical volume pve/vm-200-disk-2 changed.
new volume ID is ‘local-lvm:vm-200-disk-2’
map ‘drive-efidisk0’ to ‘/dev/pve/vm-200-disk-0’ (write zeros = 0)
map ‘drive-ide0’ to ‘/dev/pve/vm-200-disk-1’ (write zeros = 0)
map ‘drive-tpmstate0-backup’ to ‘/dev/pve/vm-200-disk-2’ (write zeros = 0)
progress 1% (read 2684420096 bytes, duration 2 sec)
progress 2% (read 5368840192 bytes, duration 4 sec)
progress 3% (read 8053260288 bytes, duration 6 sec)
………………………………………………
progress 98% (read 263071399936 bytes, duration 73 sec)
progress 99% (read 265755820032 bytes, duration 73 sec)
progress 100% (read 268440174592 bytes, duration 74 sec)
total bytes read 268440240128, sparse bytes 175452459008 (65.4%)
space reduction due to 4K zero blocks 0.864%
rescan volumes…
VM 200 (efidisk0): size of disk ‘local-lvm:vm-200-disk-0’ updated from 528K to 4M
ความหมาย:
restore VM จาก backup
สร้างเป็น VMID 200 (ไม่ชนของเดิม)
disk จะไปอยู่ที่ local-lvm (pve-data)
หลัง restore เสร็จ ทำต่อเลย
ต้องเห็น:
200 TableAU stopped
root@world2:/var/lib/vz/dump# qm list
VMID NAME STATUS MEM(MB) BOOTDISK(GB) PID
100 VM 100 stopped 512 0.00 0
200 TableAU stopped 25480 250.00 0
root@world2:/var/lib/vz/dump# qm config 200
bios: ovmf
boot: order=ide0;ide2;net0
cores: 8
cpu: host
efidisk0: local-lvm:vm-200-disk-0,efitype=4m,ms-cert=2023,pre-enrolled-keys=1,size=4M
ide0: local-lvm:vm-200-disk-1,size=250G
ide2: none,media=cdrom
machine: pc-q35-10.1
memory: 25480
meta: creation-qemu=10.1.2,ctime=1771858213
name: TableAU
net0: e1000e=BC:24:11:43:6C:83,bridge=vmbr0,firewall=1
numa: 0
onboot: 1
ostype: win11
scsihw: virtio-scsi-single
smbios1: uuid=14f129dc-b684-49fd-a31c-46e3d9b4e4c8
sockets: 1
tpmstate0: local-lvm:vm-200-disk-2,size=4M,version=v2.0
vmgenid: 4d63fc51-7113-4f7b-b63d-b925295f4ef3
เปิด VM
qm start 200
⚠️ ถ้าเปิดแล้วมีปัญหา
❌ Boot ไม่ขึ้น
ลอง:
qm set 200 –cpu x86-64-v2-AES
❌ เน็ตไม่ออก
เช็ค:
ip a
👉 ต้องมี vmbr0
ถ้าไม่ตรง:
qm set 200 –net0 e1000e,bridge=vmbr0
🔥 สรุป
✔️ คำสั่งคุณถูกต้อง 100%
✔️ ใช้ ID 200 กันชน
✔️ Restore เสร็จ = เปิดใช้งานได้เลย
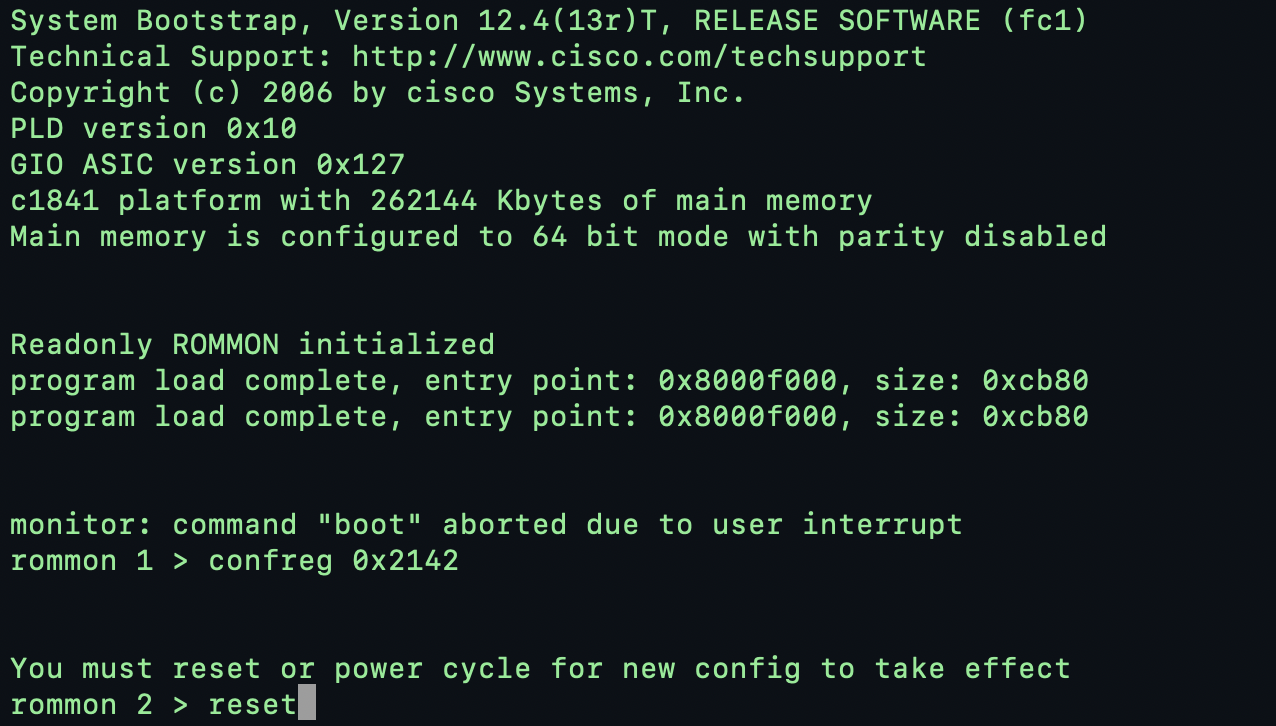
Reset Password กรณีลืม Password Cisco Router
1. เข้า Rommon ให้ได้
1.1 ปิด Router (ถอดไฟ)
1.2 เปิดใหม่ แล้ว กด Ctrl + Break ทันที
บน Mac + screen บางทีต้องใช้:
• Ctrl + A แล้วกด B
หรือ
• Ctrl + A → Ctrl + B
SecureCRT ( Menu –Edit -> SendBreak)
rommon 1 >
จากนั้นพิมพ์ Code ตามตัวอย่าง
rommon 1 > confreg 0x2142
rommon 2 > reset
2.เข้า Router โดยไม่ต้องใช้รหัสผ่าน
หลังจาก Router รีบู๊ตเสร็จจะถามว่าให้ใช้ค่าเริ่มต้นคอนฟิคไหม ตอบ NO
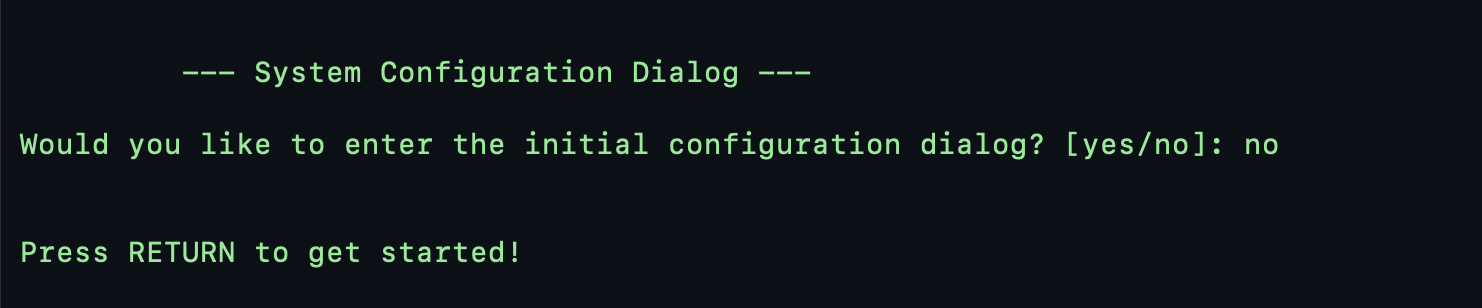
เสร็จแล้วรอสักครู่ เข้า Router แล้ว
#enable
Router#copy startup-config running-config <- Copy Config เดิมกลับมาก่อน กด Enter ไปเลย

ทีนี้ตั้งค่าใหม่ตามที่เราต้องการ
#conf t
enable secret NEWPASSWORD
line console 0
password NEWPASSWORD
login
line vty 0 4
password NEWPASSWORD
login
end

ตั้งค่า config-register กลับเป็นปกติ (สำคัญมาก)
configure terminal
config-register 0x2102
end
show version
จะเห็นบรรทัด:
Configuration register is 0x2102

เสร็จแล้ว Reload ก็จะรีบู๊ตเร้าเตอร์เข้าสู่ Mode ปกติ ตรวจเช็คหลังจากที่เปลี่ยนรหัสผ่านใหม่แล้ว
วิธีทำ DDNS ไว้ใช้งานเอง
สืบเนื่องจากว่าอยากจะลองทำ ddns ไว้ใช้งานเองไม่อยากจะสมัครใช้งานของ noip,dyndns หรืออื่นๆ ซึ่งลิมิตใช้งานต้องเสียตังค์ ก็เลยคิดว่าอยากจะทำเอง อีกทั้งมี domain ที่มีอยู่แล้ว อยากให้มีชื่อ domain ของเราเองต่อท้ายแบบโก้ๆ เลยไปหาวิธีทำมา ถามวิธีการจาก ChatGPT
มันเวิร์กดีก็เลยอยากจะเอามาแชร์ มีวิธีการดังนี้
1. จดโดเมน (khun-teee.com) ซึ่งเราจะไม่เข้าไปยุ่ง nameserver หลัก อยากจะทำ subdomain ย่อยขึ้นมาโดย delegation ไปที่อีก server โดยตั้งชื่อ domain ย่อยว่า ddns.khun-teee.com. และเวลาใช้งานจริงจะมีรูปแบบ url แบบนี้ (server).ddns.khun-teee.com:(สามารถระบุพอร์ทได้ด้วย)
2. มี server dns เอง โดยติดตั้ง bind server
3. ที่เครื่อง Client มี Script เช็ค Public IP ของตัวเองแล้วส่งไปอัพเดทที่ bind ได้ใช้ ddns-key
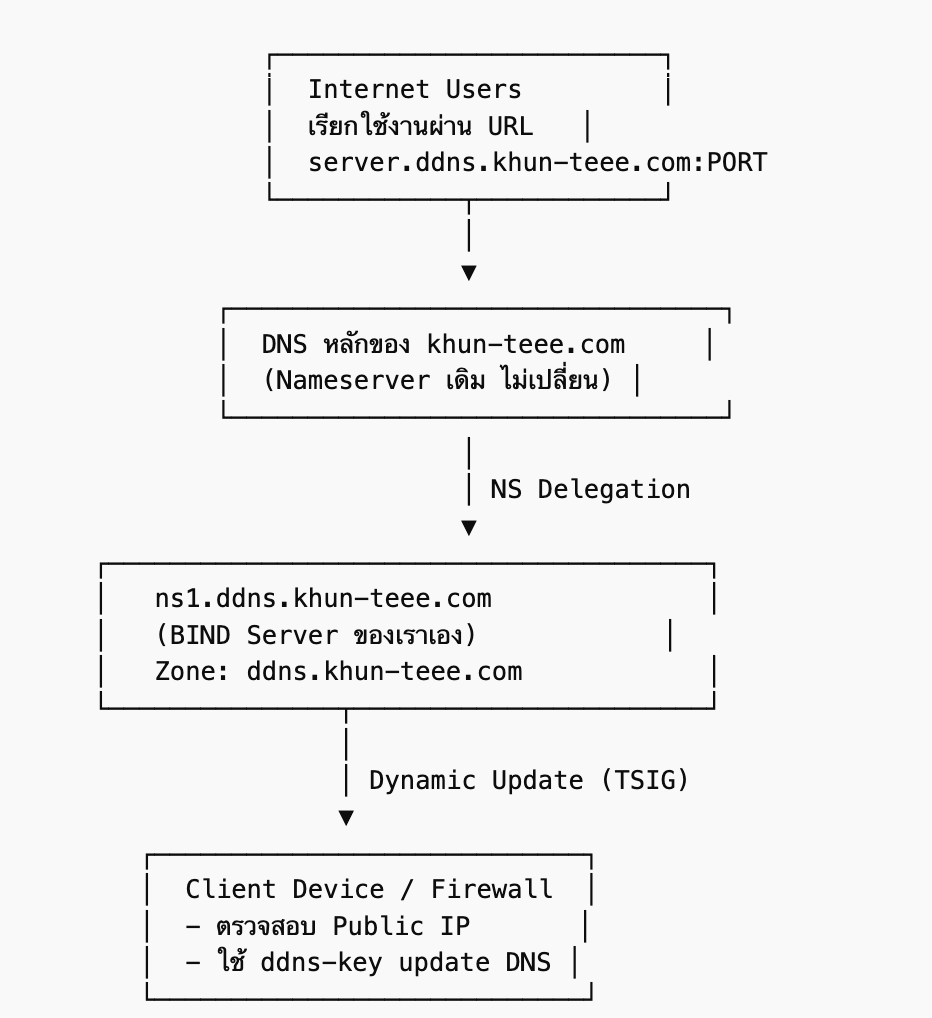
1) ขั้นแรกให้ไปที่ DNS Provider ที่เราจดทะเบียนอยู่ ที่ Record ของ DNS ให้ทำการเพิ่ม Record ดังนี้
1. name (ddns) type(ns) Variable (ns1.ddns.khun-teee.com)
2. name (ns1.ddns.khun-teee.com.). type (A) Variable (Your Public IP Address)
2) ขั้นที่สองติดตั้ง bind server
apt update
apt install bind9 bind9-utils bind9-dnsutils -y
อย่าลืมติดตั้ง webmin ด้วยเพื่อที่จะสามารถเข้าไปแก้ไข Record และสามารถเช็คจากหน้าเว็บได้ (ลองหาวิธีติดตั้งจากในเว็บ)
จาก Webmin ไปสร้าง New Master Zone. ddns.khun-teee.com
$ORIGIN .
$TTL 3600 ; 1 hour
ddns.khun-teee.com IN SOA ns1.ddns.khun-teee.com (your servername) (
2026022515 ; serial
3600 ; refresh (1 hour)
600 ; retry (10 minutes)
1209600 ; expire (2 weeks)
3600 ; minimum (1 hour)
)
NS ns1.ddns.khun-teee.com.
A xxx.xxx.xxx.xxx (แทน xxx ด้วย public ip)
$ORIGIN ddns.khun-teee.com.
$TTL 300 ; 5 minutes
สร้าง ddns-key วิธีสร้าง ddns-key (TSIG) สำหรับ BIND บน Linux
#tsig-keygen -a hmac-sha256 ddns-key
จะได้ผลลัพธ์ประมาณนี้:
key “ddns-key” {
algorithm hmac-sha256;
secret “AbCdEfGhIjKlMnOpQrStUvWxYz1234567890=”;
};
จากนั้น บันทีกลงในไฟล์
#nano /etc/bind/ddns.key
วางเนื้อหาผลลัพธ์จากข้างบนที่ได้ลงไป กดเซฟ
#nano /etc/bind/named.conf.local
จะได้ประมาณนี้
zone “ddns.khun-teee.com” {
type master;
file “/var/lib/bind/ddns.khun-teee.com.hosts”;
allow-update {
key “ddns-key.”;
};
allow-transfer { none; };
};
เช็คความถูกต้องของ named config และ Restart
#named-checkconf
#systemctl restart bind9
#netstat -lntup (ตรวจดูด้วยว่ามีพอร์ท 53 รันอยู่ไหม)
จากนั้นให้เข้าไปหน้า webmin และลองสร้าง Record เพื่อทดสอบ
เลือก zone > ddns.khun-teee.com ที่ได้สร้างไว้

ลองเพิ่ม record ตามนี้ดูก่อน เมื่อสร้างเสร็จจะเห็น record test.ddns.khun-teee.com. ip:0.0.0.0
จากนั้นเราจะลองเทส Update Record ดูจะเครื่อง localhost server ว่า สามารถอัพเดทได้หรือไม่
เขียน script
#nano test-bind.txt
server 127.0.0.1
zone ddns.khun-teee.com
update delete test.ddns.khun-teee.com. A
update add test.ddns.khun-teee.com. 300 A 5.5.5.5
send
(กด Ctrl+x)Y เพื่อ Save
เปิด terminal อีก session เพื่อ monitor แบบ realtime ว่าสามารถอัพเดทได้ไหม
#journalctl -u named -f
#journalctl -u named -p err -f
ทดสอบรันคำสั่งอัพเดท โดยจะลอง Update IP 5.5.5.5 ไปแทนที่ 0.0.0.0 ที่ record test.ddns.khun-teee.com. ip:0.0.0.0
#nsupdate -k /etc/bind/ddns.key test-bind.txt
จะเจอข้อความประมาณนี้ที่หน้า realtime monitor log
Feb 25 13:15:27 xxxx named[648512]: client @0x7f08fad68098 127.0.0.1#36654/key ddns-key: signer “ddns-key” approved
Feb 25 13:20:42 xxxx named[648512]: client @0x7f08fad68098 127.0.0.1#41311/key ddns-key: signer “ddns-key” approved
Feb 25 13:20:42 xxxx named[648512]: client @0x7f08fad68098 127.0.0.1#41311/key ddns-key: updating zone ‘ddns.khun-teee.com/IN’: deleting rrset at ‘test.ddns.khun-teee.com’ A
Feb 25 13:20:42 xxxx named[648512]: client @0x7f08fad68098 127.0.0.1#41311/key ddns-key: updating zone ‘ddns.khun-teee.com/IN’: adding an RR at ‘test.ddns.khun-teee.com’ A 5.5.5.5
Feb 25 13:20:42 xxxx named[648512]: client @0x7f08fad68098 127.0.0.1#38232/key ddns-key: signer “ddns-key” approved
แสดงว่าอัพเดทถูกแล้ว
ลองเช็คจากคำสั่ง
CheckUpdate
root@server# dig NS test.ddns.khun-teee.com
root@server# dig @127.0.0.1 test.ddns.khun-teee.com +norecurse
root@server# dig @8.8.8.8 test.ddns.khun-teee.com
3) จากนั้นไปเขียนสคริปต์ให้อัพเดทที่เครื่อง Client ที่ต้องการใช้งาน
3.1 สร้างไฟล์ TSIG key บนเครื่อง Client
#sudo nano /etc/ddns.key
เป็น Key ตัวเดียวกันที่เราสร้างไว้ฝั่ง Server
key “ddns-key” {
algorithm hmac-sha256;
secret “AbCdEfGhIjKlMnOpQrStUvWxYz1234567890=”;
};
#sudo chmod 600 /etc/ddns.key
3.2) สร้าง script update
#sudo nano ddns-update.sh
#!/bin/bash
#############################################
# Dynamic DNS Update Script (TSIG Secure)
#############################################
DNS_SERVER=”ns1.ddns.khun-teee.com”
ZONE=”ddns.khun-teee.com”
RECORD=”test.ddns.khun-teee.com”
KEYFILE=”/etc/ddns.key”
TTL=”300″
LOGFILE=”/var/log/ddns-client.log”
# ===== Function: Write Log =====
log() {
echo “$(date ‘+%Y-%m-%d %H:%M:%S’) – $1” >> $LOGFILE
}
# ===== Detect Public IP =====
CURRENT_IP=$(curl -4 -s –max-time 10 https://api.ipify.org)
if [[ -z “$CURRENT_IP” ]]; then
log “ERROR: Cannot detect public IP”
exit 1
fi
# ===== Get Current DNS IP =====
DNS_IP=$(dig @$DNS_SERVER +short $RECORD A)
# ===== Compare IP =====
if [[ “$CURRENT_IP” == “$DNS_IP” ]]; then
log “No change. Current IP is still $CURRENT_IP”
exit 0
fi
log “IP changed: $DNS_IP → $CURRENT_IP”
log “Sending update to DNS server…”
# ===== Send Update =====
nsupdate -k $KEYFILE << EOF
server $DNS_SERVER
zone $ZONE
update delete $RECORD A
update add $RECORD $TTL A $CURRENT_IP
send
EOF
# ===== Verify Update =====
sleep 2
NEW_DNS_IP=$(dig @$DNS_SERVER +short $RECORD A)
if [[ “$NEW_DNS_IP” == “$CURRENT_IP” ]]; then
log “SUCCESS: DNS updated to $CURRENT_IP”
else
log “ERROR: DNS update failed (Expected: $CURRENT_IP, Got: $NEW_DNS_IP)”
exit 1
fi
exit 0
เสร็จแล้ว(กด Ctrl+x)Y เพื่อ Save
#sudo chmod +x ddns-update.sh
ทดลองรัน
#./ddns-update.sh
#tail -f /var/log/ddns-client.log
2026-02-25 13:58:37 – IP changed: 5.5.5.5 → (public ip)
2026-02-25 13:58:37 – Sending update to DNS server…
2026-02-25 13:58:41 – SUCCESS: DNS updated to (public ip)
แสดงว่า DNS เราอัพเดทแล้ว ตั้งเวลา cron job ให้เช็ค IP ทุก 5 นาที หรือนานกว่านั้นก็ได้
#crontab -e
*/5 * * * * /home/teee/ddns-update.sh
4) ให้ IP เราออกเข้าจากเน็ทได้
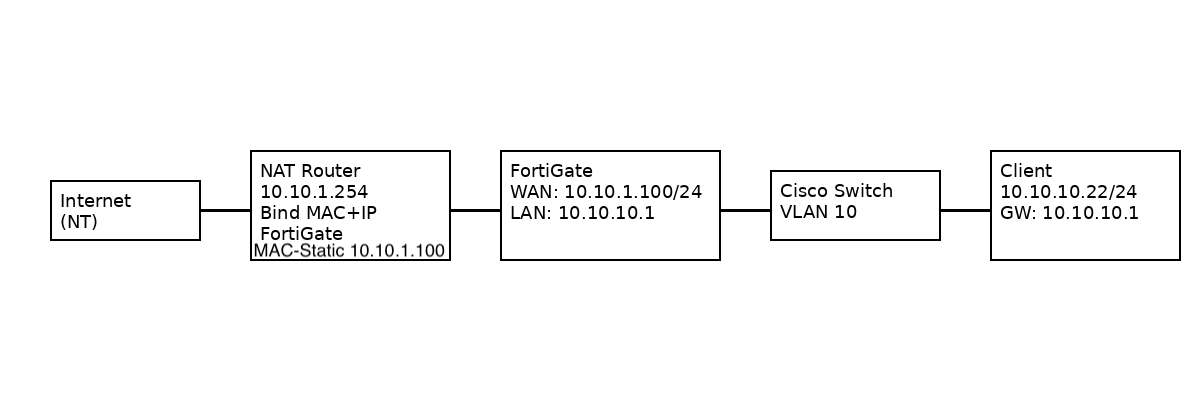
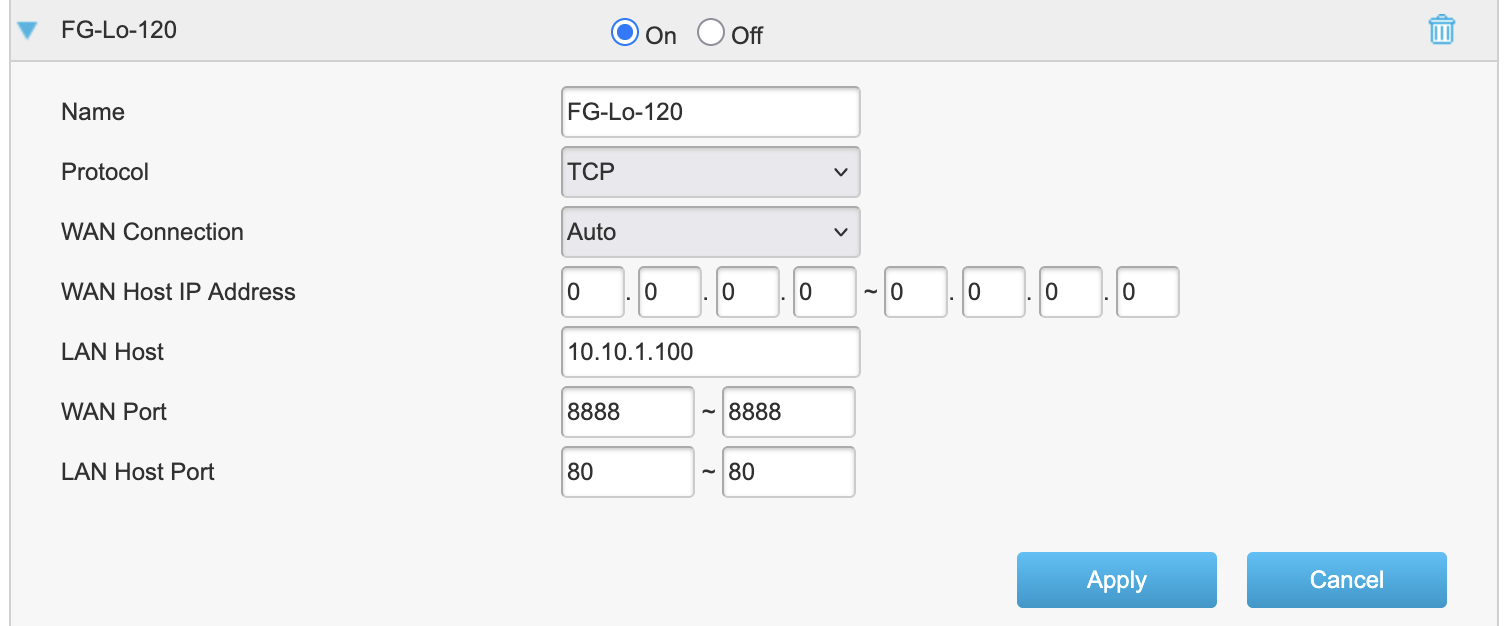
สมมติว่า IP เครื่อง Client เรา 10.10.10.120 อยากจะให้เข้าเว็บระบุพอร์ท http://test.ddns.khun-teee.com:8888
ขั้นแรกให้ไปตั้งค่า Forward port ที่ Router ให้ Forward ไปที่ขานอกของ Fortigate
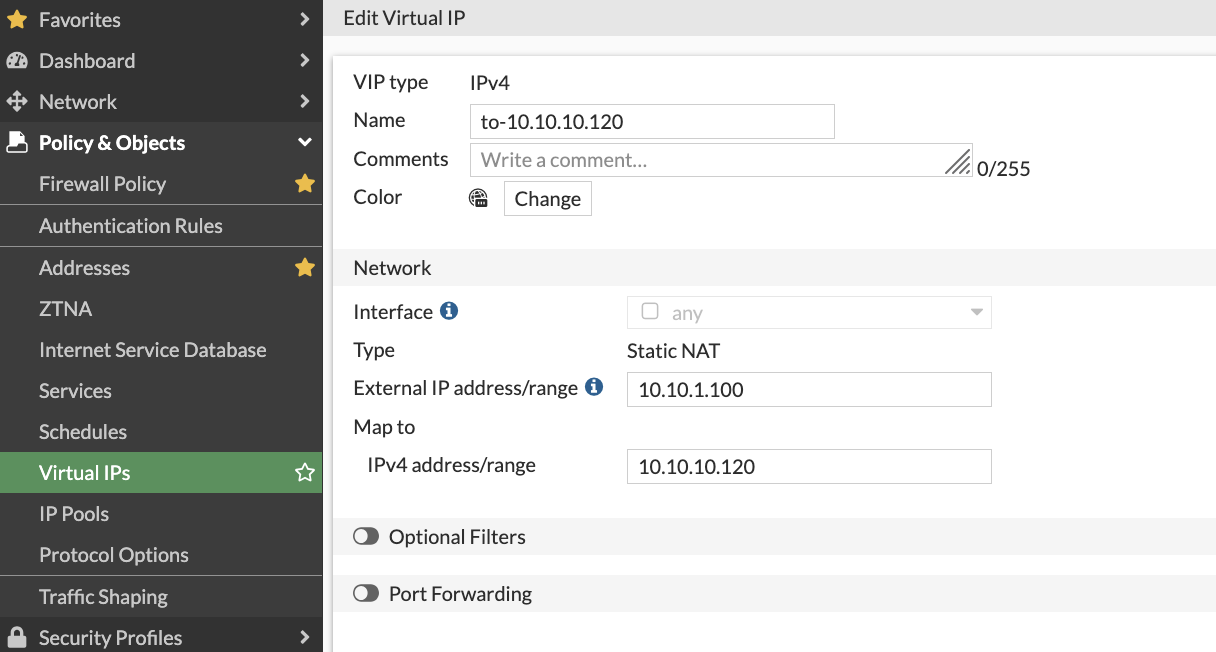
จากนั้นไป MAP IP ขานอกของ Fortigate -> (server-10.10.10.120)
และกำหนดที่ Firewall
Ok หลังจาก Allow Firewall แล้ว ลอง เข้าจากมือถือ หรือจาก Internet เส้นอื่นๆที่ไม่ใช่เส้นที่ใช้งาน
สำหรับ MAP IP ให้กับ local server IP 10.10.10.120 ดูก็จะสามารถเข้าใช้งานได้เป็นอันสำเร็จ
ทั้งนี้สามารถนำไปประยุกต์ใช้งานกับเครื่องที่เป็น Windows โดยเขียน PowerShell Script เพื่อทำการอัพเดทได้
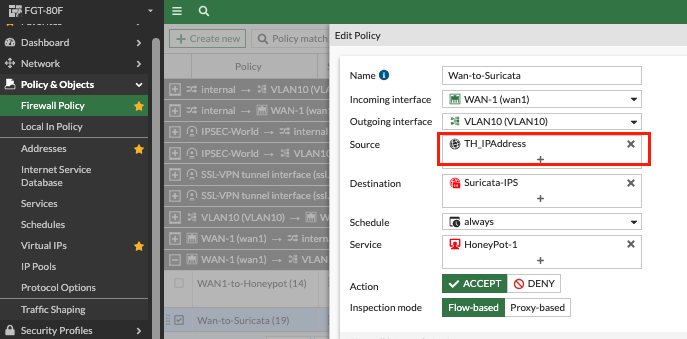
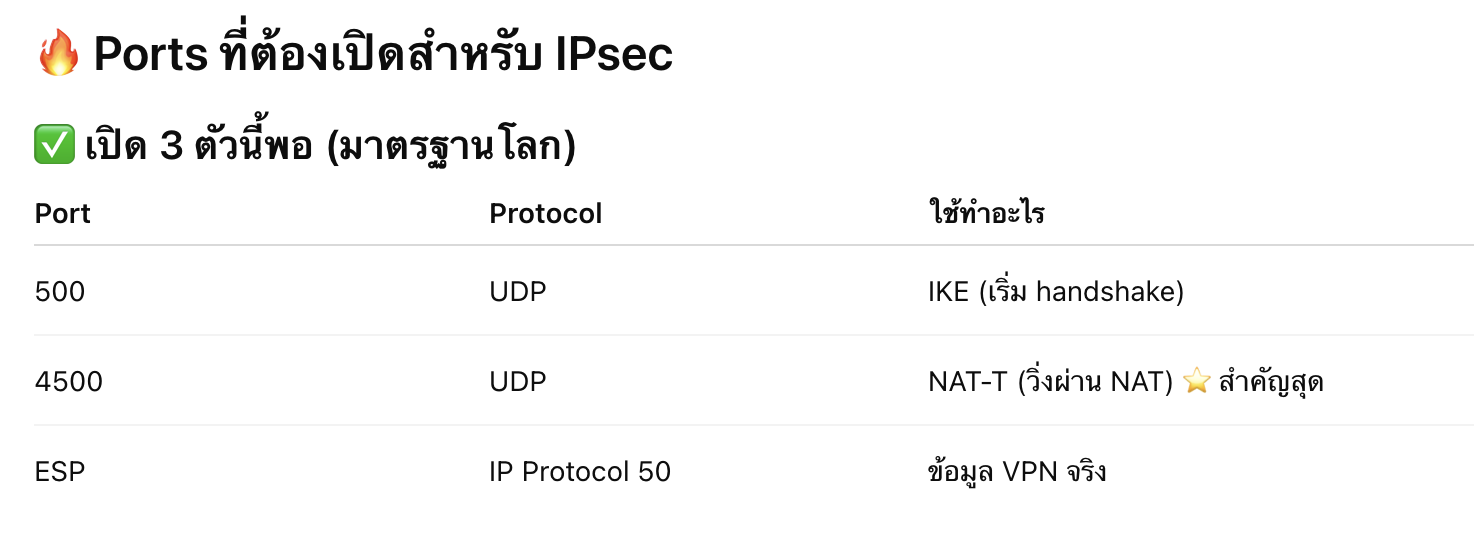
Fortigate วิธีการทำ IPsec_VPN
วิธีการสร้าง IPsec บน Fortigate
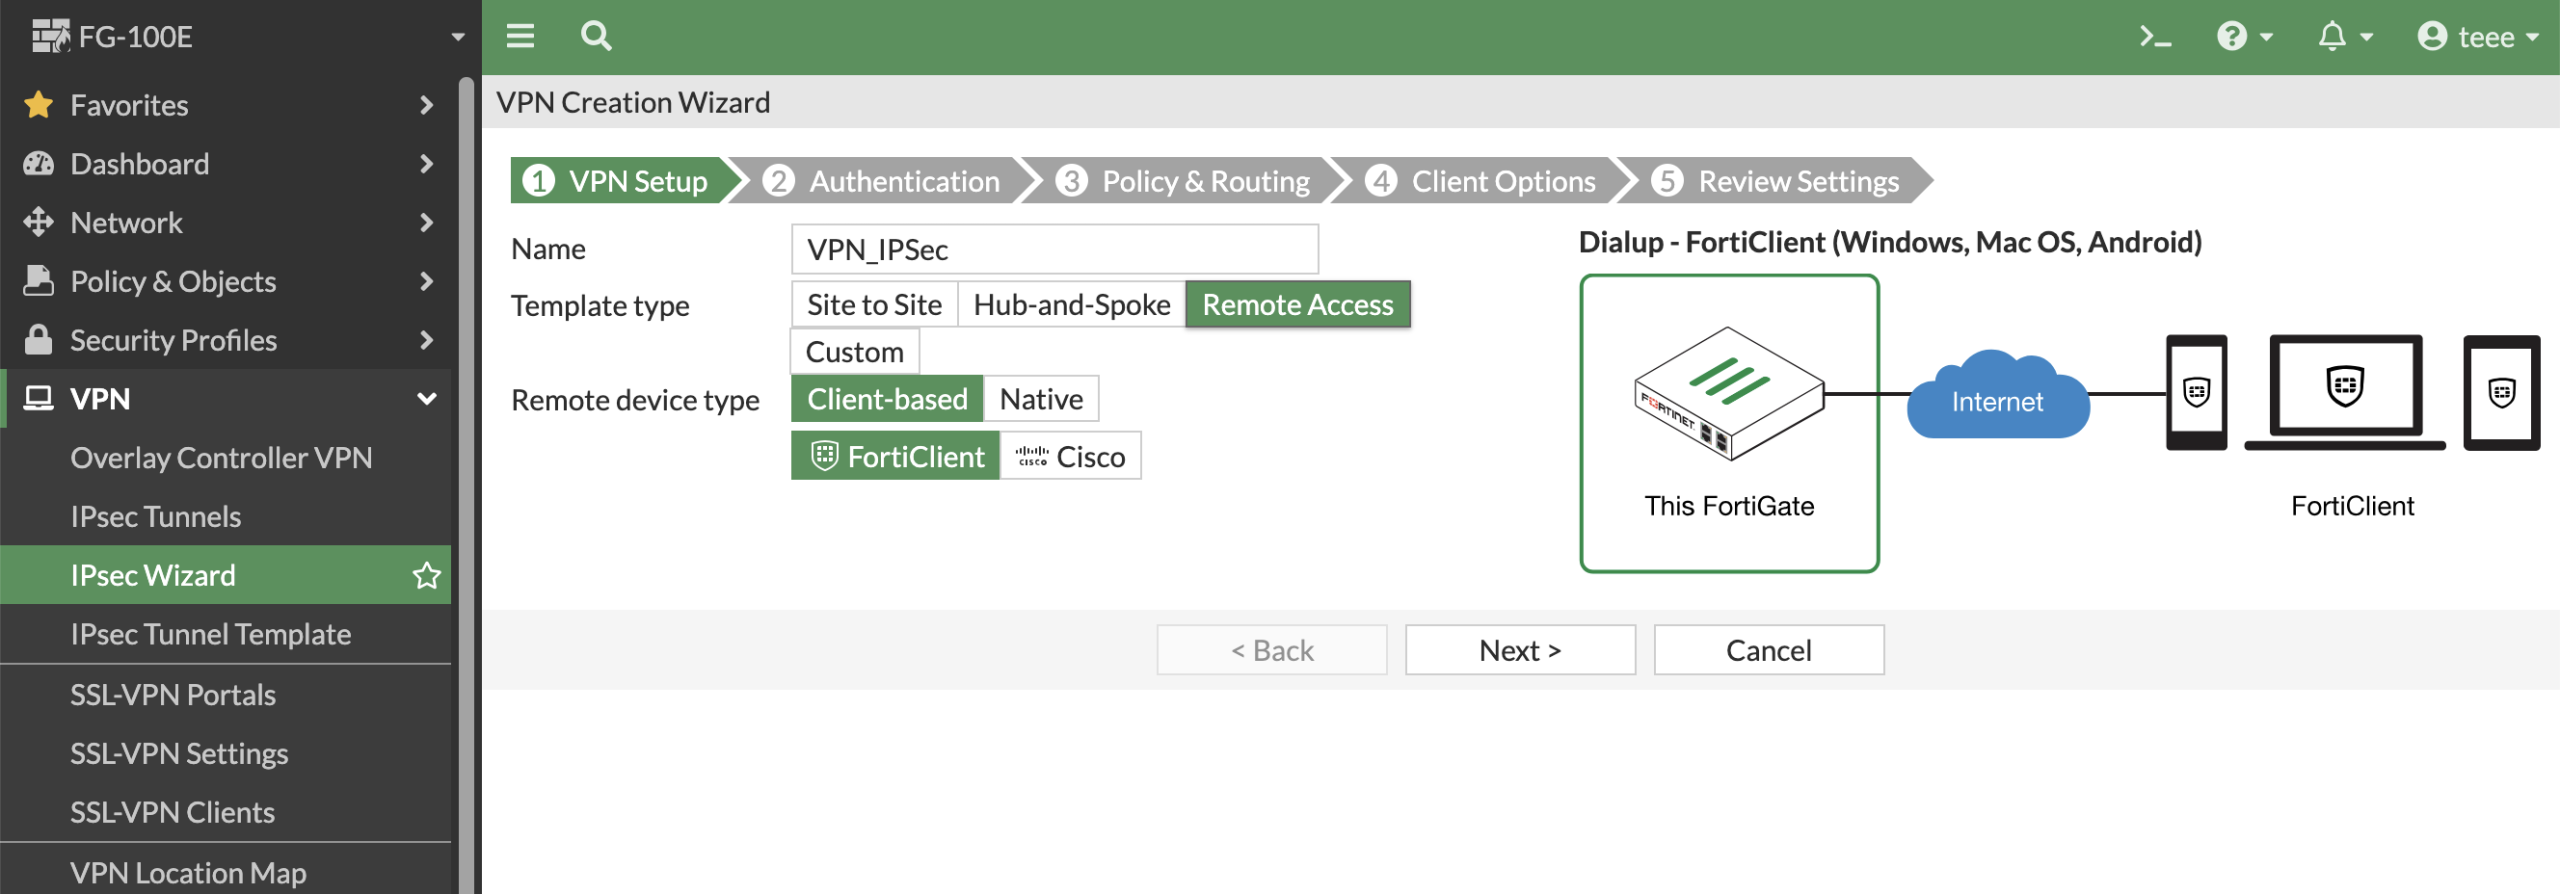
1. ขั้นแรกให้ไปที่เมนู IPsec Wizard ตั้งชื่อการเชื่อมต่อ และเลือกเป็น Remote Access > Client-based > FortiClient
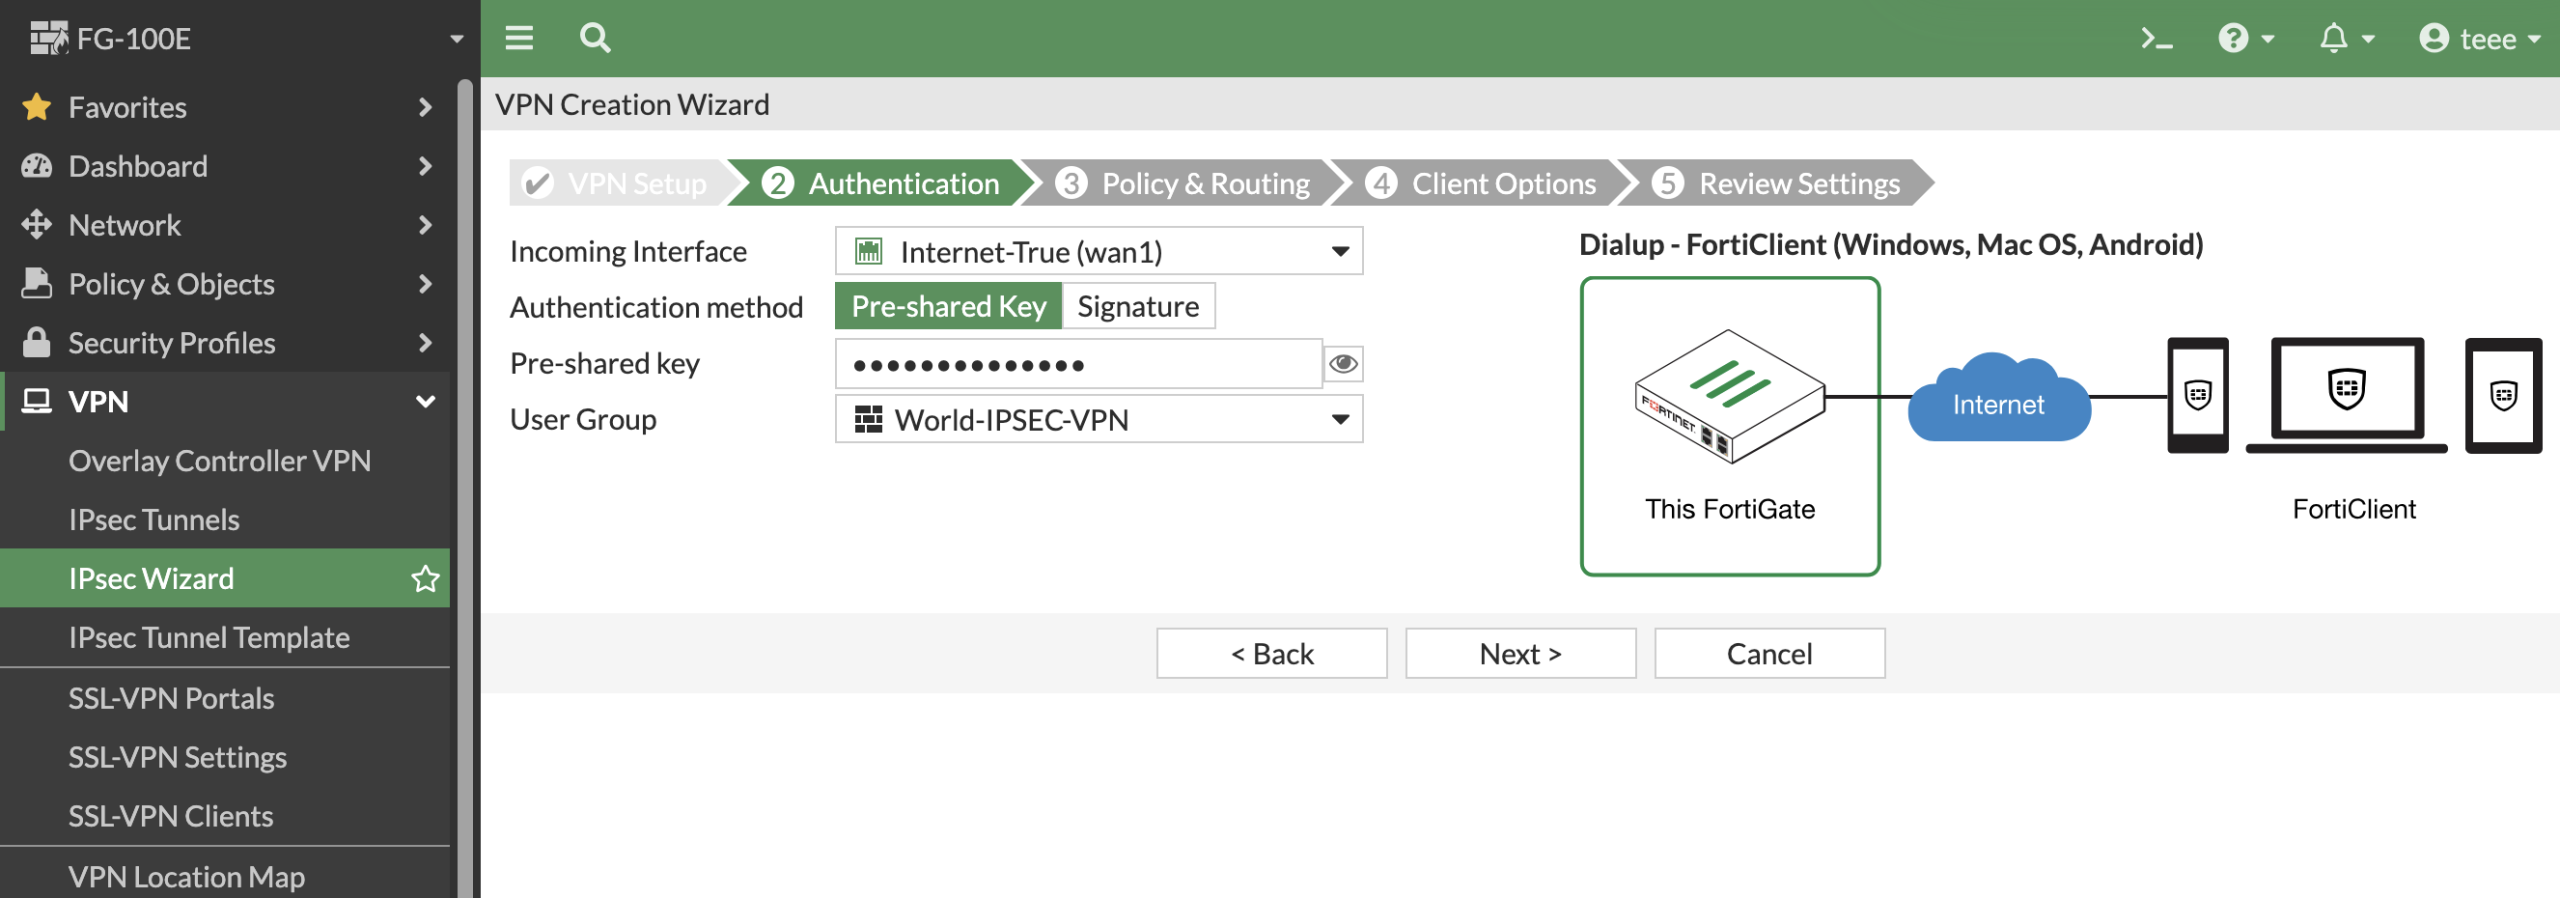
2. ที่ Incoming Interface ให้เลือกขา Wan ที่จะเข้ามาเชื่อมต่อ
และสร้าง Pre-shared Key (อันนี้สำคัญตอนสร้าง Connection จาก Client จดไว้ด้วย)
และเลือก User Group กลุ่มผู้ที่จะเข้ามาใช้งาน ในที่นี้ได้สร้างไว้แล้ว และเพิ่มผู้จะใช้งานเข้ากลุ่มแล้ว
ตัวอย่างการสร้างจาก SSL_VPN
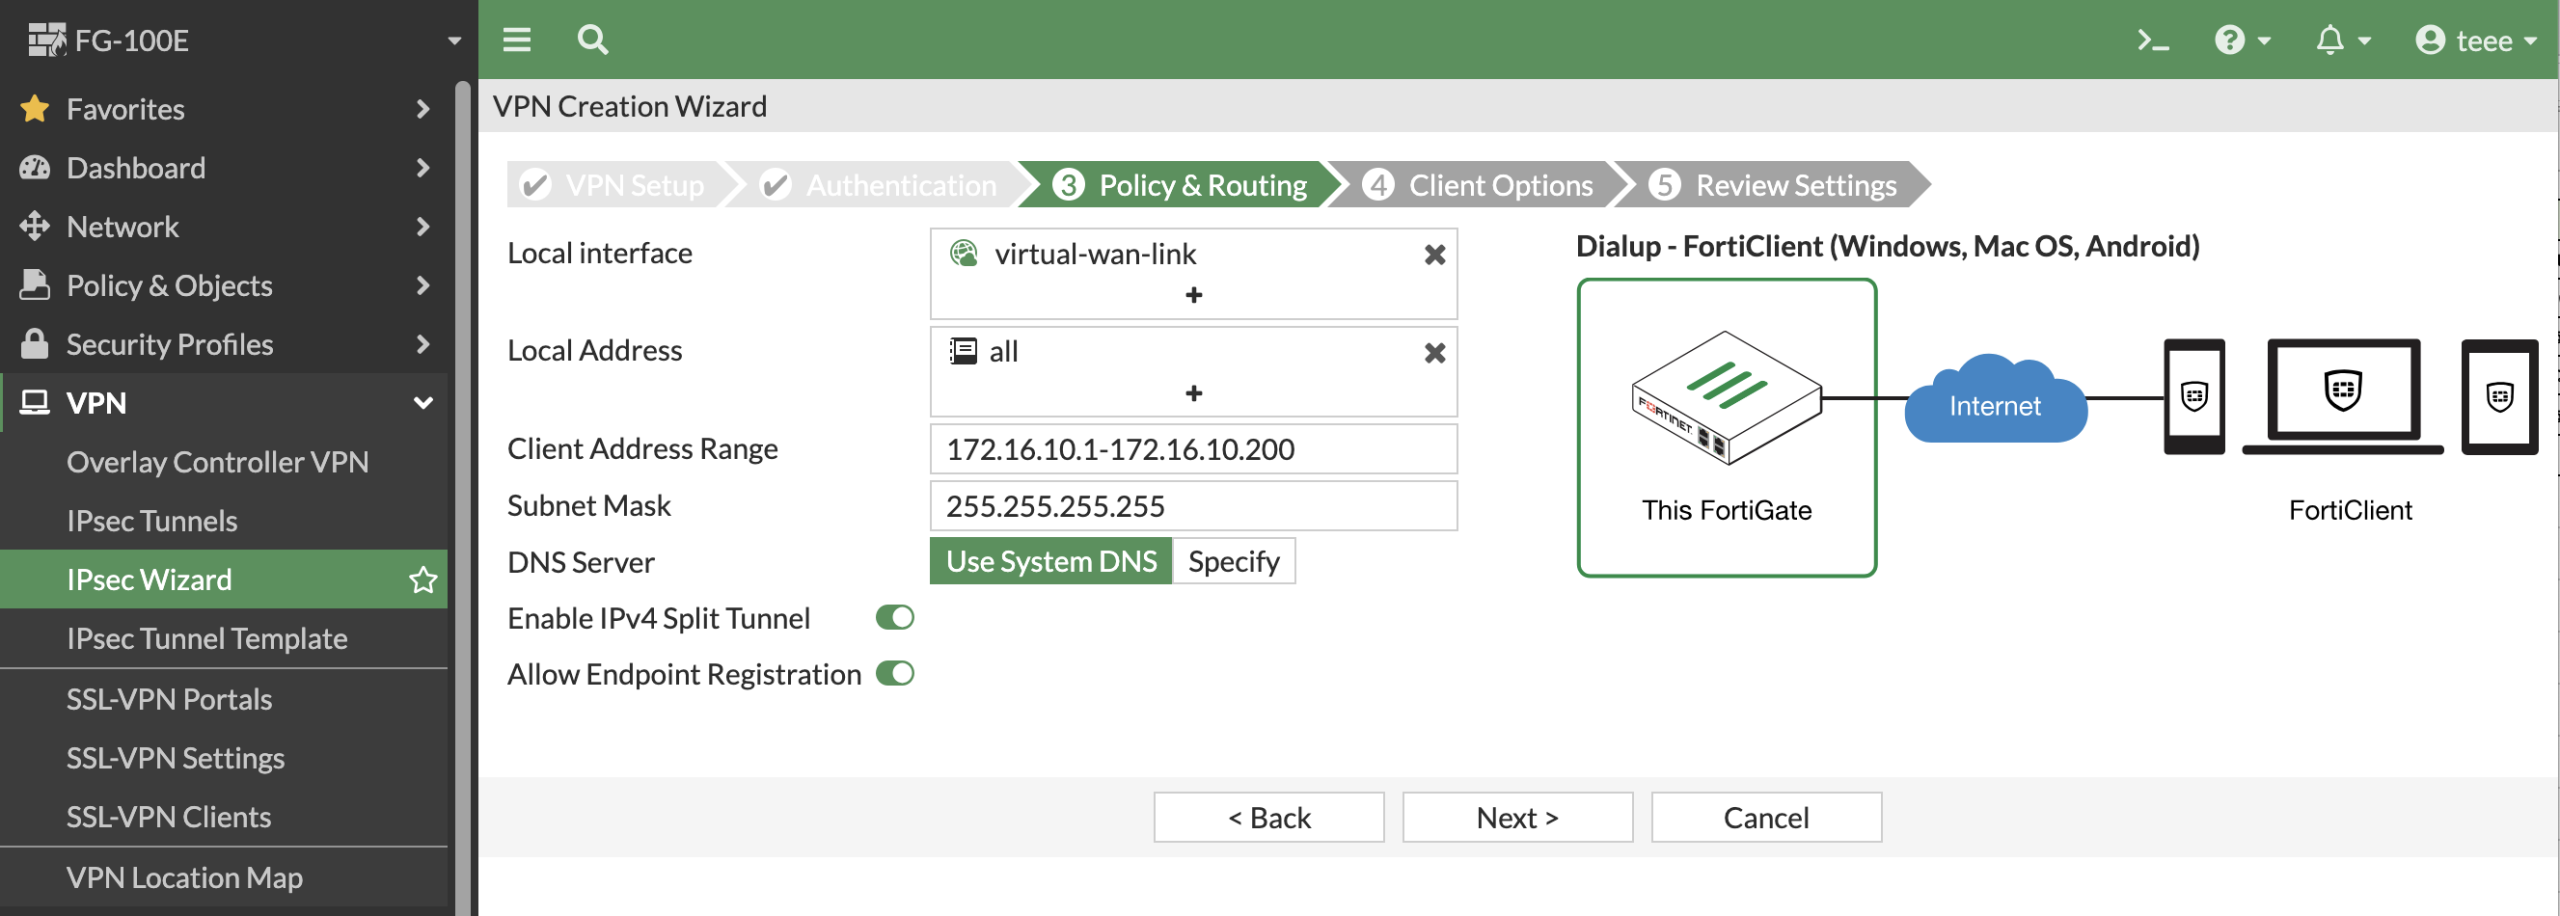
3. เลือก Local Interface ในที่นี้เลือกเป็น ขาของ SD-WAN หรือถ้าใช้งาน Internet จากพอร์ทไหนก็เลือกที่พอร์ทนั้น เช่น WAN ส่วน Local Address เลือก All
ในส่วนของ Client Address Range อันนี้เป็นส่วนของ IP ที่ FortiClient จะได้รับแจกตอนที่เชื่อมต่อเข้ามา
ส่วนอื่นๆไม่ต้องแก้ไขอะไรกด Next ต่อไปเลย
4. อันนี้เลือกว่าจะอนุญาตให้ Forticlient เชื่อมต่อเข้ามาสามารถ Save รหัสผ่านได้ไหม กด Next ต่อไปได้เลย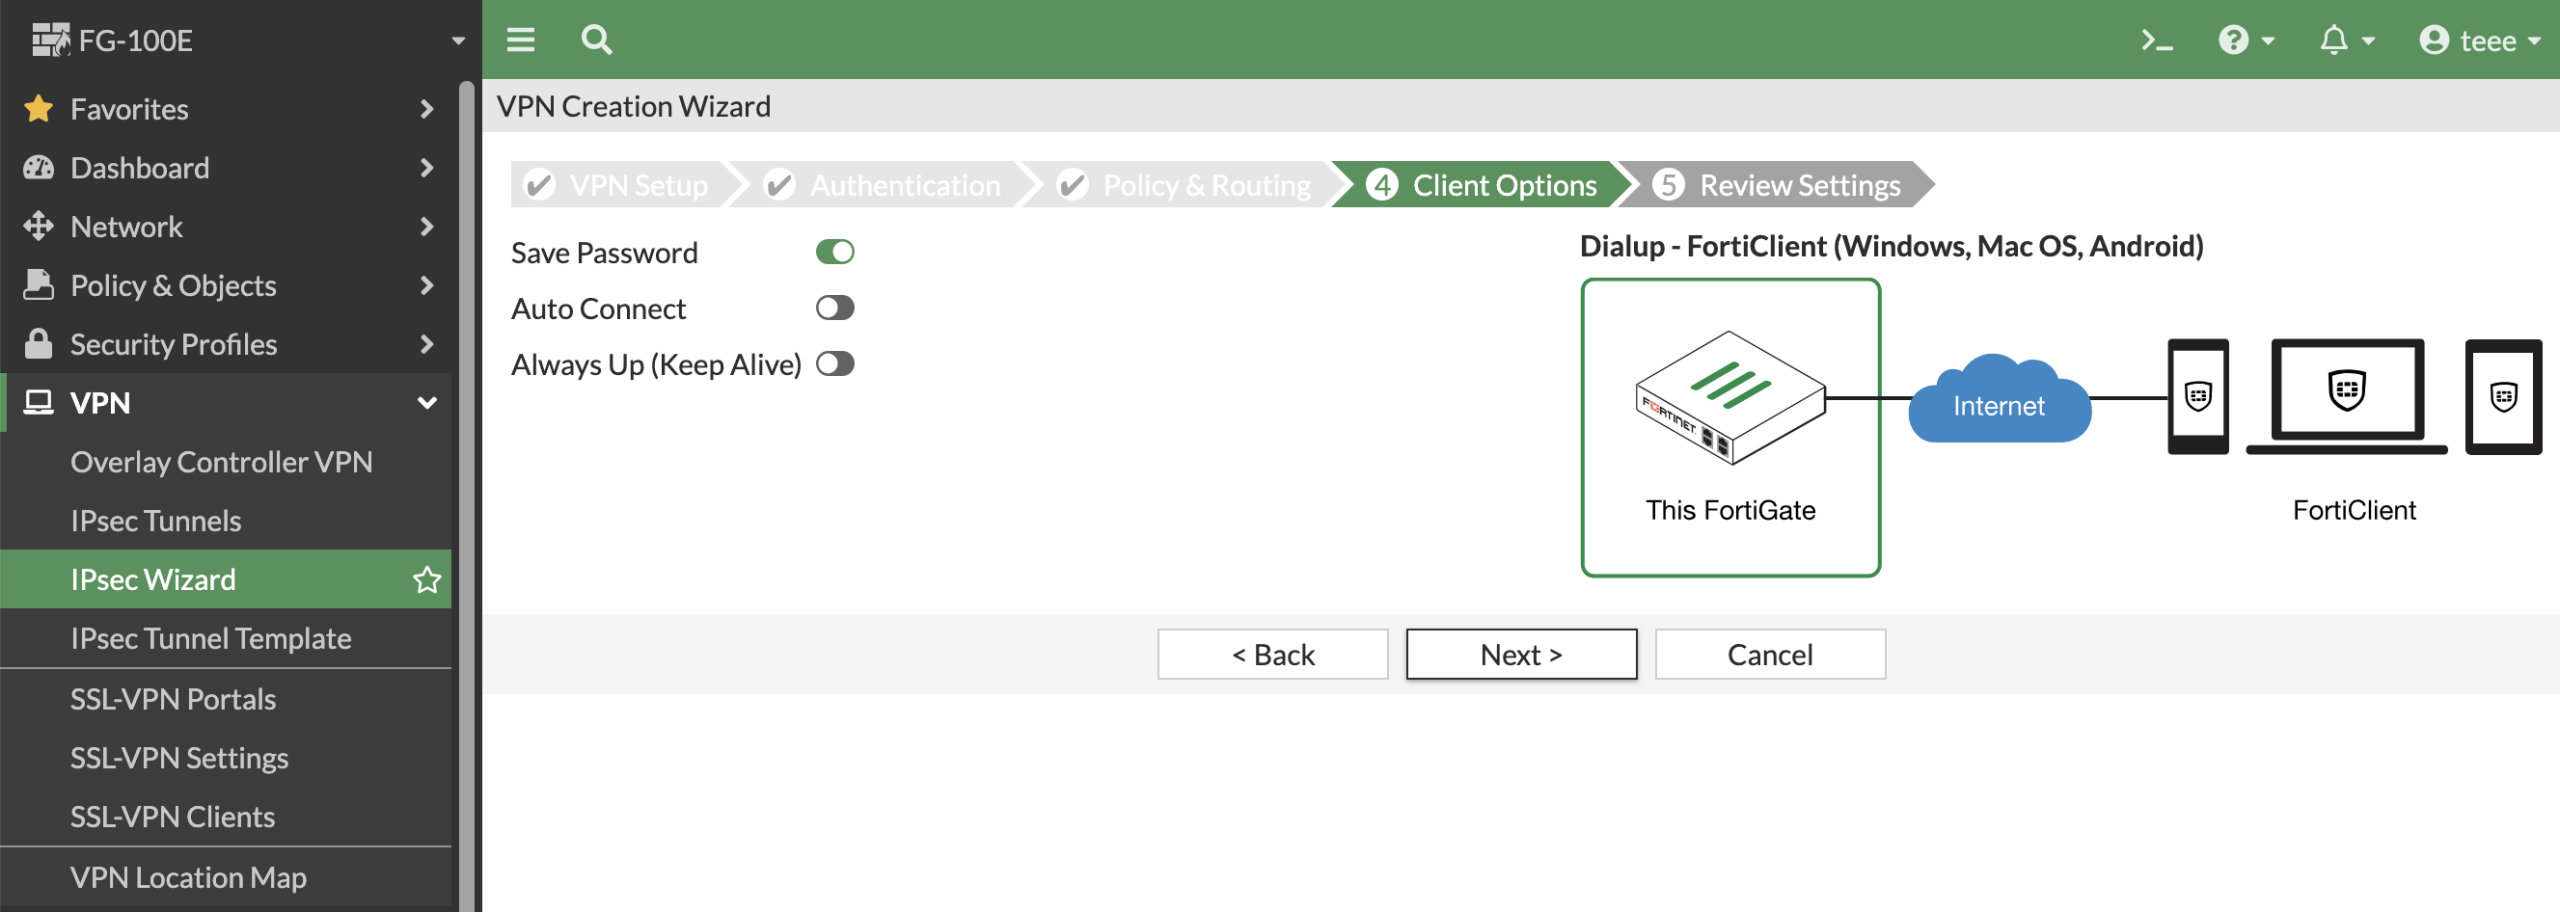
5. ขั้นตอนสรุปภาพรวมของ Config ทั้งหมด กด Create เพื่อสร้าง IPSec Tunnels ได้เลย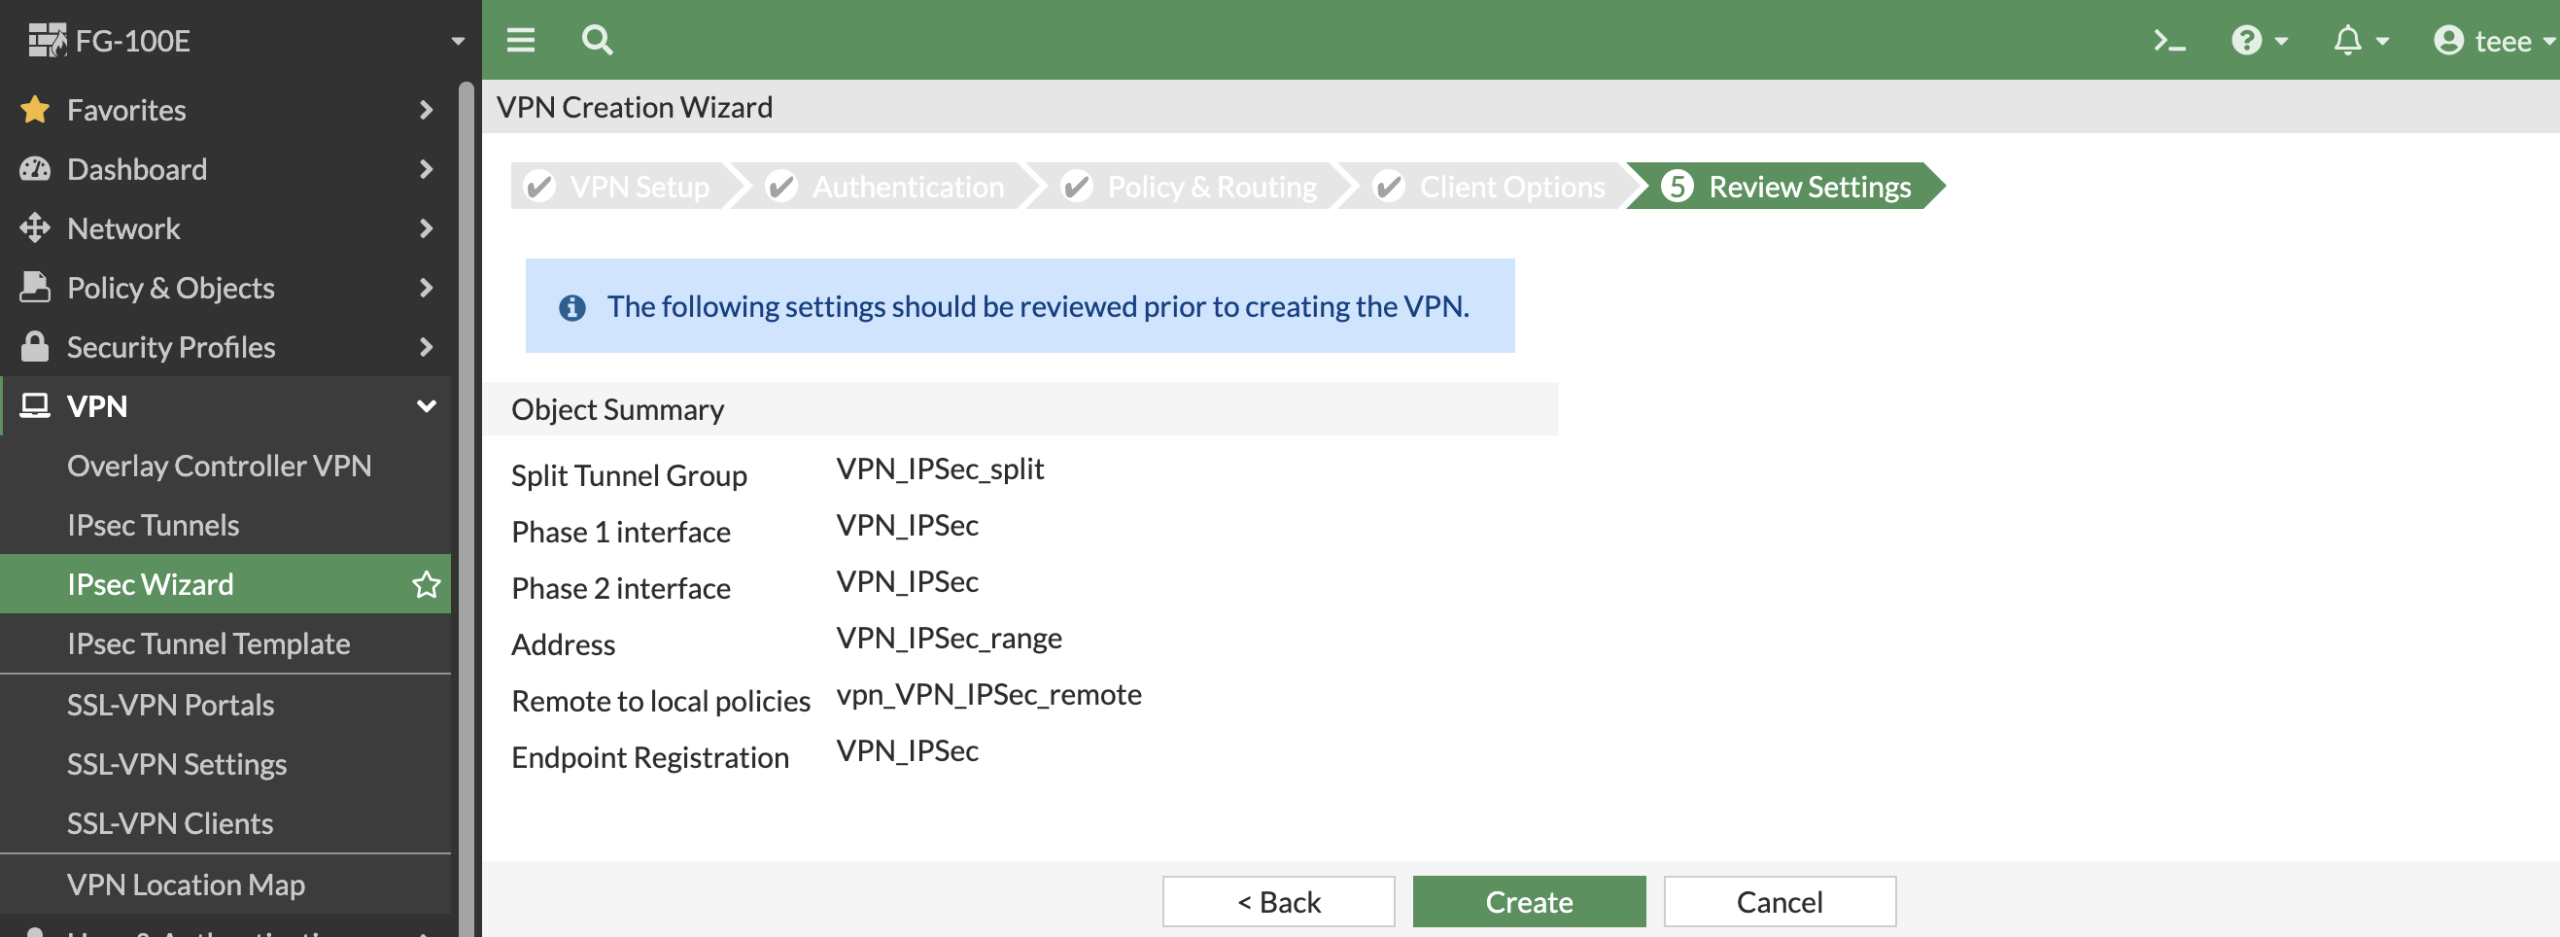
6. หลังจากสร้างเสร็จแล้วก็จะมีให้สร้างเพิ่มไหม ในที่นี้ไม่สร้างเพิ่ม กด Show Tunnel List เพื่อแสดง ที่เราสร้างสำเร็จแล้ว
7. หลังจากที่เราสร้างเสร็จก็จะปรากฏ Tunnel ที่เราเพิ่งสร้างไป
8. ที่ Firewall จะปรากฏ Policy ที่ IPSec Wizard สร้างให้ซึ่งสามารถเชื่อมต่อเข้ามาได้แล้ว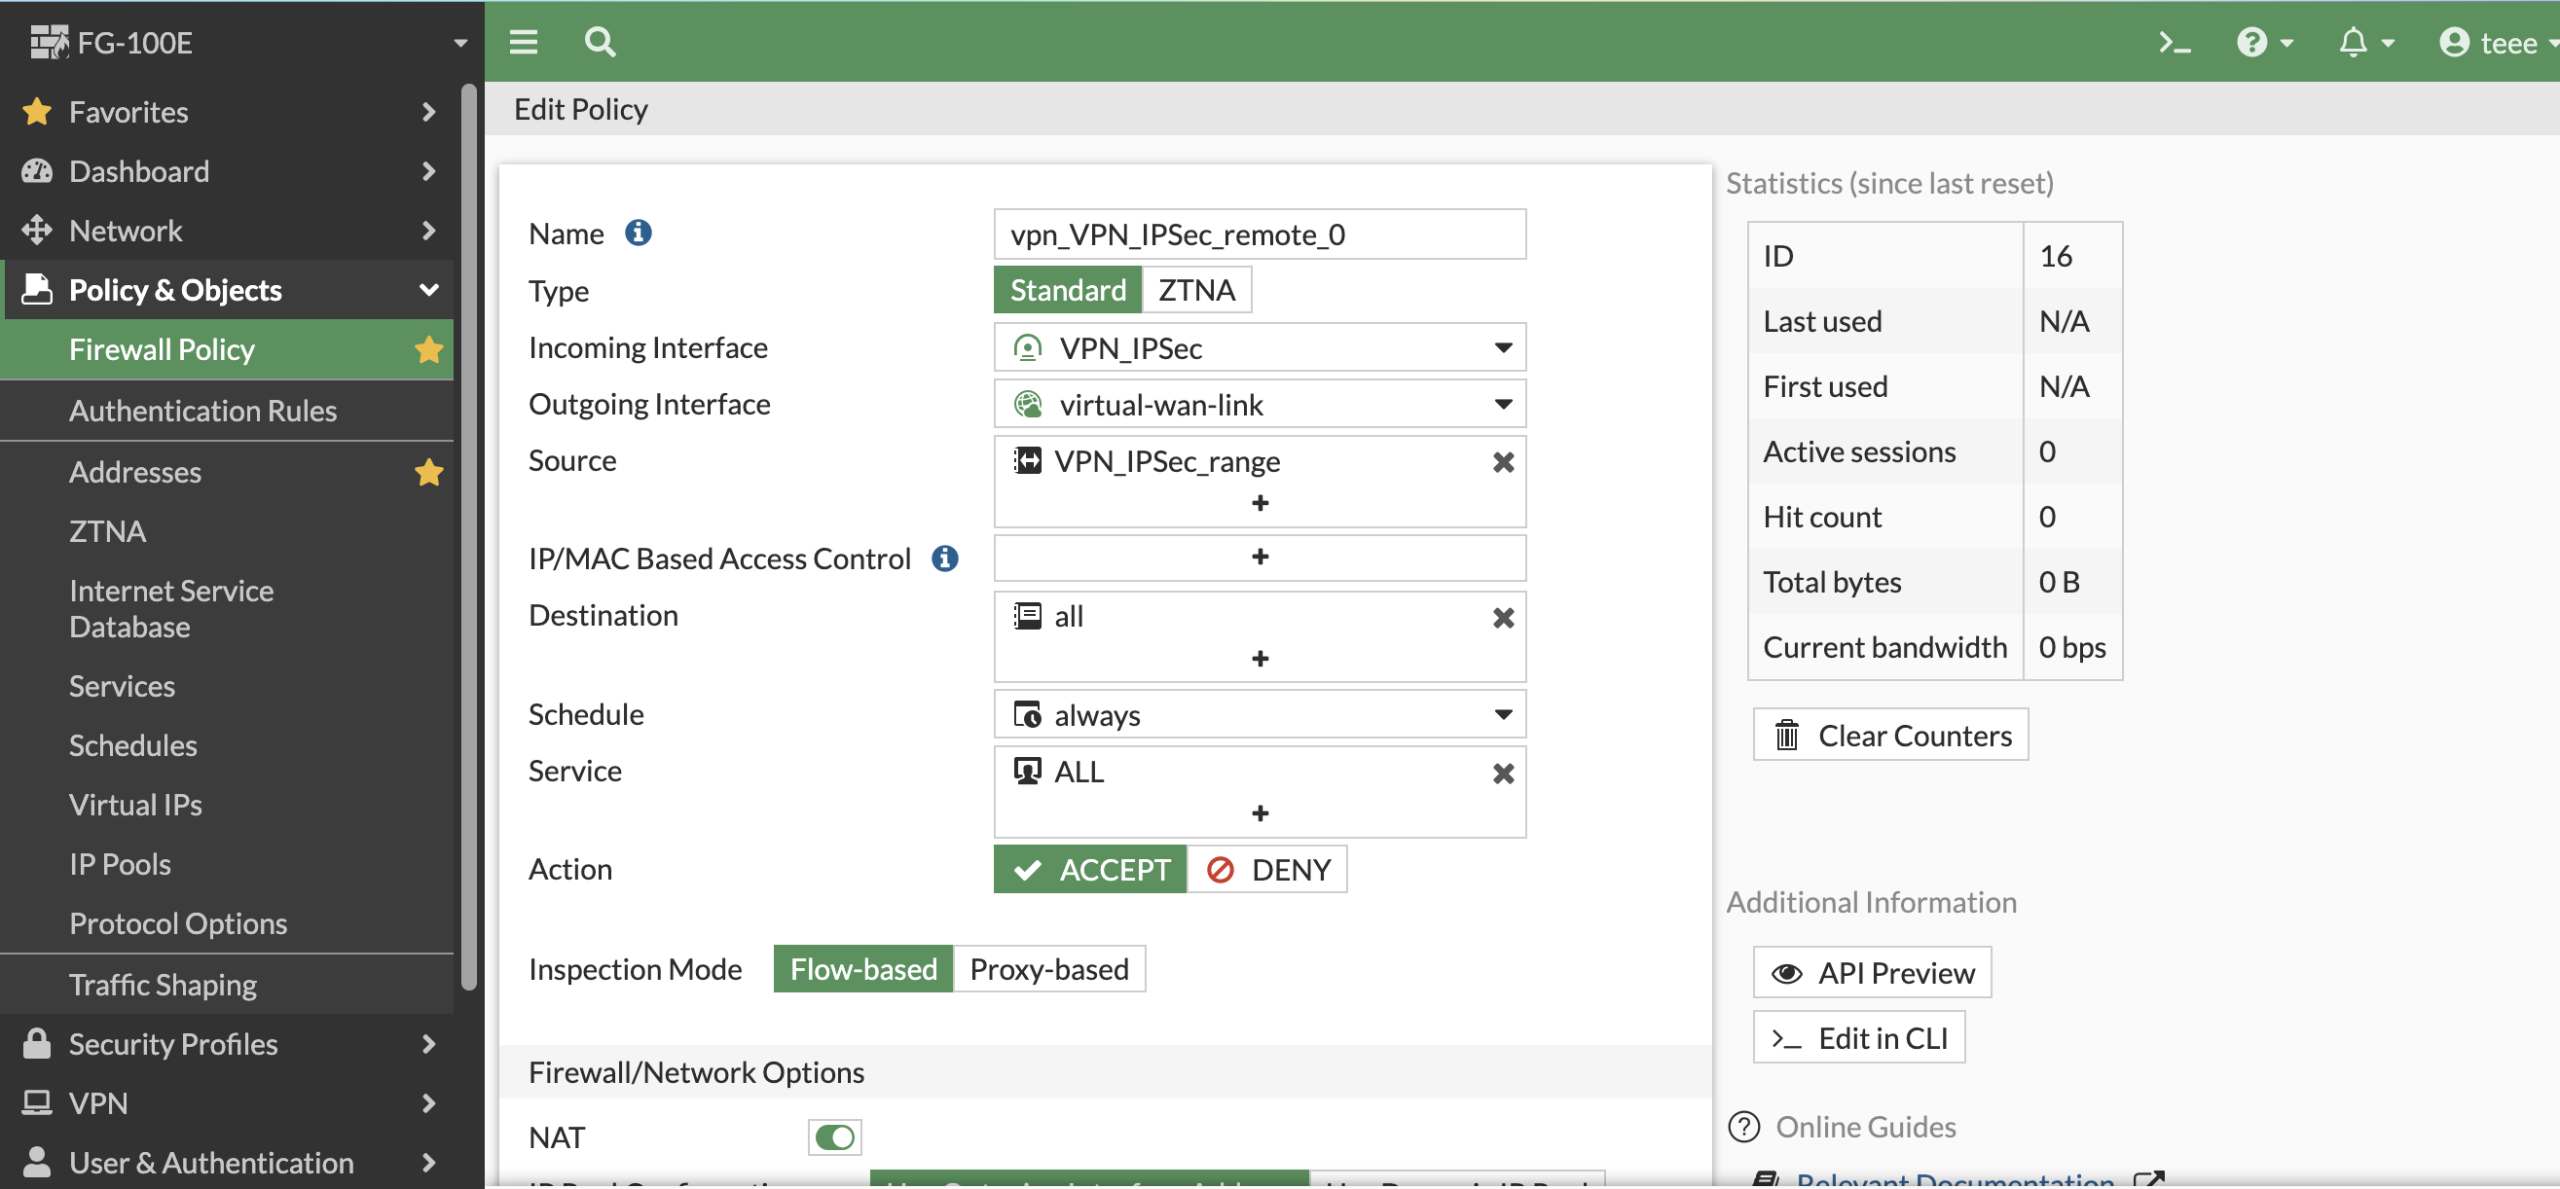
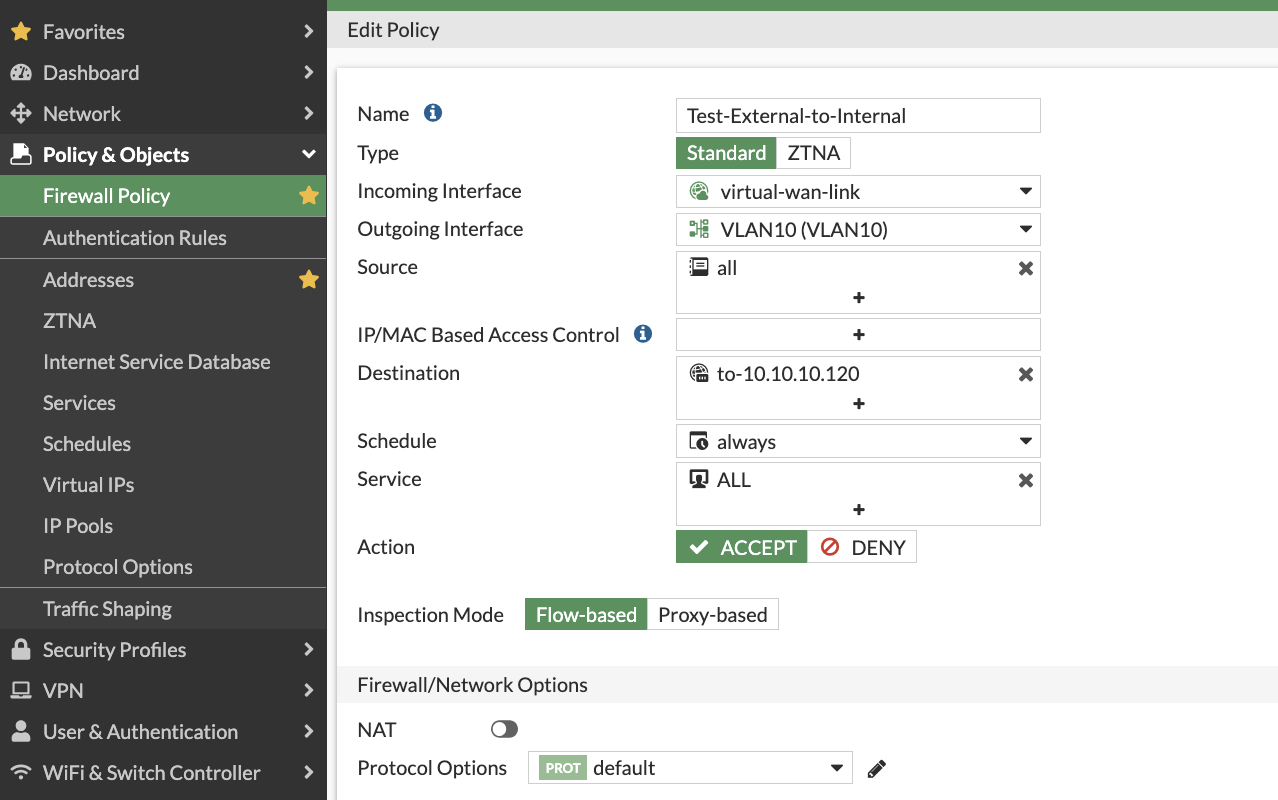
9. จาก Firewall Policy ที่ Wizard สร้างให้ ถ้าเราต้องการจะ Allow เพิ่มเติมเพื่อให้สามารถใช้งานได้อย่างสมบูรณ์ เช่น ในที่นี้ต้องการจะ Allow Vlan10 เพื่อให้สามารถ เข้าใช้งาน Fortigate Management ได้ซึ่งจะอนุญาตให้เฉพาะ Vlan10 เท่านั้นเข้าได้ ไม่อนุญาตให้เข้าจาก Public ก็เพิ่ม Firewall Policy นี้เข้าไปด้วย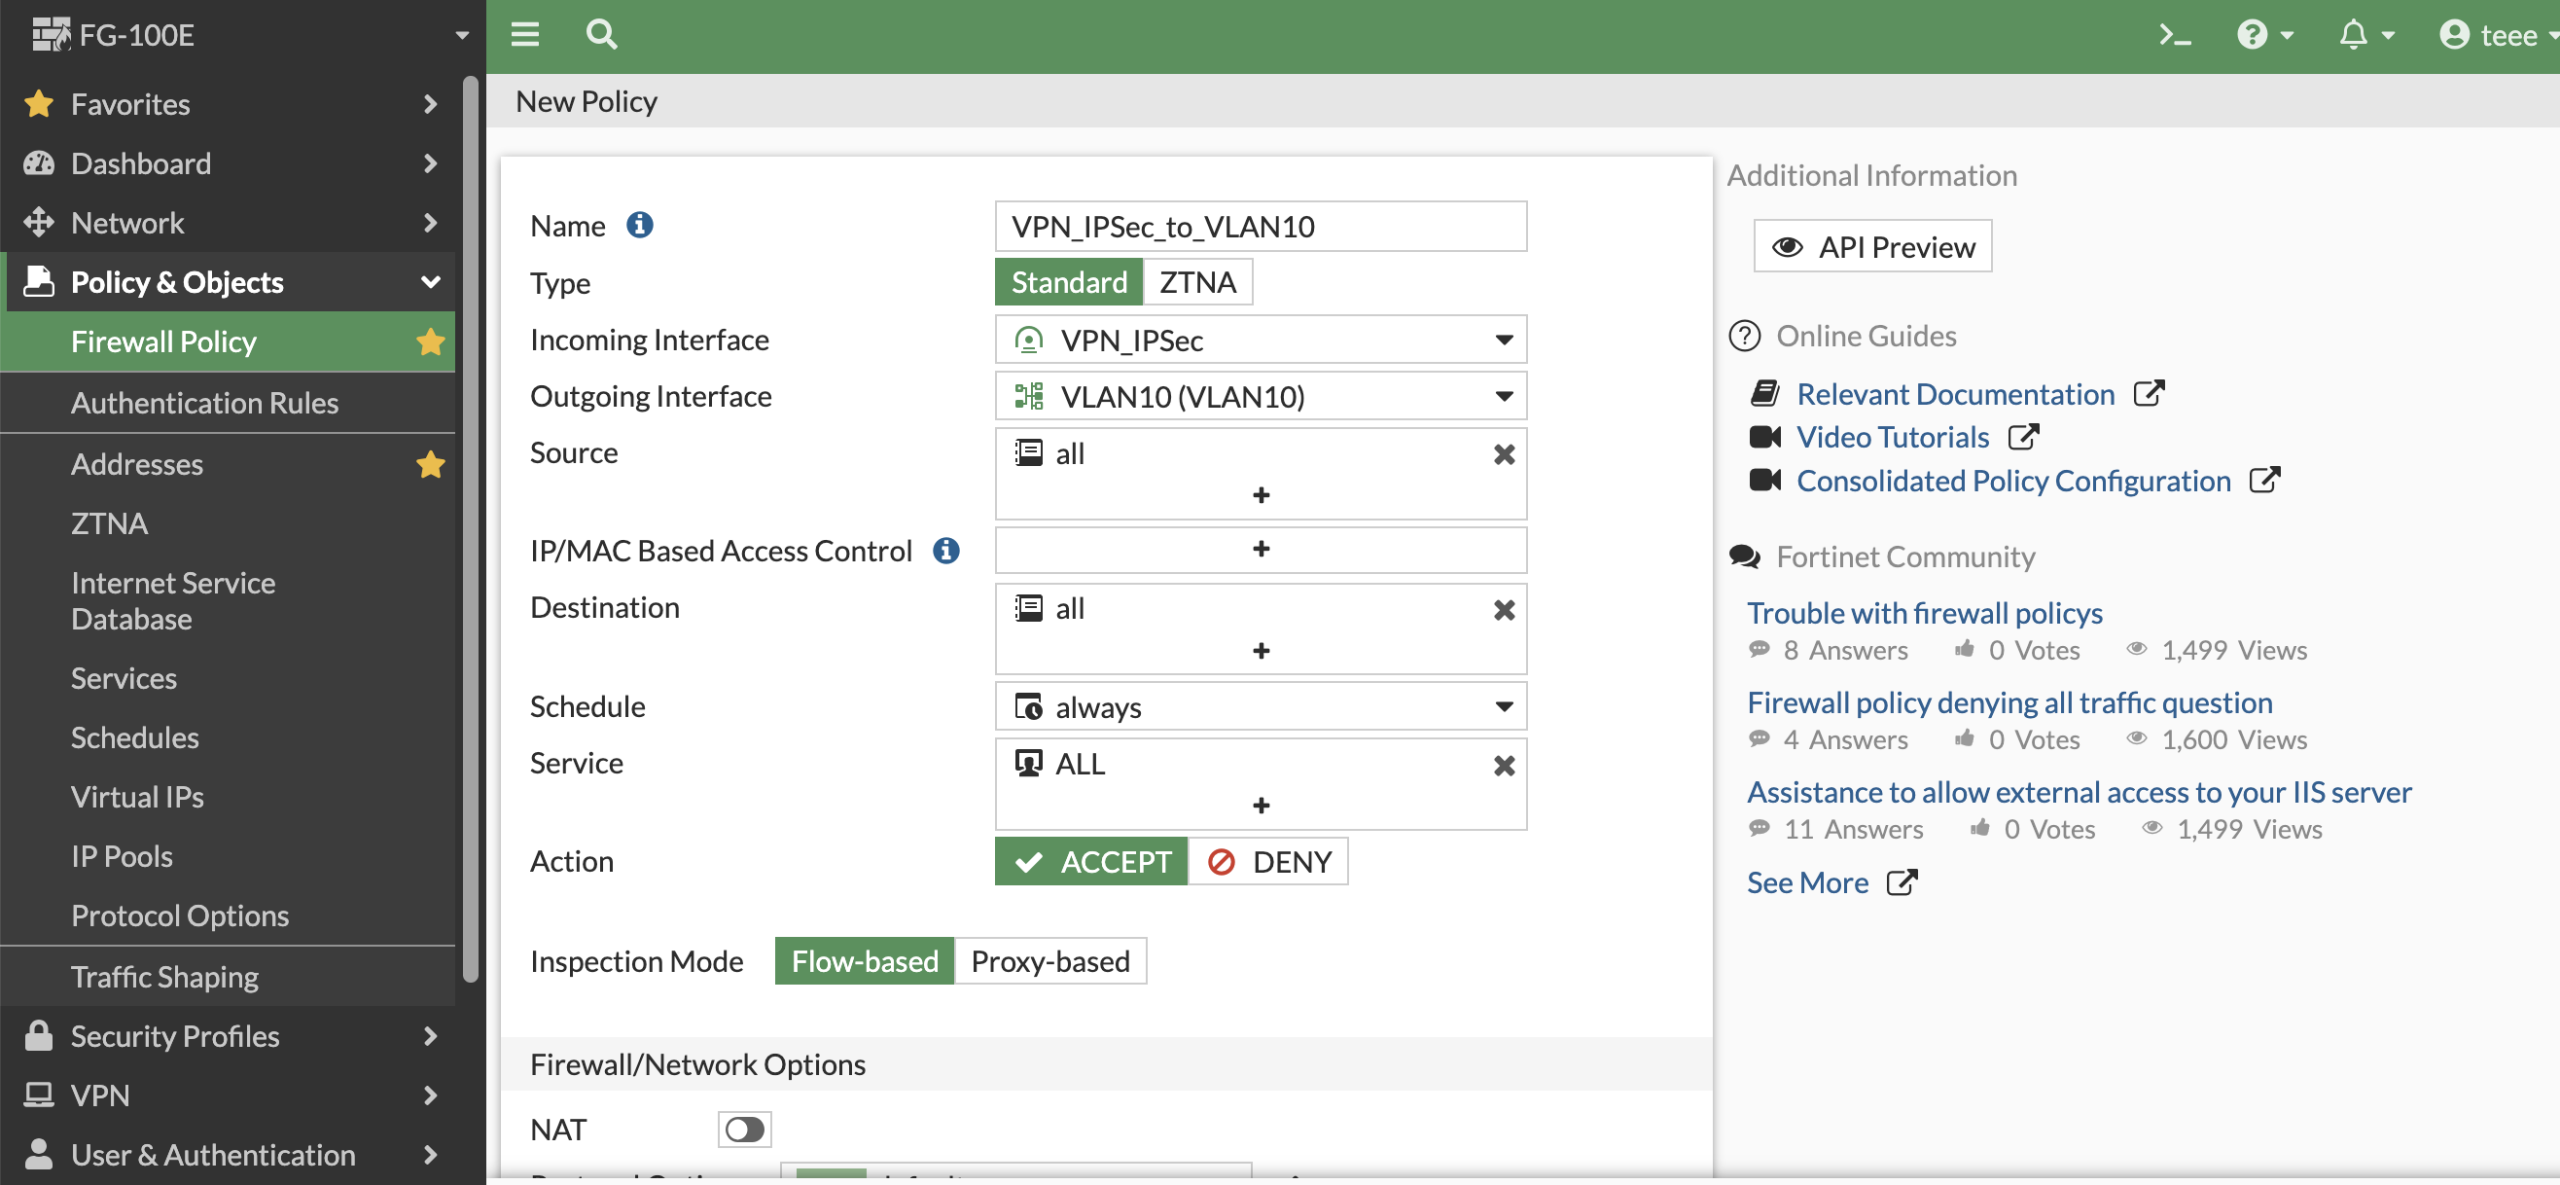
10. สรุป Firewall Policy ที่เกี่ยวข้องกับ IPSec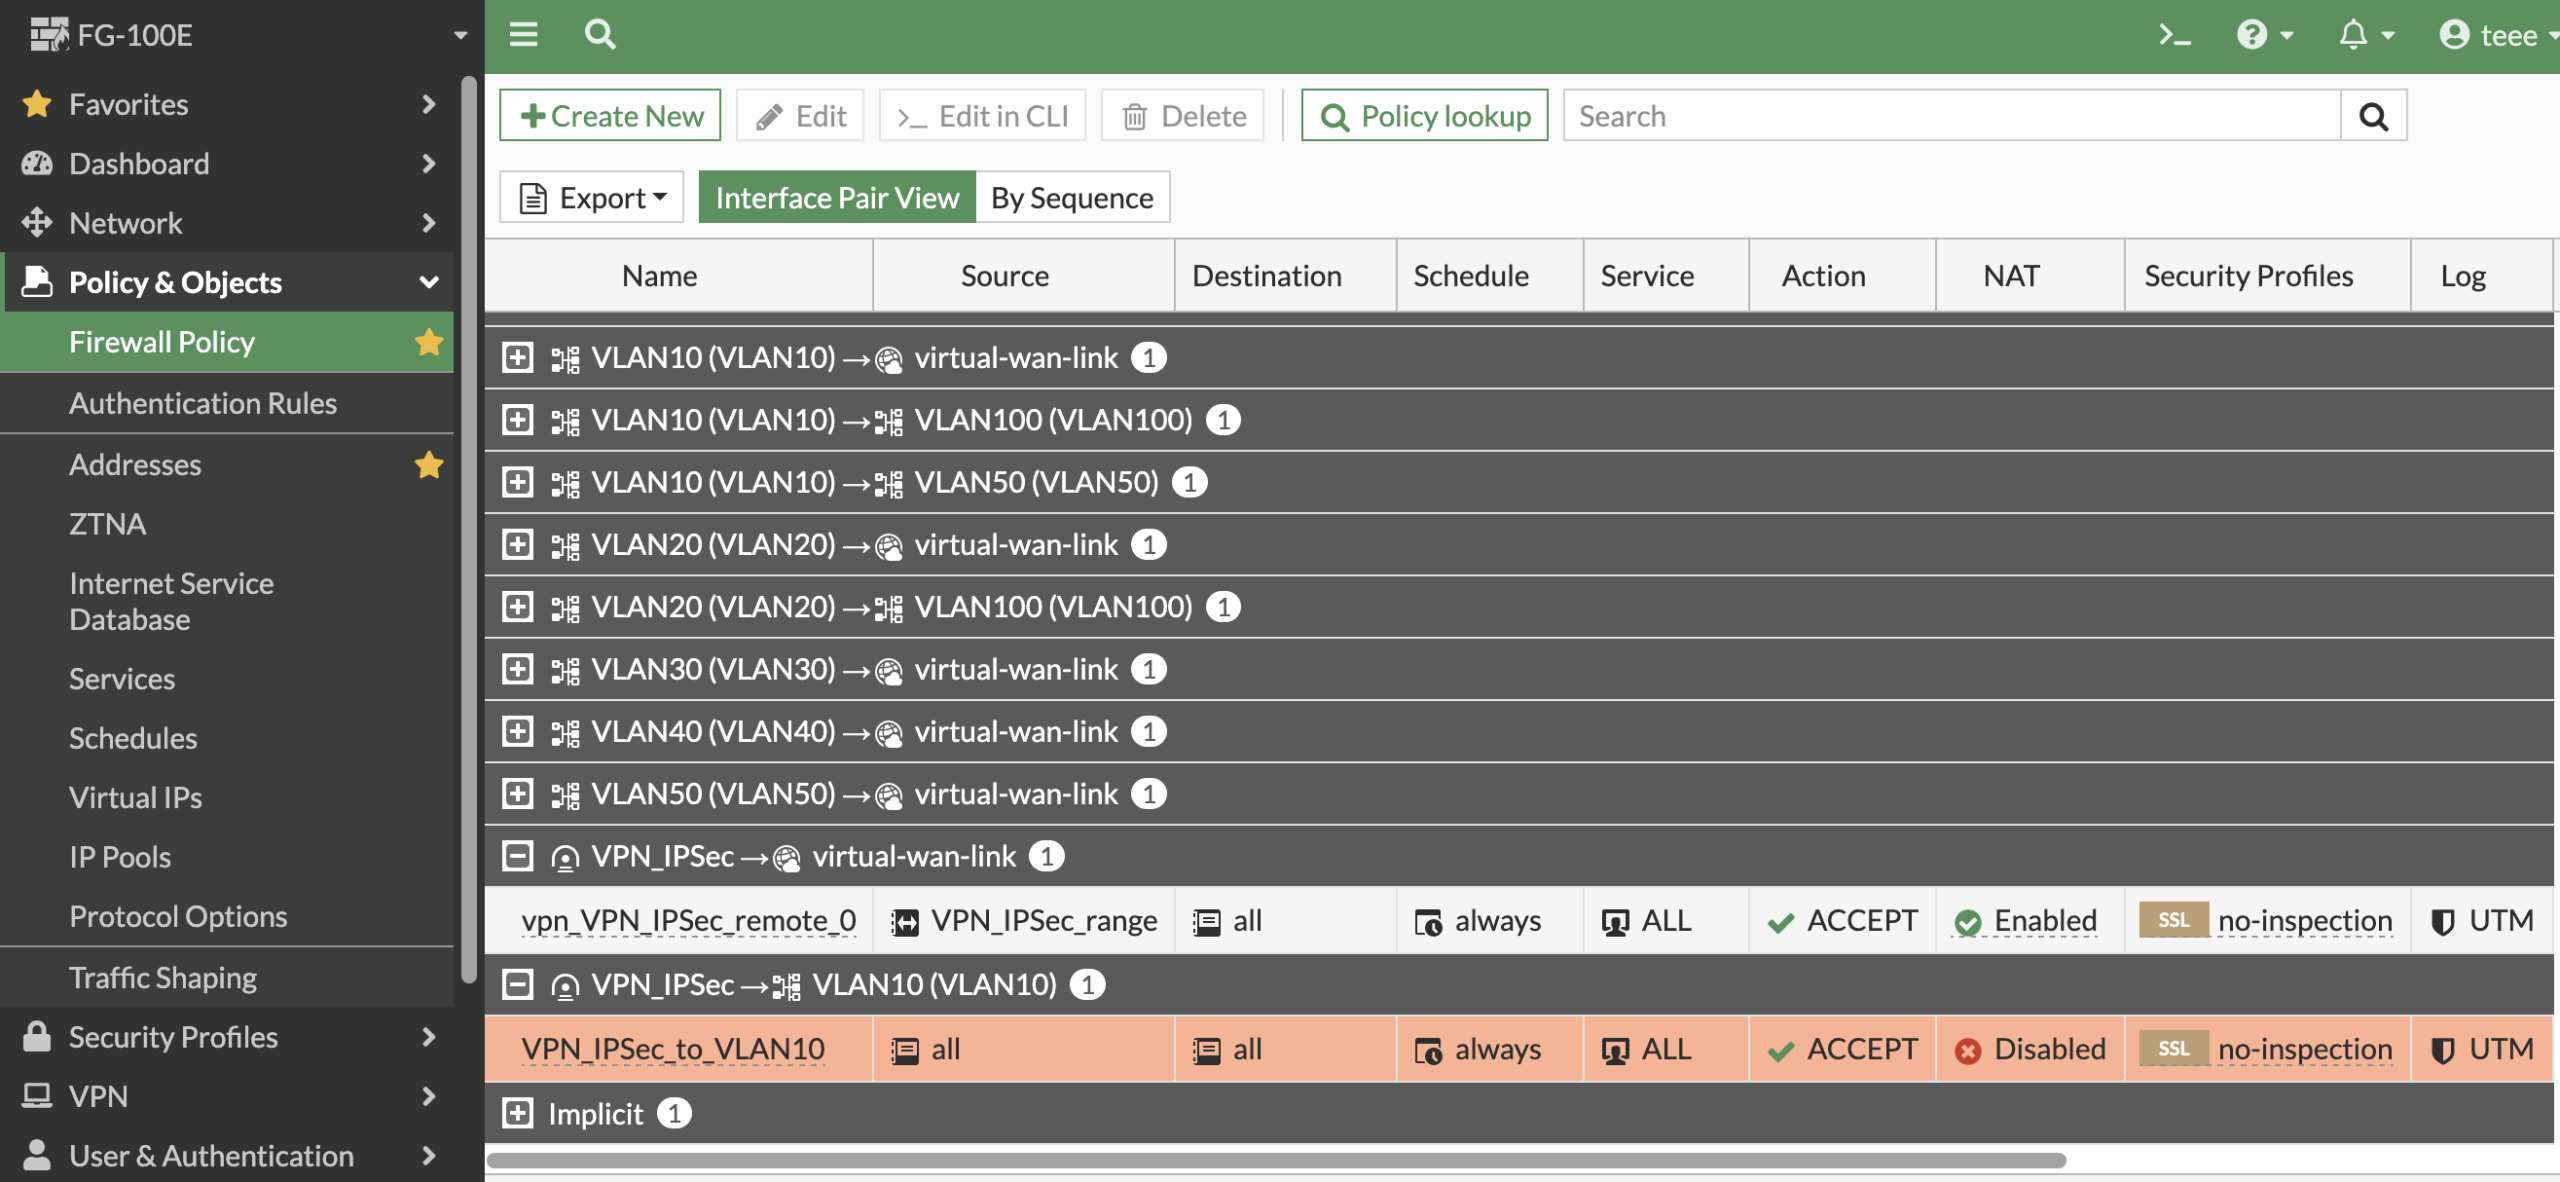
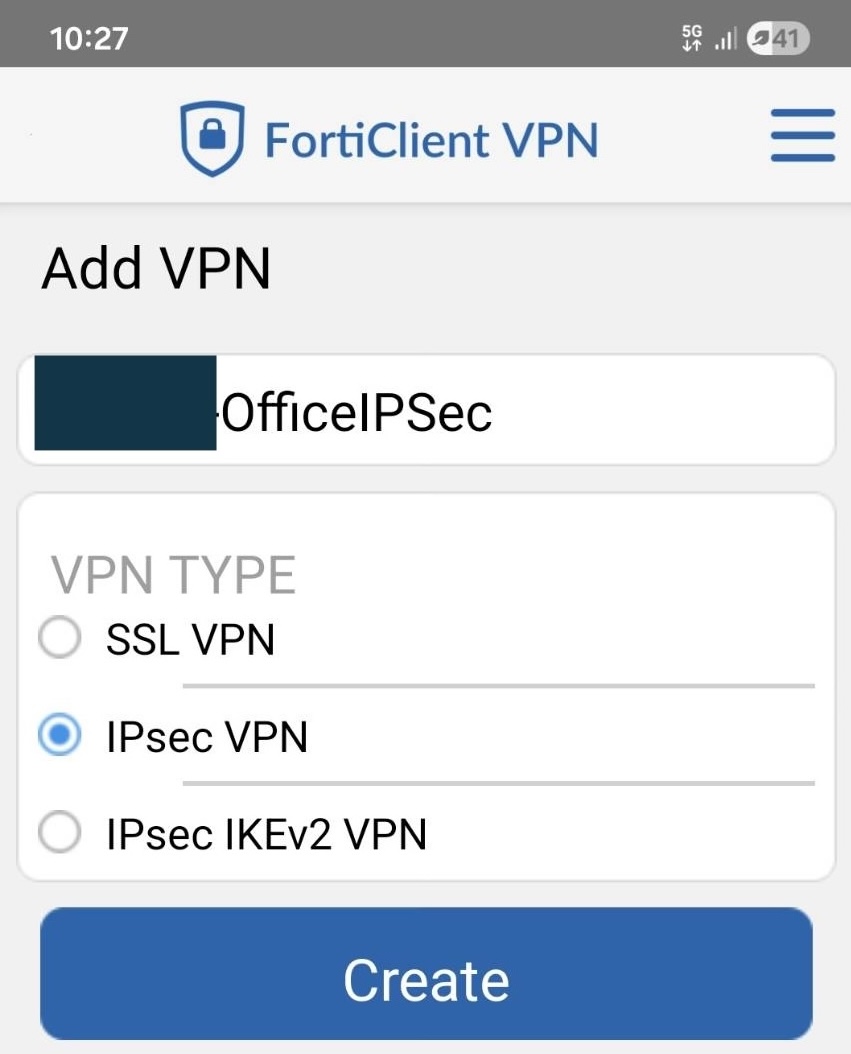
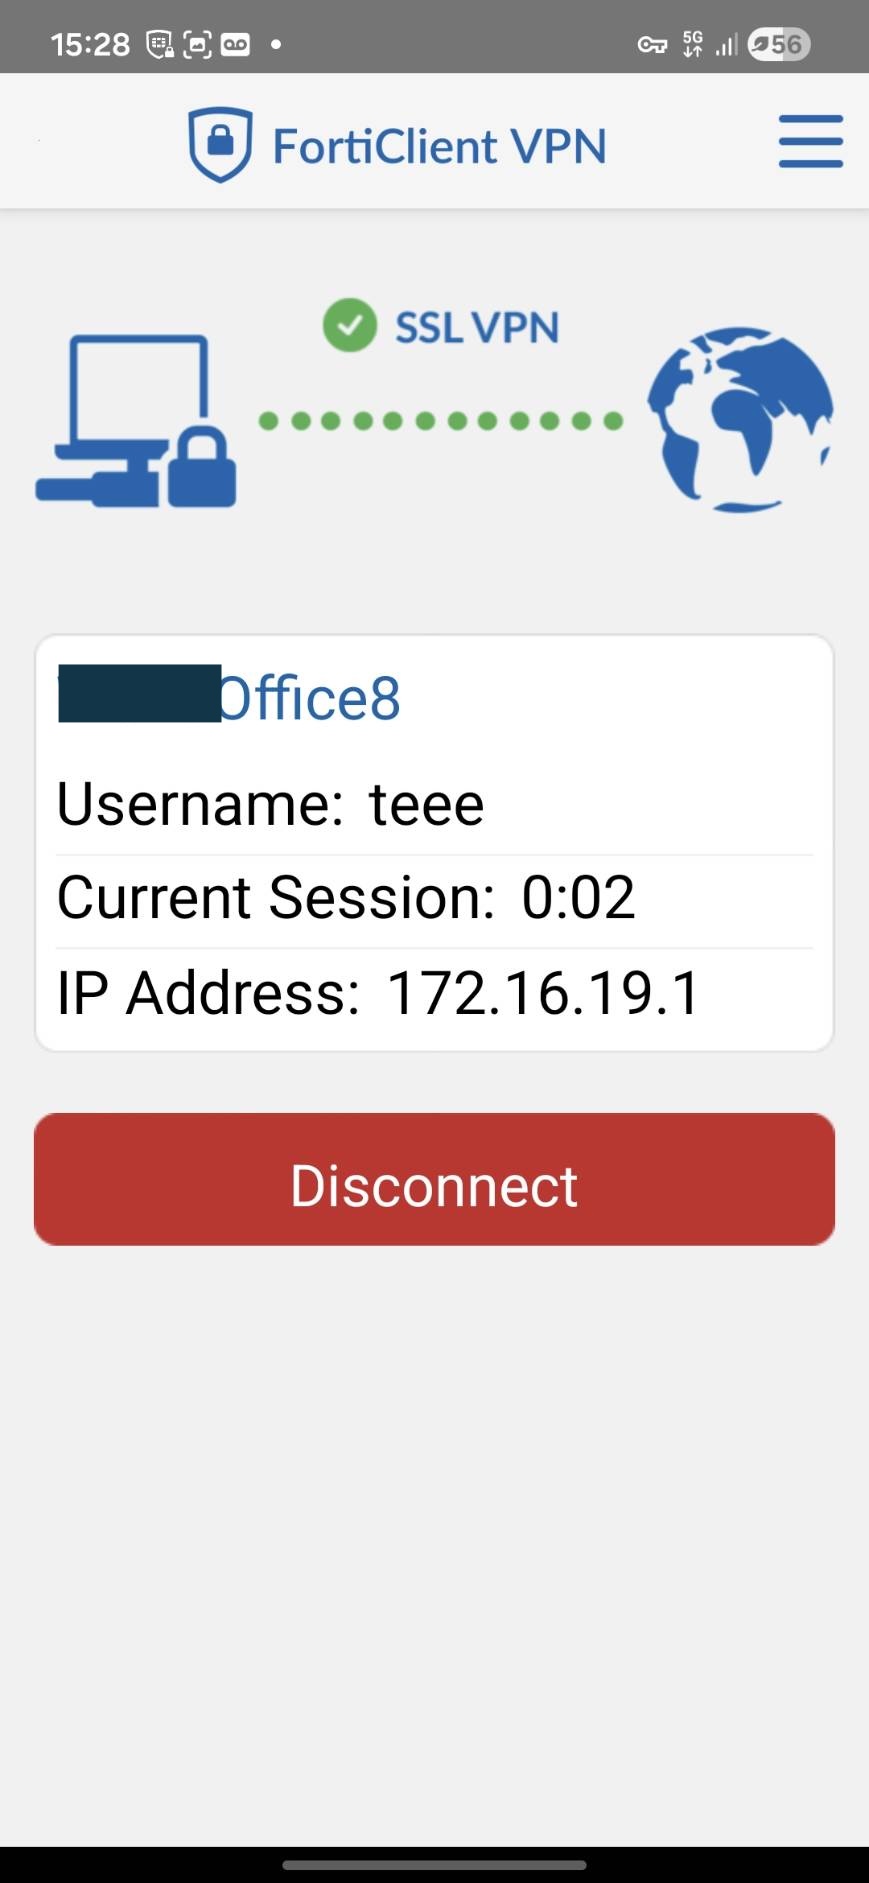
11. ที่ฝั่งของ FortiClient การตั้งค่าเชื่อมต่อ เลือกเป็น IPsec VPN
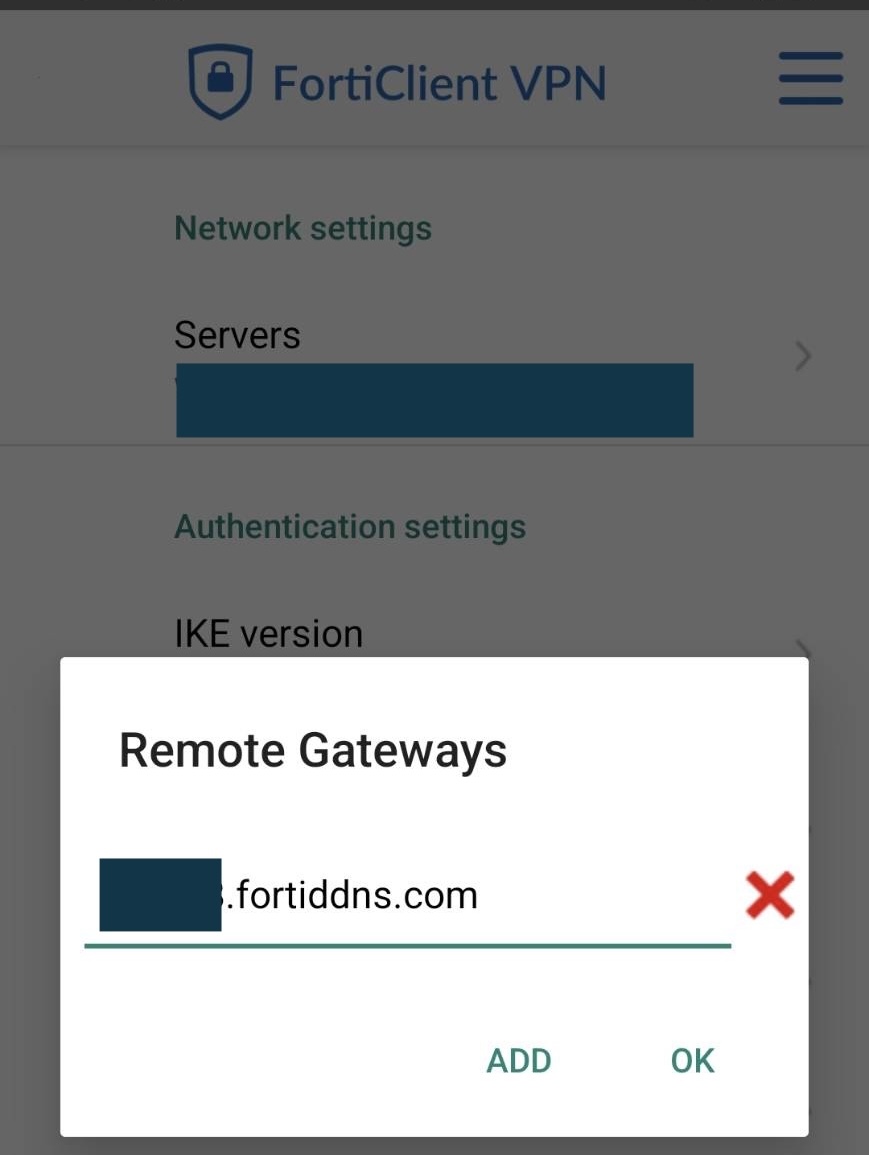
12. ใส่ชื่อ Domain ที่ต้องการจะเชื่อมต่อ
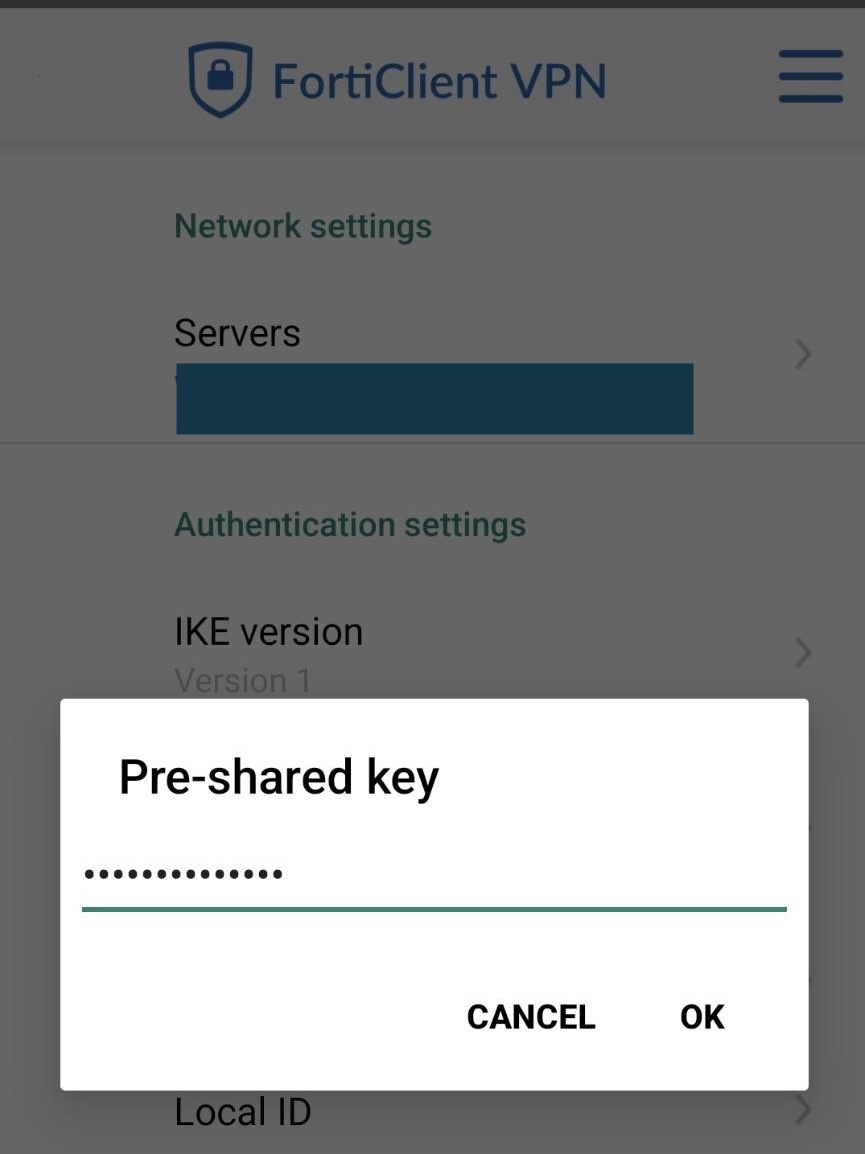
13.ใส่ Pre-sharedKey ที่ตั้งไว้ตามข้อ 2
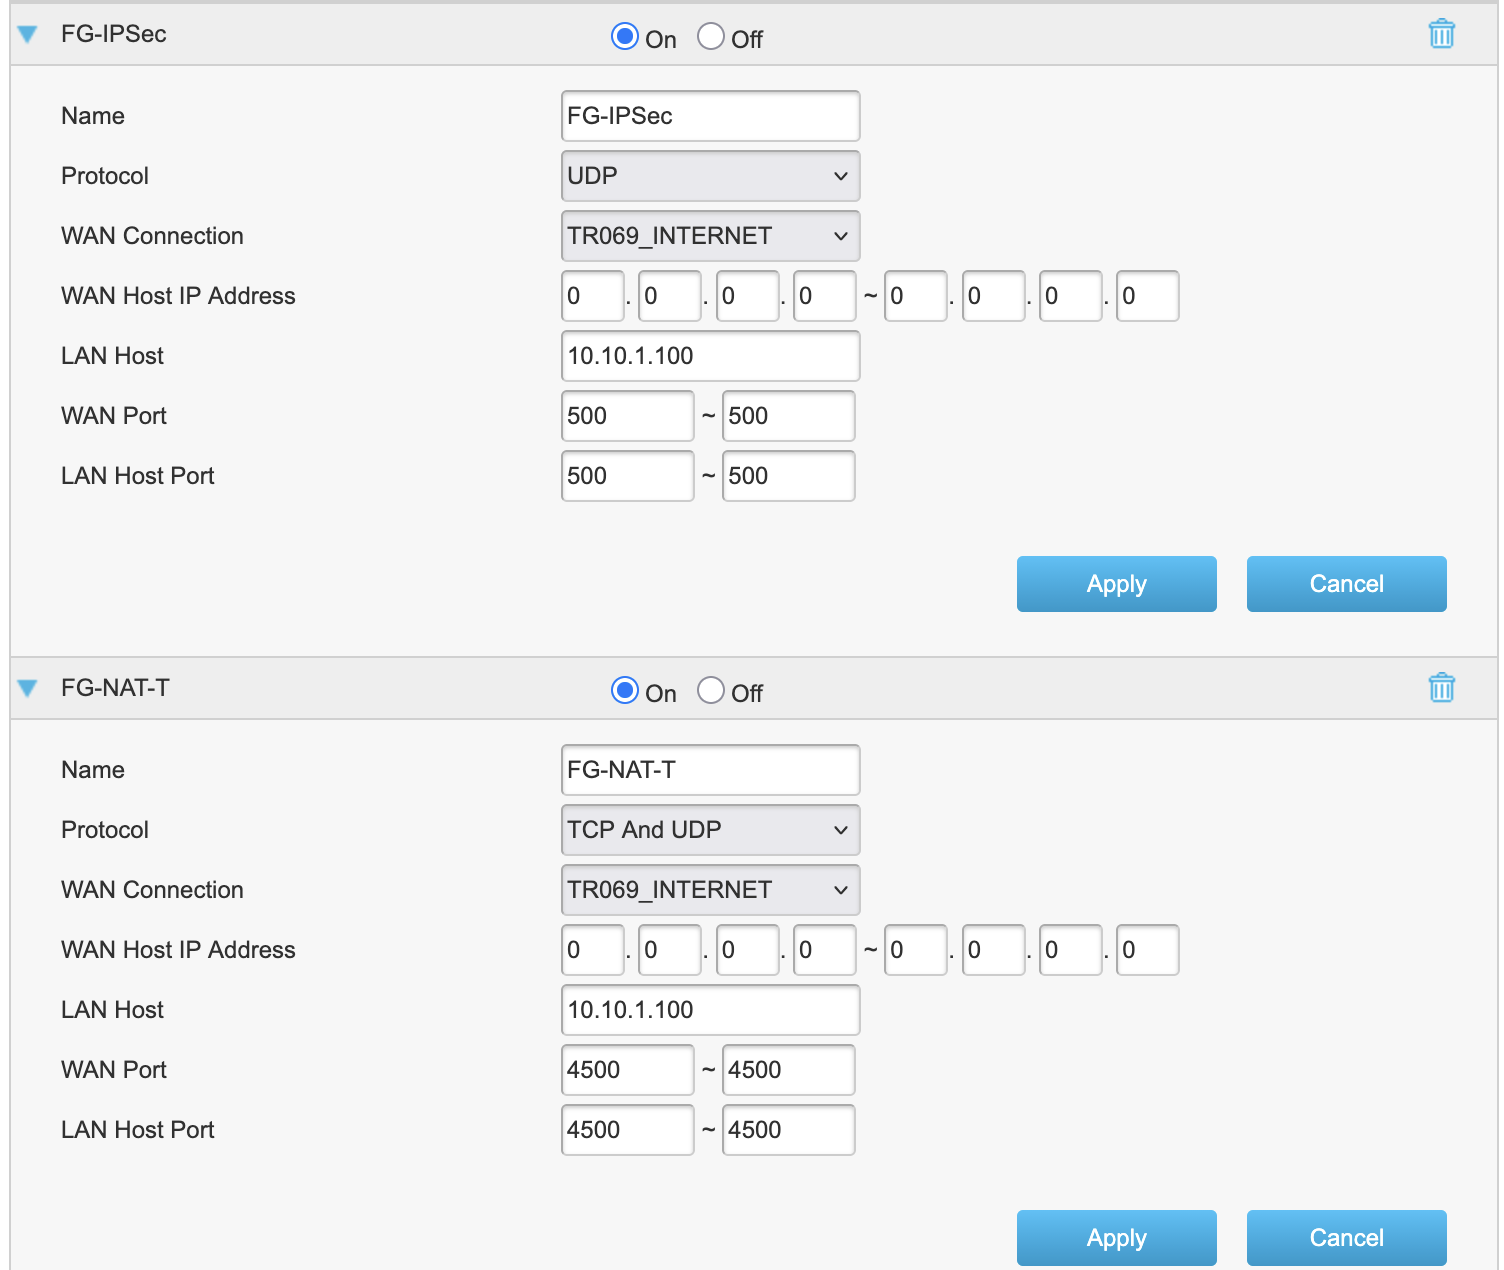
14.ถ้าต่อจาก Router ก็ไป Forward Port มาที่ Fortigate
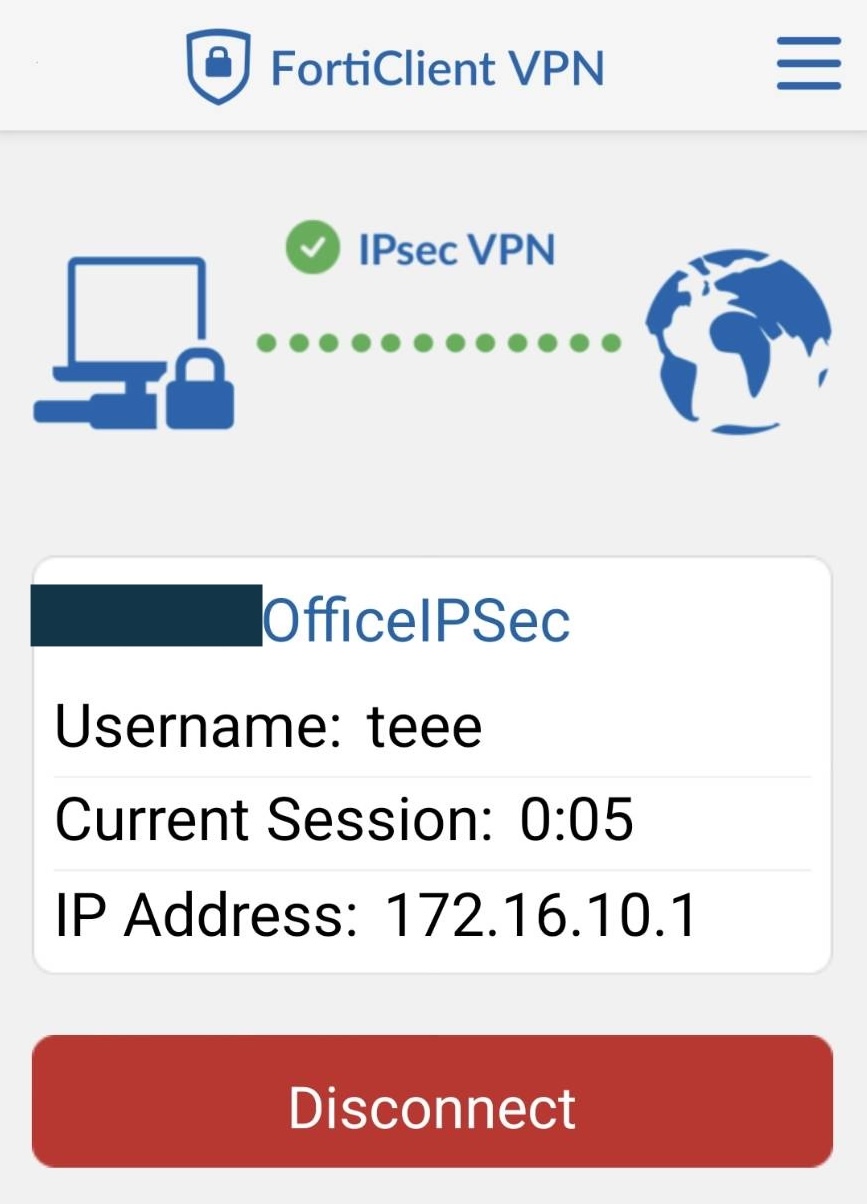
15. ทดสอบการเชื่อมต่อ
Fortigate วิธีการทำ SSL-VPN โดยใช้งาน Internet บ้าน (True,AIS,NT)
ปัญหาคือ Internet ที่ใช้งานตามบ้านไม่ได้ทำการ Fix IP ไว้ทำให้ได้รับ Public IP ไม่ซ้ำกันทำให้ยากที่จะ เข้าใช้งานจาก Public Interet
Diagram
ส่วนใหญ่ต้องแก้ปัญหาด้วยการใช้งาน Dynamic DNS ซึ่งต้องสมัครใช้งานเรื่อยๆ เช่น no-ip.com,dyndns.org
แต่ใน fortigate ได้มีบริการ dynamic dns ติดมาด้วย ดังนั้นจะต้องไปเปิดใช้งานเพื่อใช้คุณสมบัตินี้
ให้ไปที่เมนู Network > DNS
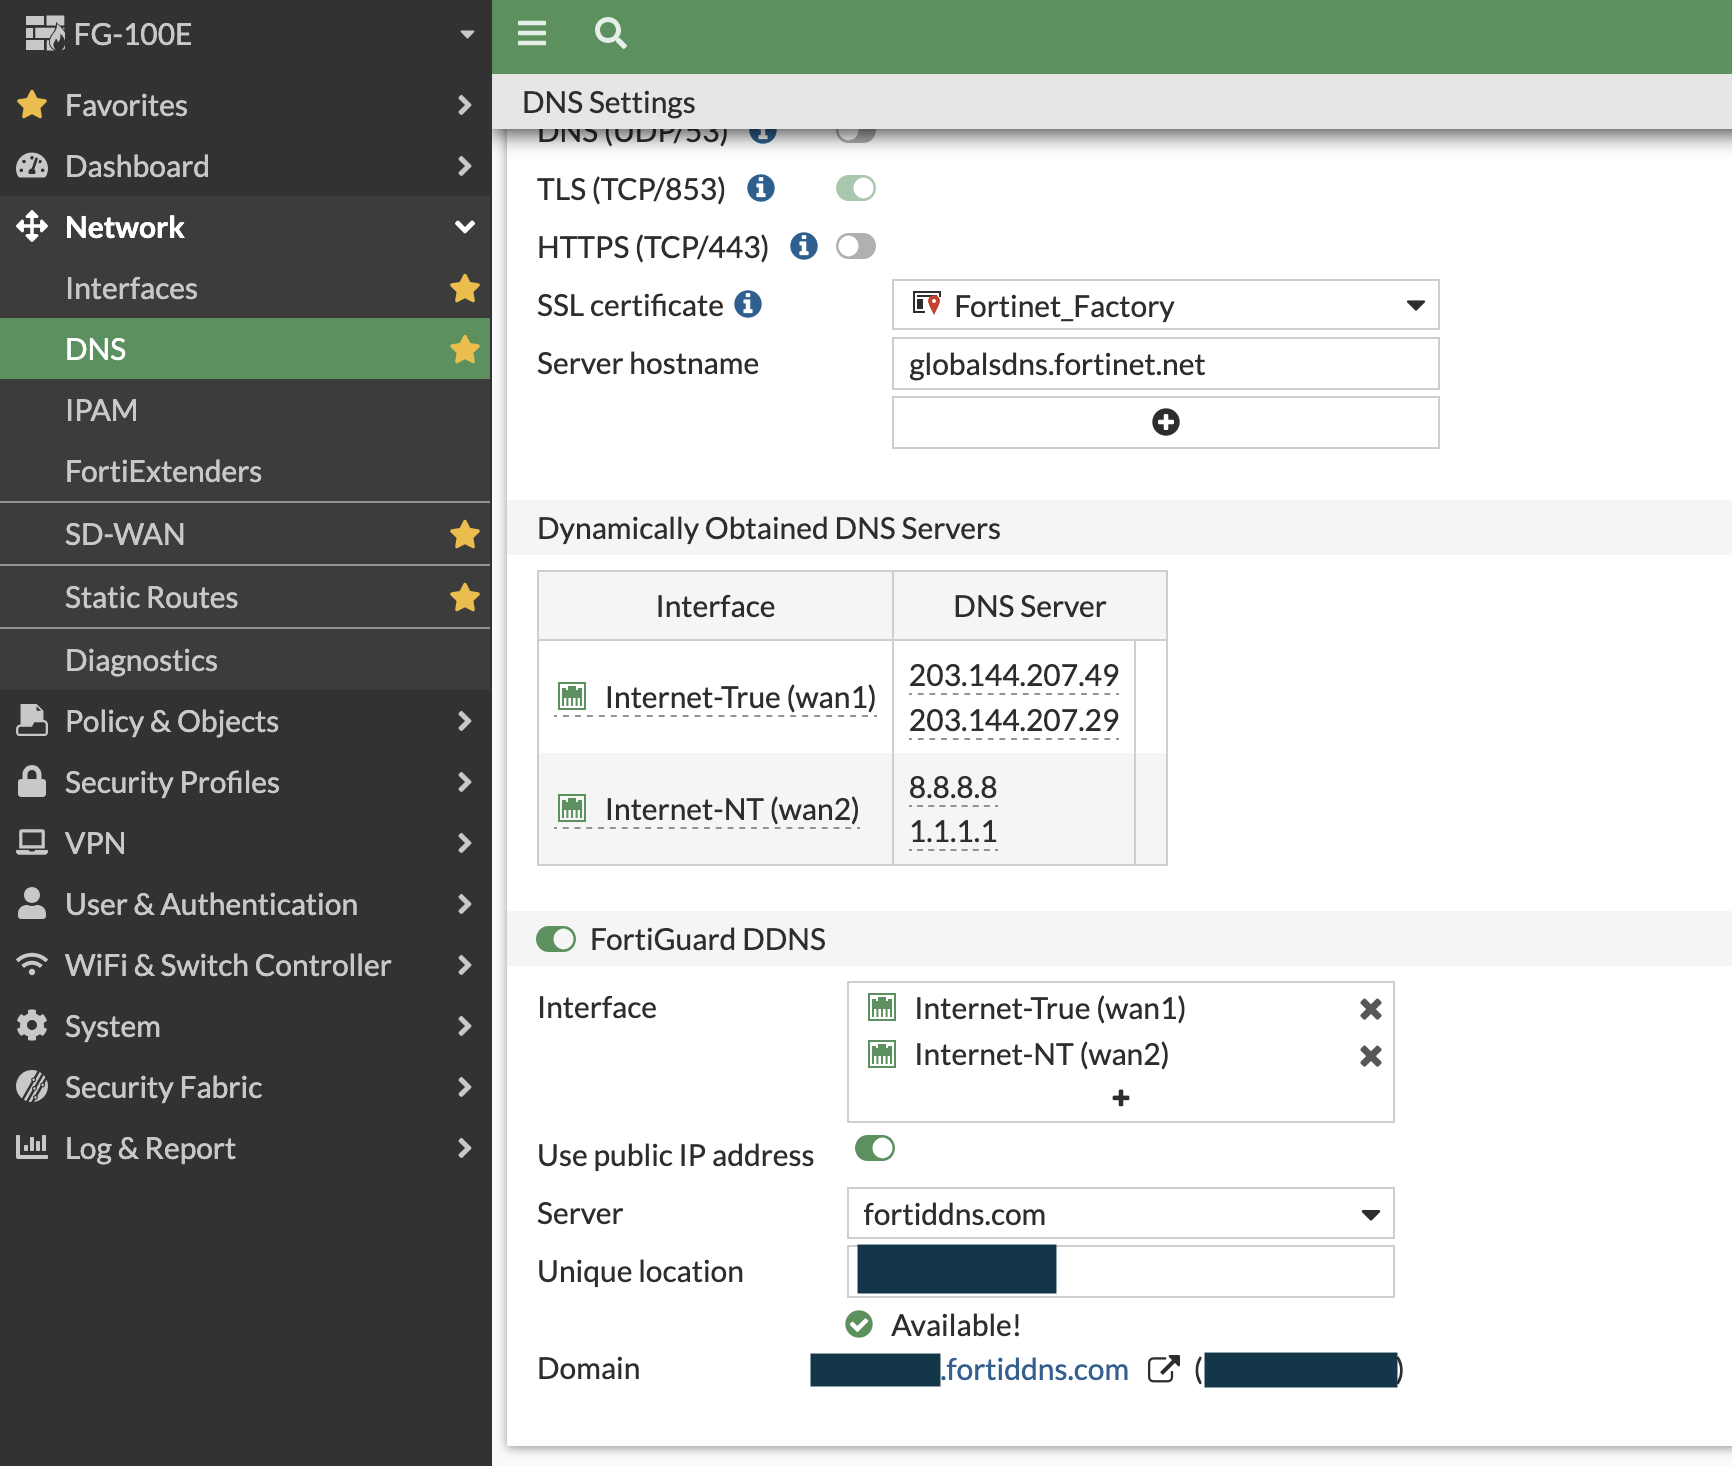
เปิดใช้งาน FortiGuard DDNS
เลือก Interface ( internet ที่ใช้งานอยู่)
เลือก Server ที่ ทาง Fortigate เปิดให้ใช้บริการ
Unique location (พิมพ์ชื่อที่ต้องการใช้งานโดยจะไม่ซ้ำกับชื่ออื่นๆที่ใช้งานไปแล้ว)
จากนั้นก็จะได้ ชื่อที่เราตั้ง . ตามด้วย Domain DDNS ที่ Fortigate ให้ใช้งานได้ พร้อมแสดง Public IP ของเราที่ใช้งาน
จากนั้นก็ไป Forward Port บน Router และ กำหนด VPN SSL Port ที่เราต้องการใช้งานในที่นี้จะกำหนดให้เป็นพอร์ท 10443
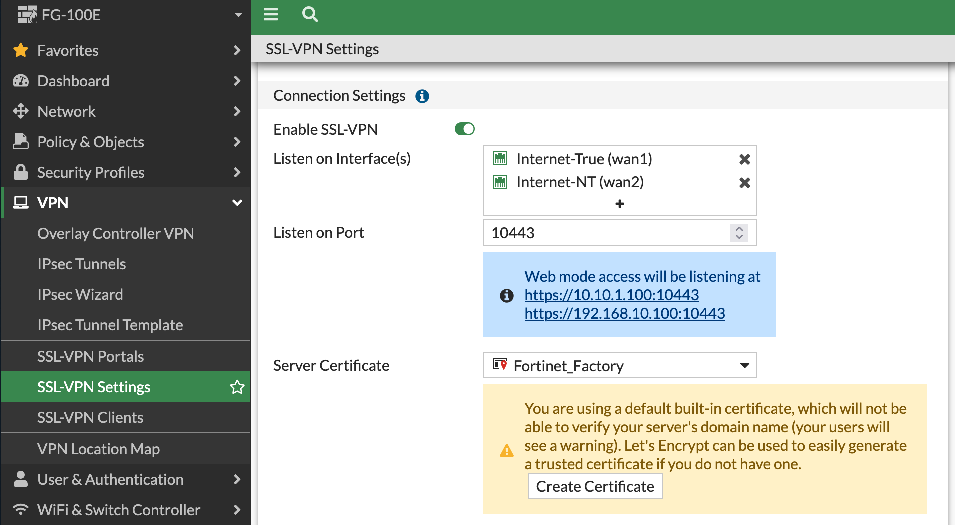
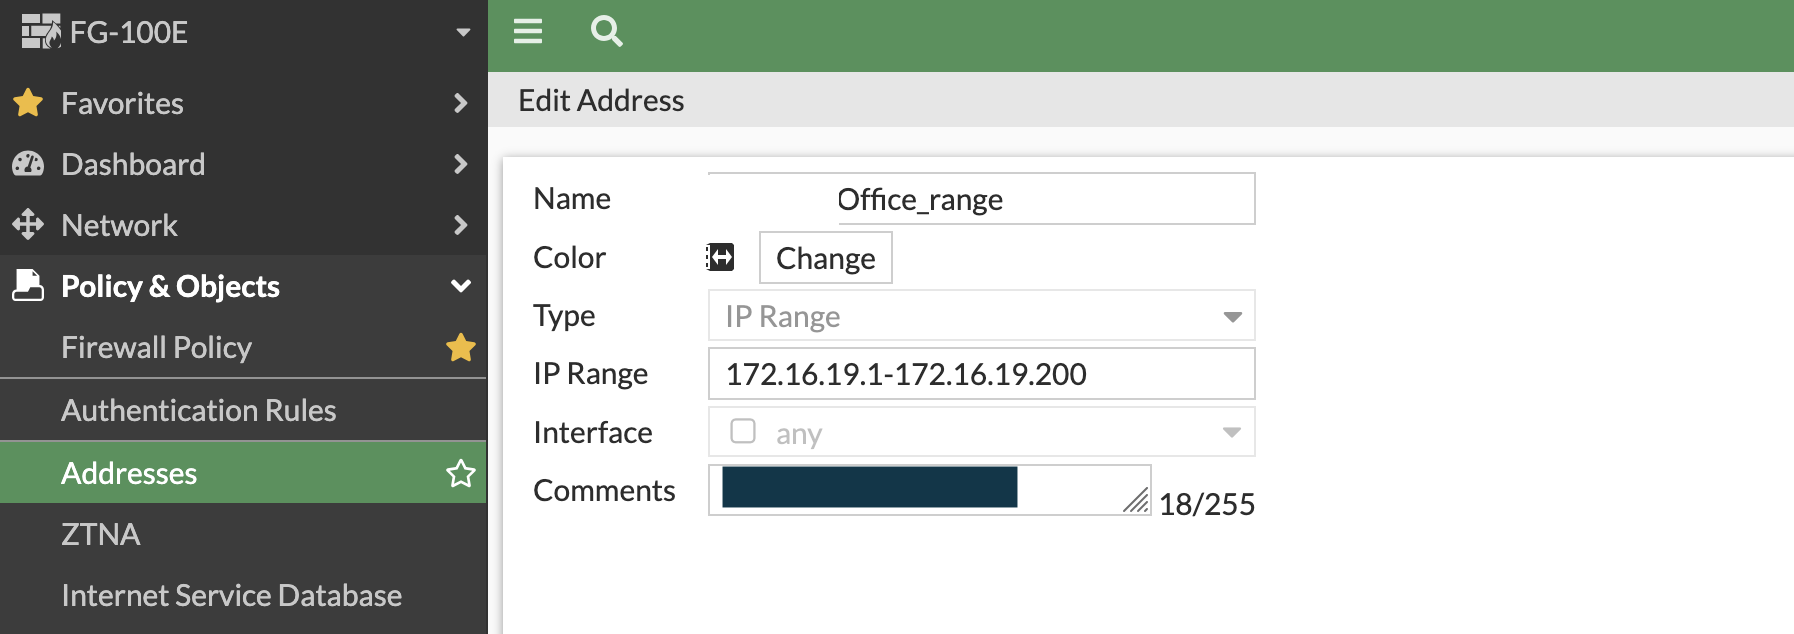
ไปสร้างกลุ่ม IP Address สำหรับใช้งาน VPN ว่างต้องการ Range IP เท่าไหร่ โดยสามารถใช้งาน Default ที่ระบบ
สร้างให้หรือสร้างเองก็ได้ ในที่นี้จะกำหนดเอง ตามรูป
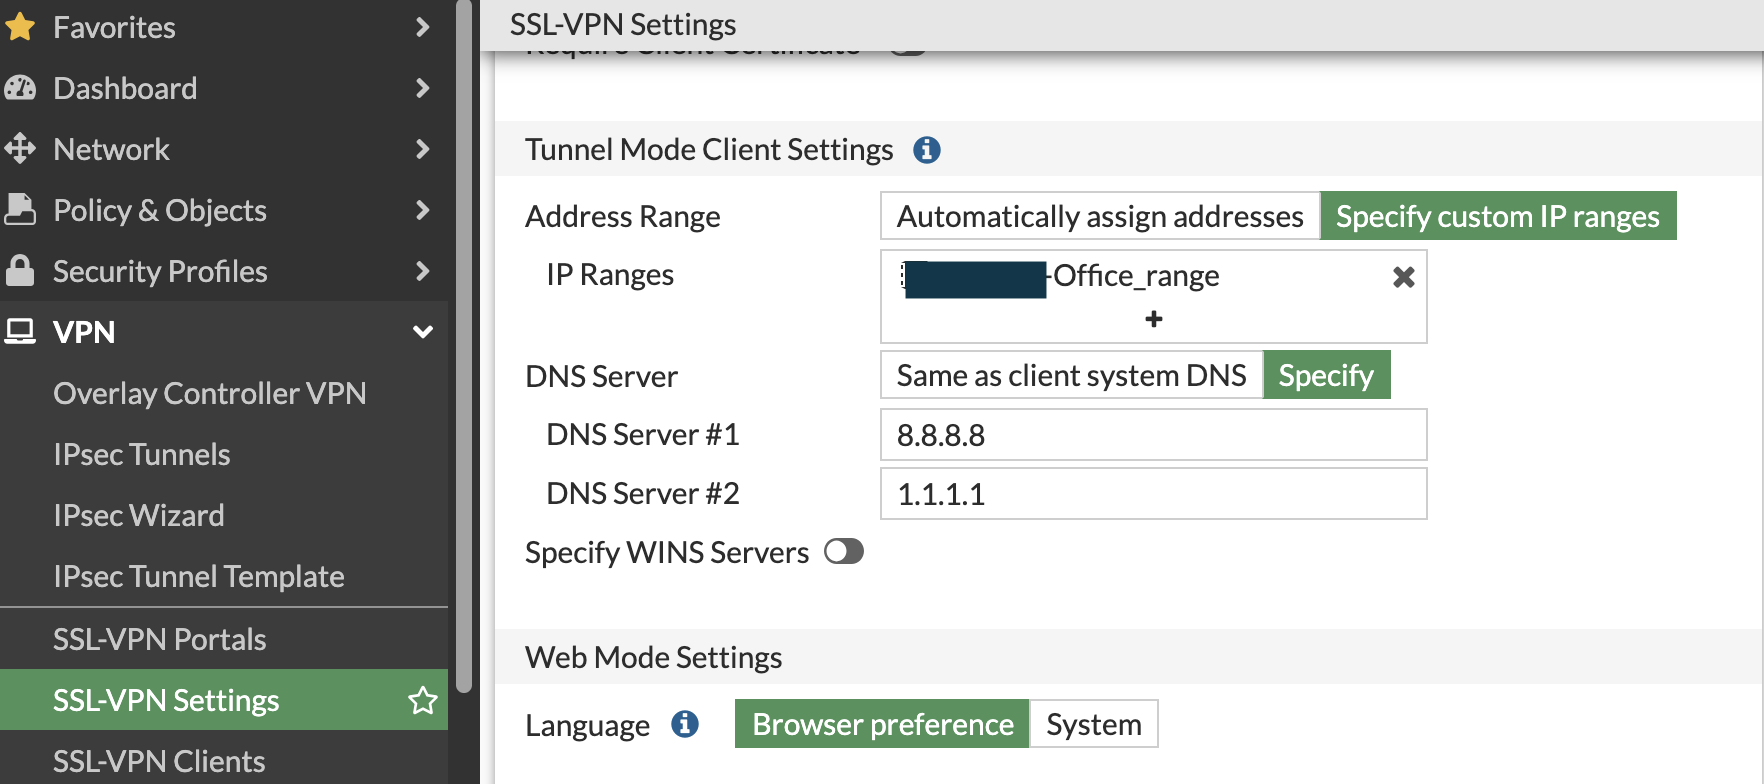
ไปเพิ่มบน VPN Setting ด้วย
จากนั้นไปสร้างกลุ่มที่จะ VPN เข้ามาใช้งาน และ Account ที่จะใช้งาน Login
ชื่อกลุ่มตั้งเป็นชื่ออะไรก็ได้ และเลือกสมาชิคเข้ากลุ่มที่ต้องการใช้งาน vpn
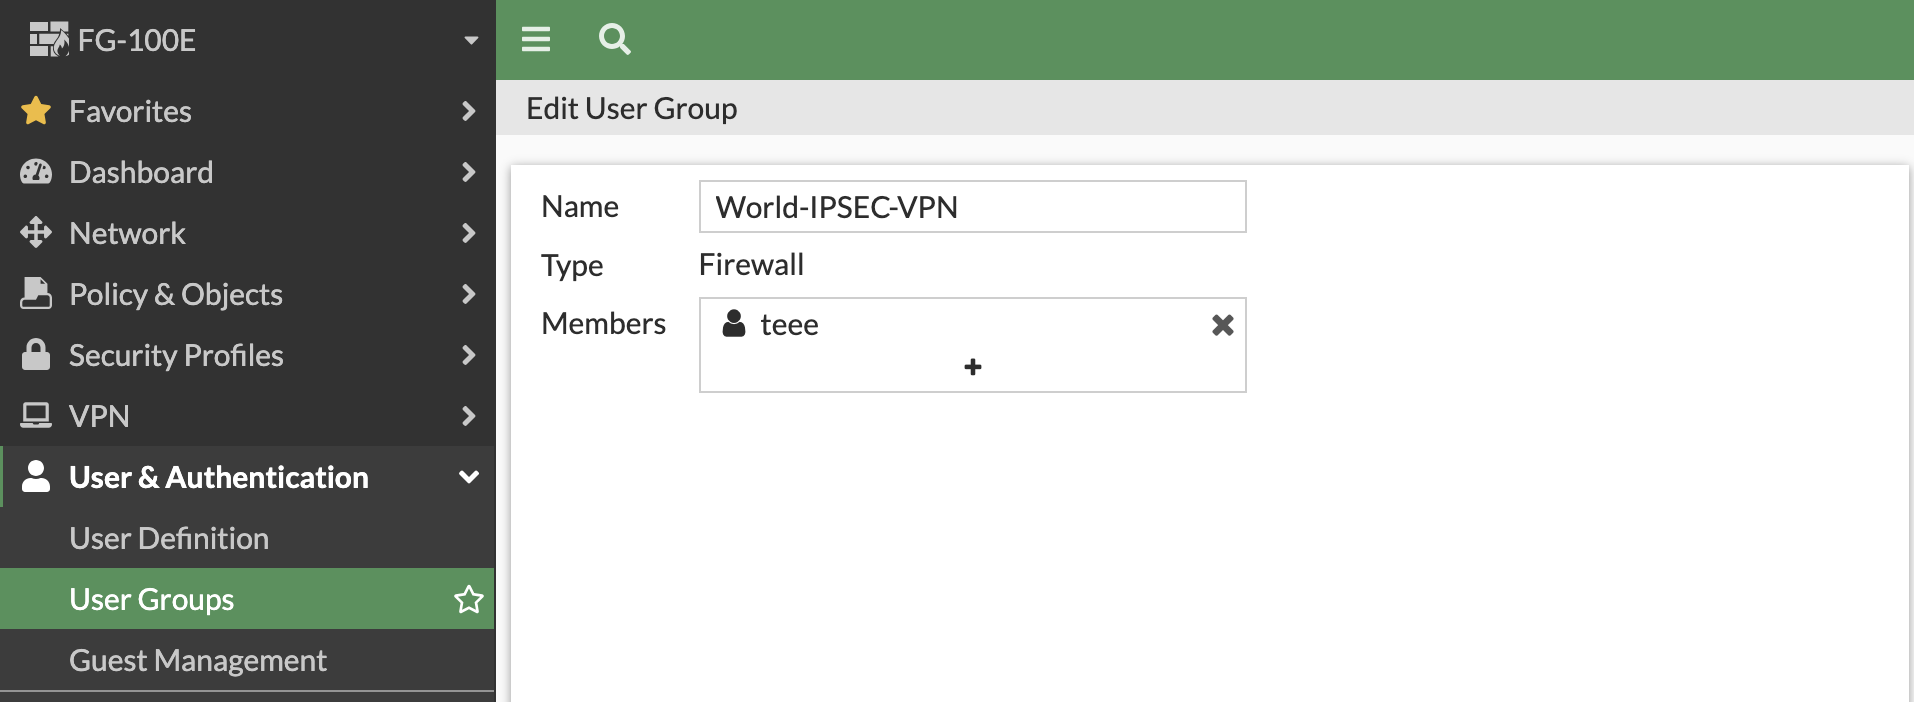
ไปเพิ่มกลุ่มนี้ใน Authentication/Portal Mapping ด้วย
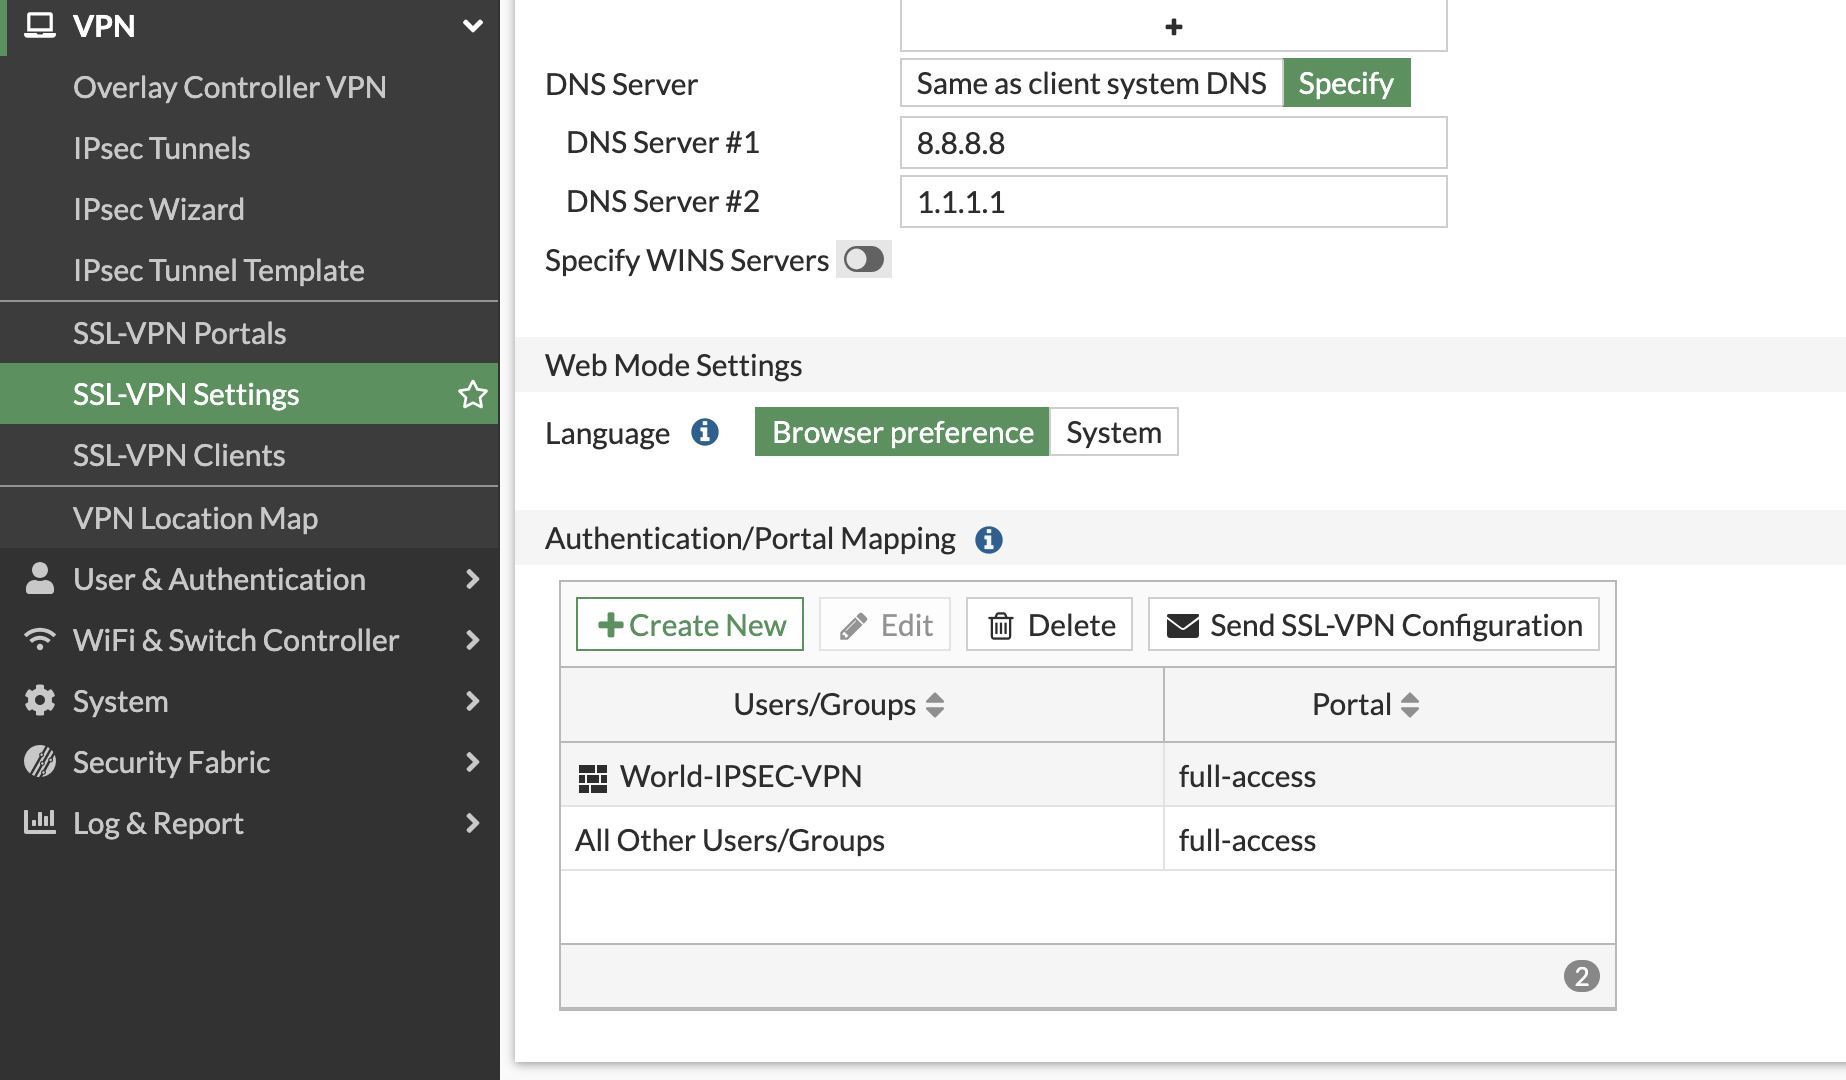
หลังจากตั้งค่า VPN Setting เสร็จแล้วก็ให้ไปตั้งค่าที่ Firewall Policy เพื่ออนุญาตให้ VPN เข้ามา
Outgoing Interface คือ VLAN ในออฟฟิศ VLAN10-10.10.10.0/24 ตาม Diagram
Destination ก็ใส่เป็น VLAN10
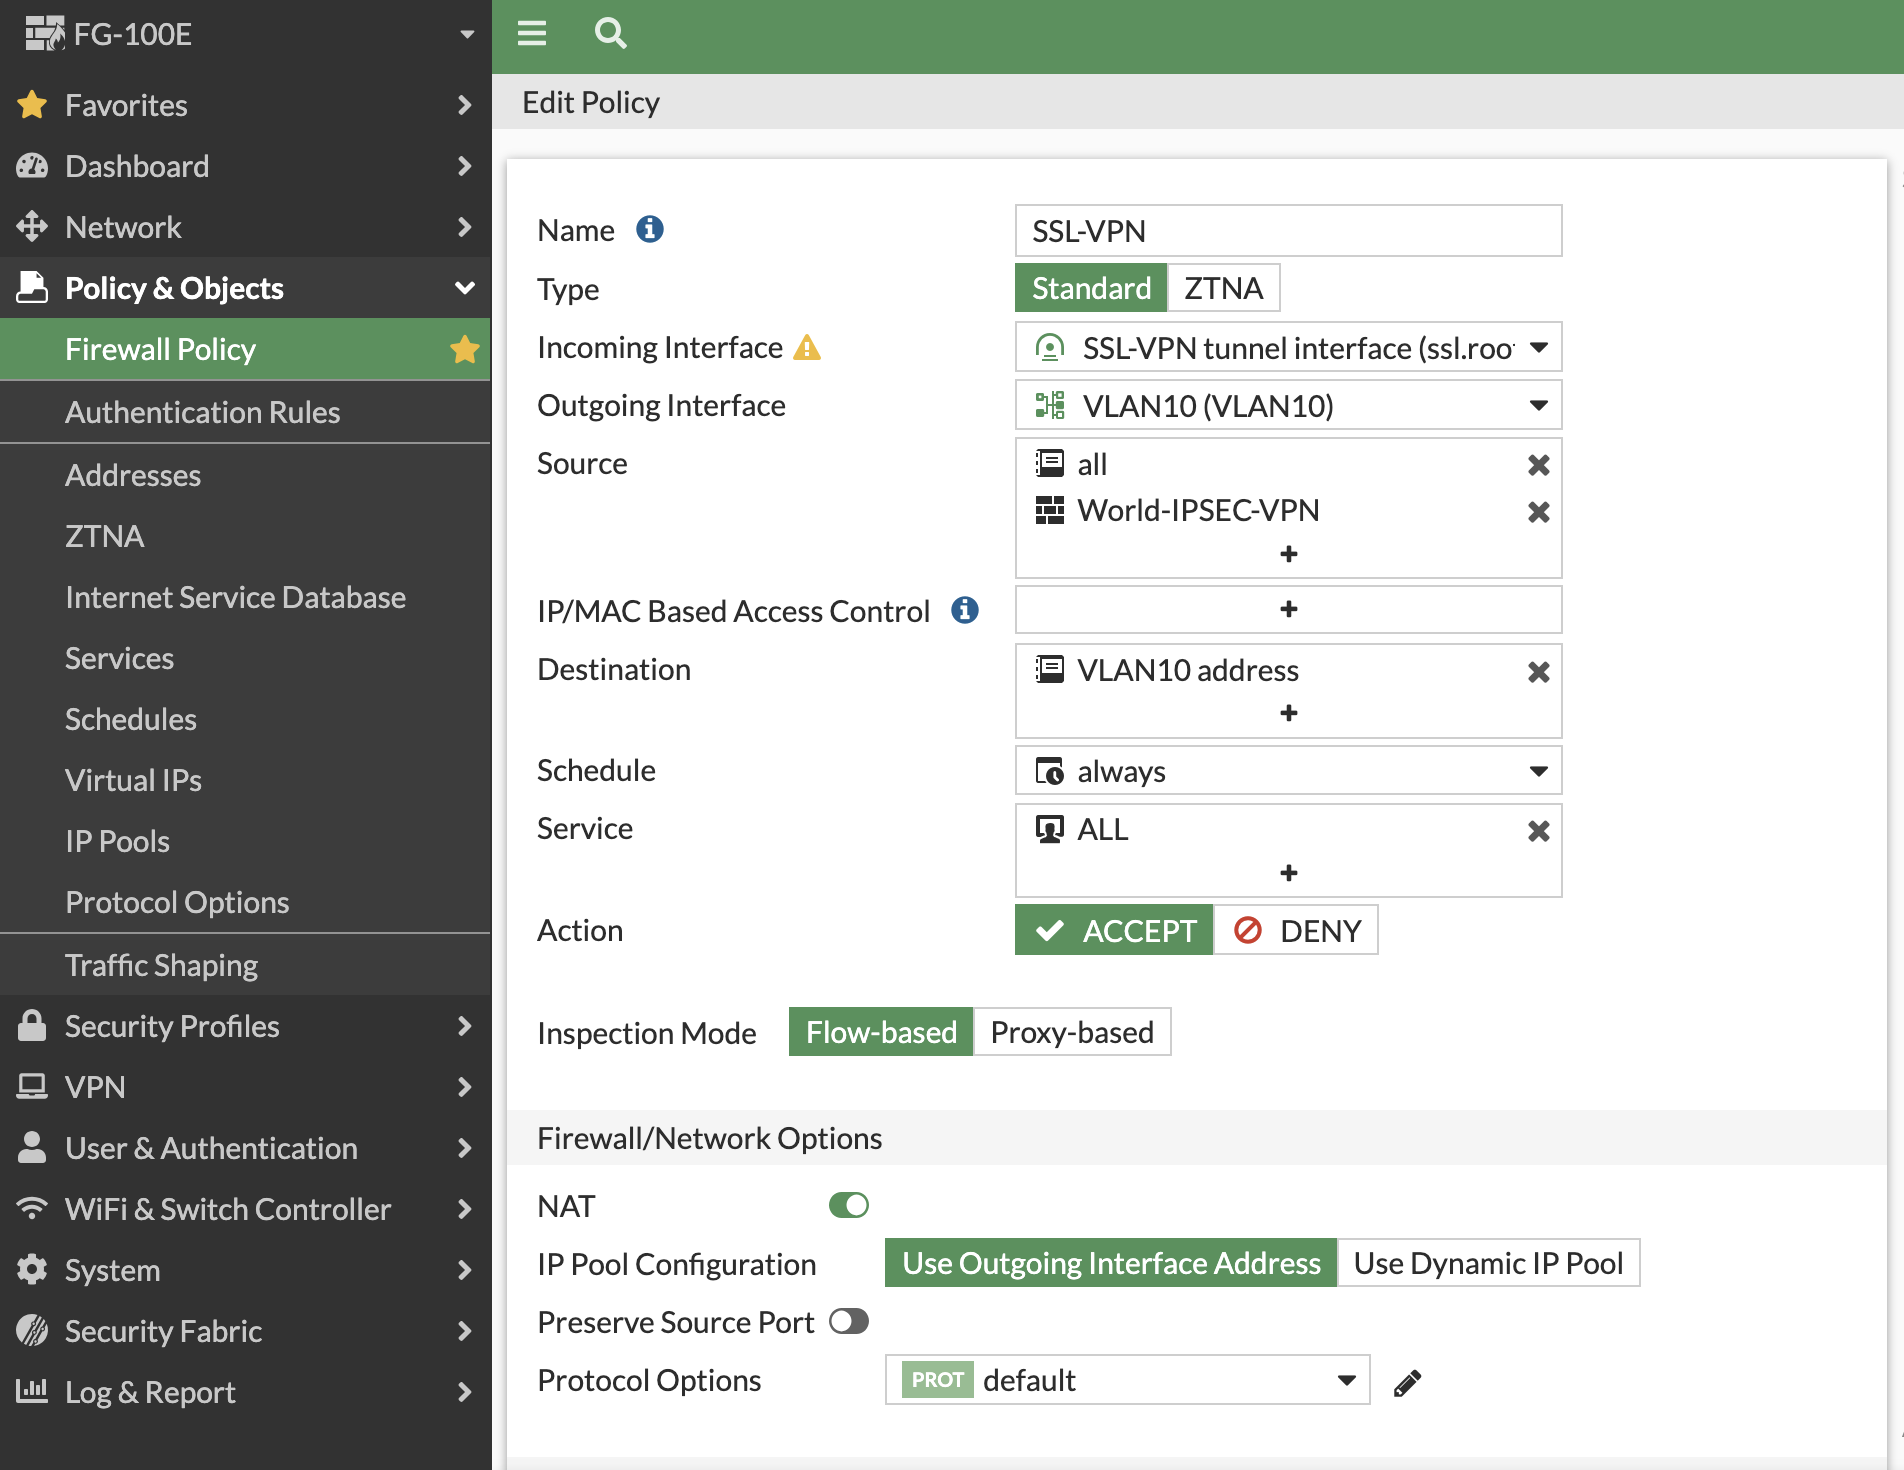
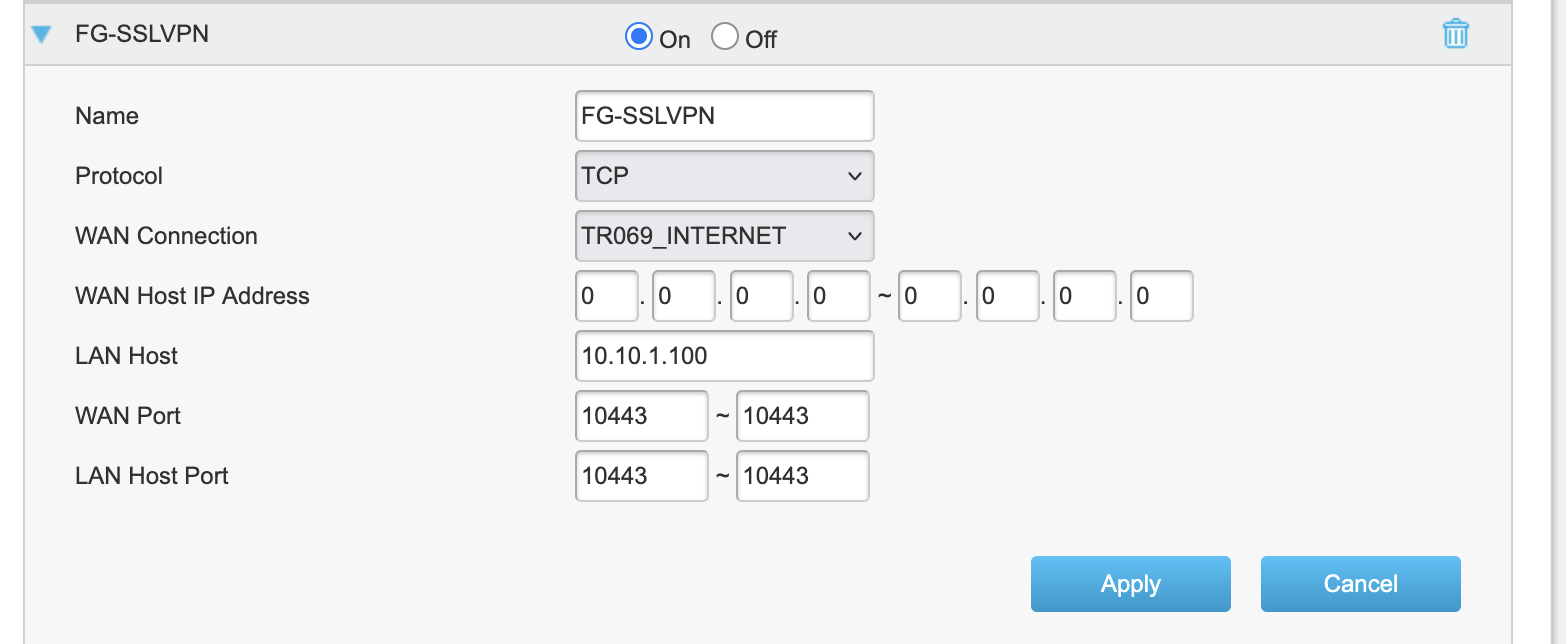
สุดท้ายอย่าลืมไป Forward Port จาก Router เพื่อใช้งาน พอร์ท 10443 ตามที่ตั้งค่า ไว้ใน VPN Setting
LAN Host คือ IP ของ Fortigate ขา WAN ที่ต่อจาก Router เพื่อออก Internet
หลังจาก Forward Port เรียบร้อยแล้วก็ทดสอบการใช้งาน โดยไป Download Fortinet Client มาติดตั้งและลองทดสอบต่อ VPN
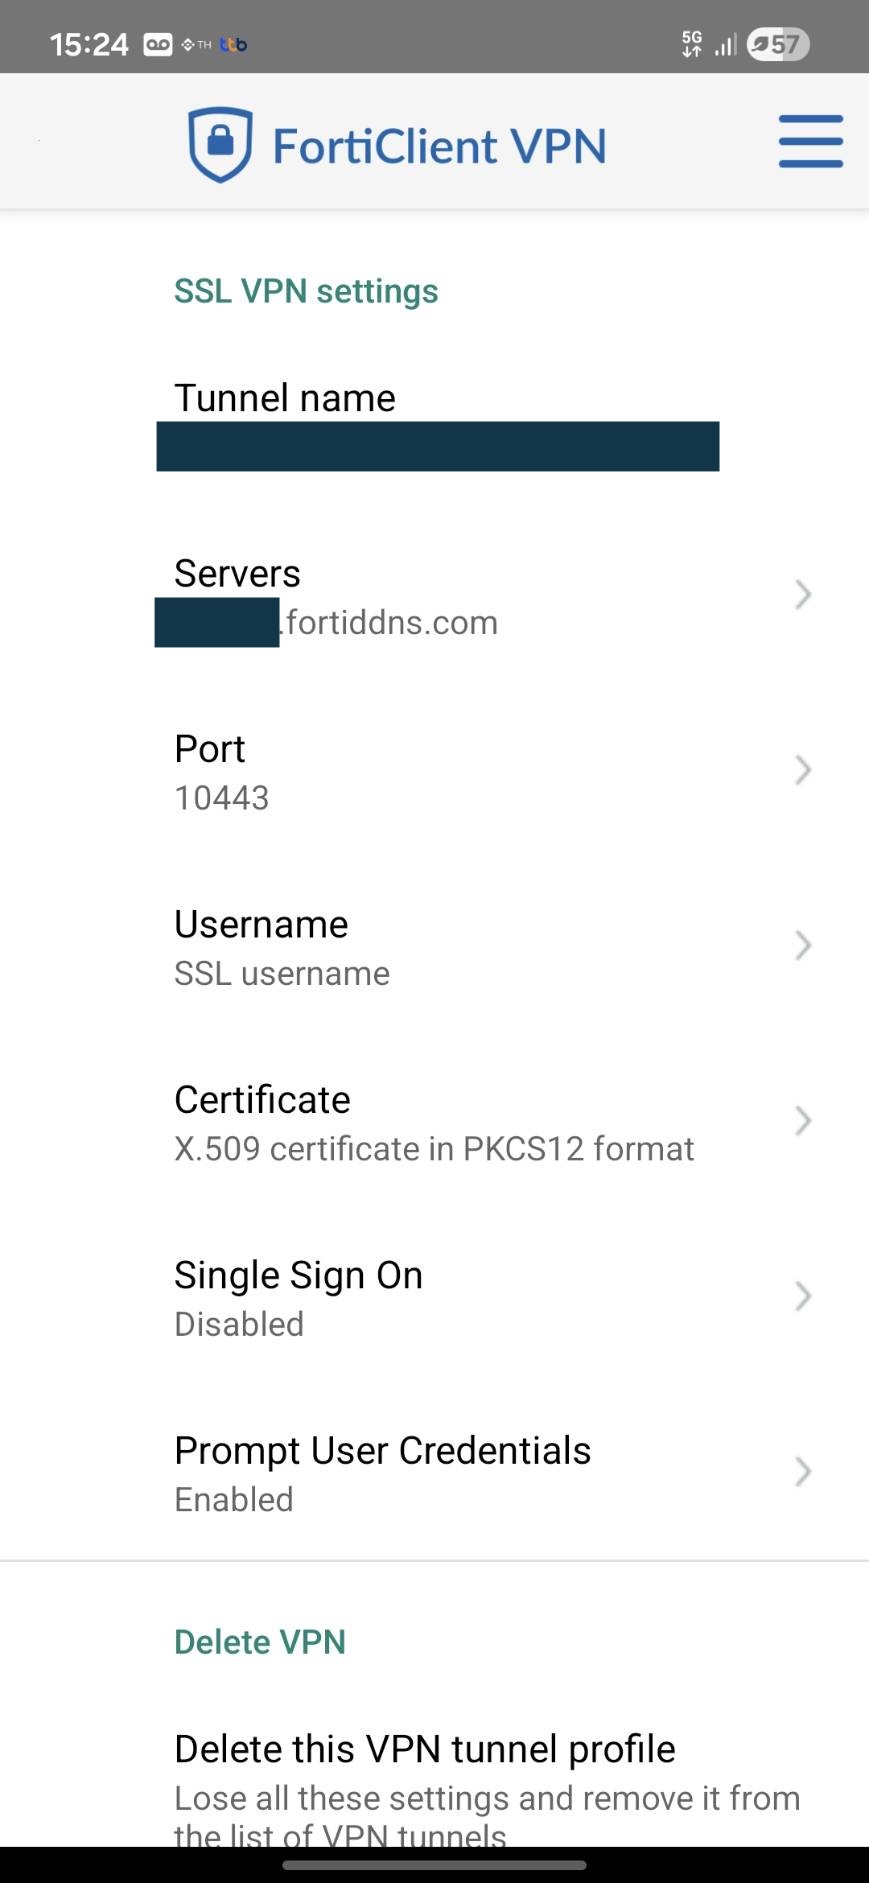
สร้าง VPN Connection Name ตามชอบ
Server : ใส่เป็นชื่อที่ได้จองไว้ตอนเปิด FortiGuard DDNS. เสร็จแล้ว Save แล้วลองเขื่อมต่อดู
การ Map External Public IP ไปที่ Internal Server IP
การ Map External Public IP ไปที่ Internal Server IP เพื่อให้ Server
สามารถเข้าใช้งานได้จาก Internet และสามารถนำ IP Public ไป Map DNS เพื่อเข้าใช้งานผ่าน Domain Name ได้ขั้นแรกให้ทำการ Map External Public IP Address กับเครื่อง Server ของเราก่อน

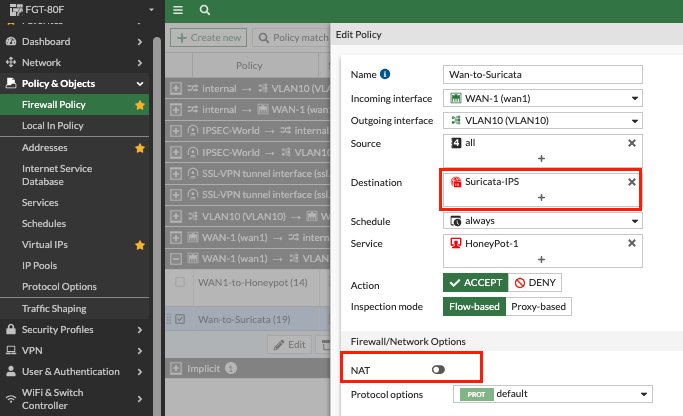
จากนั้นก็นำไปใช้งานโดยไปกำหนด Policy ที่ Firewall
โดยกำหนดให้ Destination เป็น VirtualIPs ที่ได้ Map ไว้จากด้านบน
อย่าลืม Disable NAT ด้วย เพราะเราจะทำให้ได้ Log ที่วิ่งเข้ามาที่เครื่องได้ IP จริงจาก Public
การสร้าง Geo Location ให้เฉพาะ IP ภายในประเทศเข้าได้เท่านั้น
ขั้นแรกให้ไปที่เมนู Policy&Objects > Addresses และเลือก Type เป็น Geography / Thailand
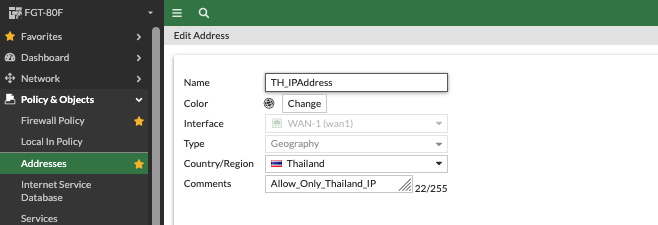
การนำไปใช้ ให้เลือก Source จาก Address ที่ได้สร้างไว้