Archive for the ‘Linux’ Category
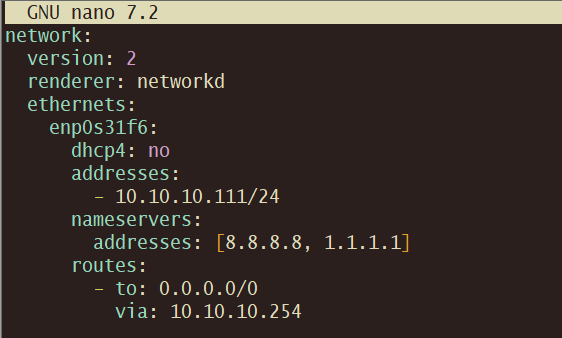
Netplan Ubuntu
LAN
nano /etc/netplan/00-installer-config.yaml
sudo chmod 600 /etc/netplan/00-installer-config.yaml
sudo netplan apply
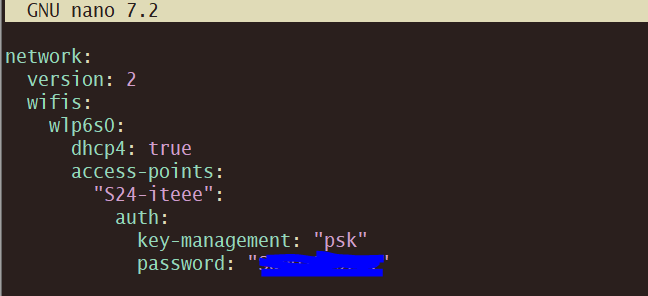
WiFi
sudo nano /etc/netplan/50-cloud-init.yaml
ขึ้นข้อความ -bash: warning: setlocale: LC_CTYPE: cannot change locale (UTF-8): No such file or directory
ข้อความนี้:
-bash: warning: setlocale: LC_CTYPE: cannot change locale (UTF-8): No such file or directory
💡 หมายเหตุ: ข้อความ warning นี้ไม่กระทบการใช้งานปกติของระบบ แต่แก้ไขแล้วจะไม่ขึ้นทุกครั้งที่เปิด shell
เกิดจาก ระบบไม่รู้จัก locale ที่คุณตั้งค่าไว้ โดยเฉพาะ UTF-8
1. ตรวจสอบ locale ที่ติดตั้ง:
teee@san:~$ locale -a
C
C.utf8
en_US.utf8
POSIX
th_TH.utf8
คุณอาจเห็นรายการเช่น en_US.utf8 หรือ th_TH.utf8
2.ถ้าไม่มี locale ที่ต้องการ ให้ generate:
ตัวอย่างสำหรับ en_US.UTF-8:
sudo locale-gen en_US.UTF-8
sudo update-locale LANG=en_US.UTF-8
3.แก้ไฟล์ environment ของผู้ใช้ (เช่น ~/.bashrc หรือ ~/.profile)
teee@san:~$ export LC_CTYPE=UTF-8
teee@san:~$ export LC_CTYPE=en_US.utf8
teee@san:~$ source ~/.bashrc
teee@san:~$ locale
LANG=en_US.UTF-8
LANGUAGE=en_US:en
LC_CTYPE=”en_US.UTF-8″
LC_NUMERIC=”en_US.UTF-8″
LC_TIME=”en_US.UTF-8″
4. Logout/Login อีกครั้ง
การอัปเกรด จาก Debian 12.11 (Bookworm) → Debian 13.0 (Trixie)
การอัปเกรด จาก Debian 12.11 (Bookworm) → Debian 13.0 (Trixie) ทำได้แบบ in-place upgrade (ไม่ต้องลงใหม่)
ขั้นตอนการอัปเกรด Debian 12 → 13
⚠️ ข้อควรระวัง
• ควร backup ข้อมูลและ config สำคัญ (เช่น /etc, /home, ฐานข้อมูล ฯลฯ) ก่อน
• ทำการอัปเกรดผ่าน SSH + tmux/screen เผื่อเน็ตหลุดจะได้ไม่พัง
• ต้องมี free space ใน / และ /boot พอสมควร
1. อัปเดต Debian 12 (Bookworm) ให้ล่าสุดก่อน
sudo apt update
sudo apt upgrade
sudo apt full-upgrade
sudo apt –purge autoremove
ตรวจสอบเวอร์ชัน
root@san:~# lsb_release -a
No LSB modules are available.
Distributor ID: Debian
Description: Debian GNU/Linux 12 (bookworm)
Release: 12
Codename: bookworm
ควรขึ้นว่า Debian GNU/Linux 12.11 (bookworm)
2. เปลี่ยน APT sources ไปที่ Trixie
เปิดไฟล์ /etc/apt/sources.list ด้วย editor (เช่น nano)
sudo nano /etc/apt/sources.list
แล้วเปลี่ยนคำว่า bookworm → trixie
#deb http://deb.debian.org/debian bookworm main contrib non-free non-free-firmware
#deb http://deb.debian.org/debian-security bookworm-security main contrib non-free non-free-firmware
#deb http://deb.debian.org/debian bookworm-updates main contrib non-free non-free-firmware
deb http://deb.debian.org/debian trixie main contrib non-free non-free-firmware
deb http://deb.debian.org/debian-security trixie-security main contrib non-free non-free-firmware
deb http://deb.debian.org/debian trixie-updates main contrib non-free non-free-firmware
3. อัปเดตแพ็กเกจให้เห็น repo ใหม่
sudo apt update
4. ทำ minimal upgrade
sudo apt upgrade –without-new-pkgs
5. อัปเกรดเต็มระบบเป็น Debian 13
sudo apt full-upgrade
ตรงนี้จะใช้เวลานาน และอาจมี prompt ถามว่าจะเก็บไฟล์ config เดิมหรือใช้ไฟล์ใหม่ (แนะนำกด N เพื่อเก็บ config เดิม เว้นแต่คุณอยาก reset)
6. ล้างของเก่า
sudo apt –purge autoremove
7. รีบูตเครื่อง
sudo reboot
8. ตรวจสอบเวอร์ชันหลังอัปเกรด
lsb_release -a
ควรขึ้นว่า
root@san:/home/teee# lsb_release -a
No LSB modules are available.
Distributor ID: Debian
Description: Debian GNU/Linux 13 (trixie)
Release: 13
Codename: trixie
แต่ถ้าขึ้น Error
Description: Debian GNU/Linux 13.0 (trixie)
Errors were encountered while processing:
ca-certificates
php-composer-ca-bundle
python3-certifi
python3-requests
freeradius-config
python3-pip
python3-httplib2
ca-certificates-java
python3-reportbug
liblwp-protocol-https-perl
libwww-perl
python3-pip-whl
reportbug
E: Sub-process /usr/bin/dpkg returned an error code (1)
ปัญหานี้เจอบ่อยตอน major upgrade ของ Debian → สาเหตุคือ dependency chain เปลี่ยน / มีไฟล์ค้าง / แพ็กเกจไม่ compatible แบบตรงๆ
root@san:~# dpkg –configure -a
Setting up ca-certificates (20250419) …
Updating certificates in /etc/ssl/certs…
0 added, 0 removed; done.
Setting up php-composer-ca-bundle (1.5.6-1) …
Setting up python3-certifi (2025.1.31+ds-1) …
Setting up python3-requests (2.32.3+dfsg-5) …
Setting up freeradius-config (3.2.7+dfsg-1) …
Installing new version of config file /etc/freeradius/3.0/certs/Makefile …
Installing new version of config file /etc/freeradius/3.0/clients.conf …
Installing new version of config file /etc/freeradius/3.0/mods-available/date …
Installing new version of config file /etc/freeradius/3.0/mods-available/detail …
Installing new version of config file /etc/freeradius/3.0/mods-available/eap …
Installing new version of config file /etc/freeradius/3.0/mods-available/json …
Installing new version of config file /etc/freeradius/3.0/mods-available/ldap …
Installing new version of config file /etc/freeradius/3.0/mods-available/ldap_google …
Installing new version of config file /etc/freeradius/3.0/mods-available/linelog …
Installing new version of config file /etc/freeradius/3.0/mods-available/mschap …
Installing new version of config file /etc/freeradius/3.0/mods-available/python3 …
Installing new version of config file /etc/freeradius/3.0/mods-available/radutmp …
Installing new version of config file /etc/freeradius/3.0/mods-available/rest …
Installing new version of config file /etc/freeradius/3.0/mods-available/smsotp …
Configuration file ‘/etc/freeradius/3.0/mods-available/sql’
==> Modified (by you or by a script) since installation.
==> Package distributor has shipped an updated version.
What would you like to do about it ? Your options are:
Y or I : install the package maintainer’s version
N or O : keep your currently-installed version
D : show the differences between the versions
Z : start a shell to examine the situation
The default action is to keep your current version.
*** sql (Y/I/N/O/D/Z) [default=N] ? N
Configuration file ‘/etc/freeradius/3.0/radiusd.conf’
==> Modified (by you or by a script) since installation.
==> Package distributor has shipped an updated version.
What would you like to do about it ? Your options are:
Y or I : install the package maintainer’s version
N or O : keep your currently-installed version
D : show the differences between the versions
Z : start a shell to examine the situation
The default action is to keep your current version.
*** radiusd.conf (Y/I/N/O/D/Z) [default=N] ? N
root@san:~# apt -f install
Reading package lists… Done
Building dependency tree… Done
Reading state information… Done
The following packages were automatically installed and are no longer required:
icu-devtools libicu-dev libnsl-dev libpthread-stubs0-dev libsub-override-perl libtirpc-dev node-busboy node-end-of-stream node-pump python3-httplib2 python3-pycurl python3-pyparsing
python3-pysimplesoap sgml-base
Use ‘apt autoremove’ to remove them.
0 upgraded, 0 newly installed, 0 to remove and 419 not upgraded.
root@san:~# apt autoremove
root@san:~# sudo apt update
root@san:~# apt list –upgradable
root@san:~# apt upgrade
Aug 18 14:07:33 san apachectl[1755]: apache2: Syntax error on line 146 of /etc/apache2/apache2.conf: Syntax error on line 1 of /etc/apache2/mods-enabled/perl.load: Cannot load /usr/lib/apache2/module>
Aug 18 14:07:33 san apachectl[1752]: Action ‘start’ failed.
Aug 18 14:07:33 san apachectl[1752]: The Apache error log may have more information
อันนี้เป็น error ของ Apache2 หลังอัปเกรด Debian → module perl โหลดไม่ได้
ซึ่งหมายถึง ไฟล์ mod_perl.so หายไป หรือไม่ compatible กับ Apache เวอร์ชันใหม่ (เพราะ Debian 13 ใช้ Apache 2.4.62 ขึ้นไป → mod_perl เดิมของ Debian 12 ไม่ใช้ได้แล้ว)
วิธีแก้ปัญหา
1. เช็คว่ามี mod_perl package ติดตั้งอยู่หรือไม่
dpkg -l | grep libapache2-mod-perl2
•ถ้าไม่เจอ → ต้องติดตั้งใหม่
•ถ้ามีแต่ไฟล์ไม่อยู่ → ลอง reinstall
2. ติดตั้งหรือ reinstall mod_perl
sudo apt update
sudo apt install –reinstall libapache2-mod-perl2
3. ถ้ายังมี error → ปิดการโหลด perl module ไปก่อน
sudo a2dismod perl
sudo systemctl restart apache2
Apache จะรันได้ตามปกติ แต่จะ ไม่มี mod_perl (ใช้ CGI/Perl script ไม่ได้)
4. ถ้าต้องการ mod_perl จริง ๆ
•ตรวจสอบ path ของ module:
ls -l /usr/lib/apache2/modules/ | grep perl
•แล้วแก้ไขไฟล์ /etc/apache2/mods-enabled/perl.load ให้ตรงกับไฟล์ที่มีอยู่จริง เช่น:
Apache
LoadModule perl_module /usr/lib/apache2/modules/mod_perl.so
(บางเวอร์ชันอาจจะชื่อ mod_perl.c หรือ path ย้าย)
5. Restart Apache อีกครั้ง
sudo systemctl restart apache2
sudo systemctl status apache2
👉 คำถามคือ: ยังต้องใช้ Perl บน Apache อยู่ไหม (เช่นรัน CGI/Perl script)?
•ถ้าไม่ใช้ → แค่ a2dismod perl แล้ว Apache จะกลับมาปกติ
•ถ้ายังใช้ → ต้องลง libapache2-mod-perl2 ใหม่ให้ตรงกับ Debian 13
✅ เสร็จแล้ว คุณจะได้ Debian 13.0 stable (Trixie)
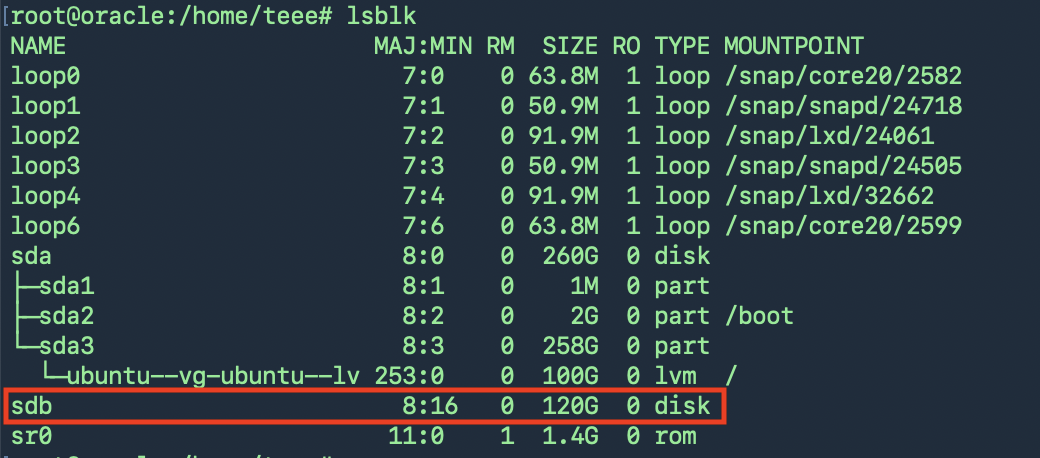
วิธีเพิ่ม Harddisk ให้กับ Linux Guest บน VmWare
วิธีเพิ่ม Harddisk ให้กับ Linux Guest บน VmWare
> Vmware Guest และได้ Edit เพื่อเพิ่ม Harddisk
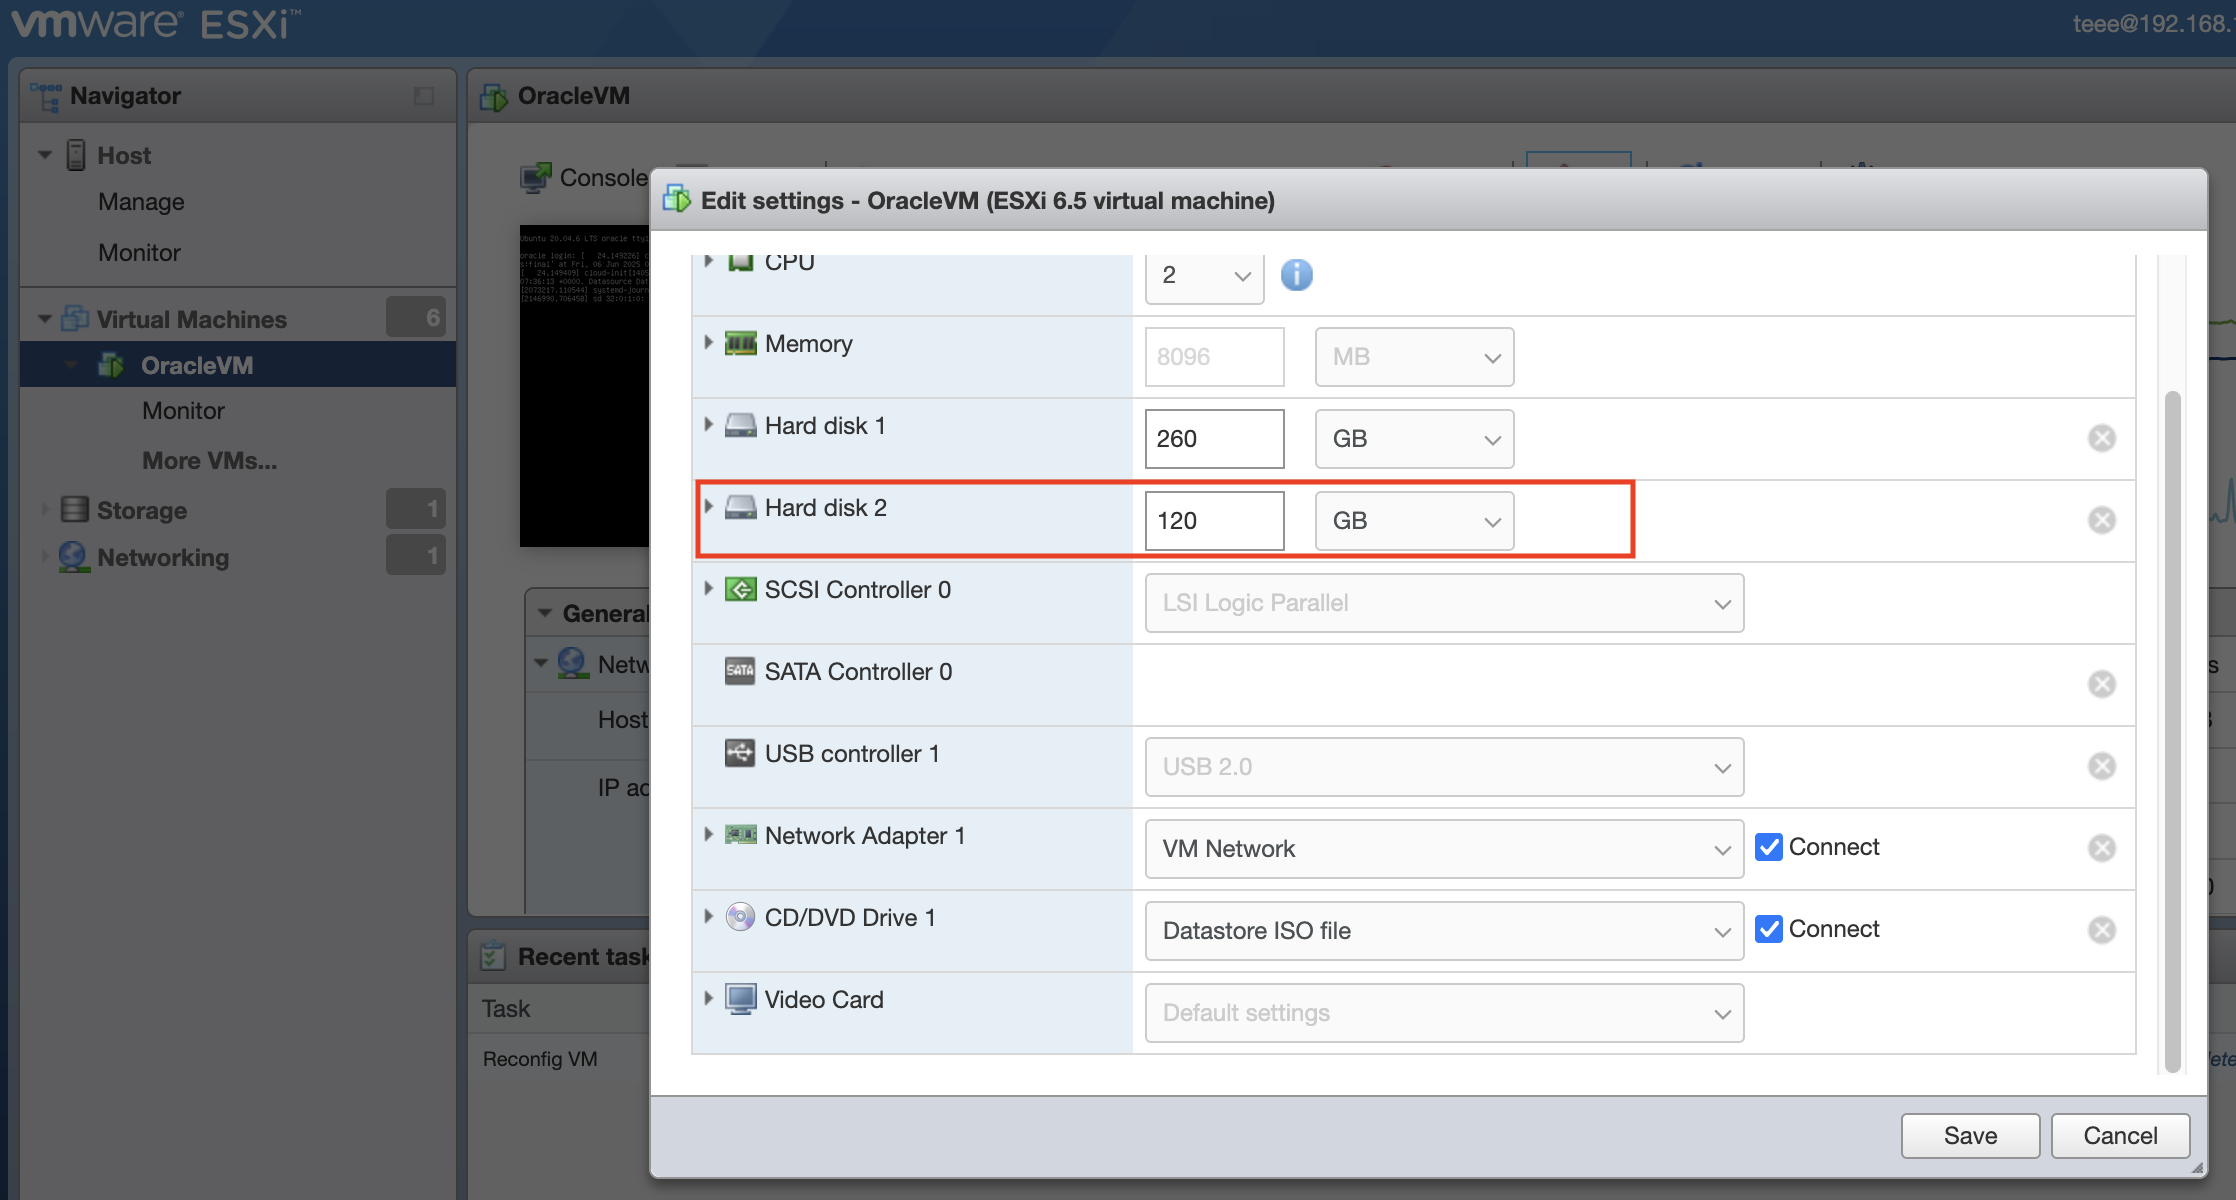
และตรวจสอบ Harddisk ที่เพิ่มเข้าไปใหม่เจอในระบบหรือไม่ด้วยคำสั่ง lsblk
หากไม่เจอ Harddisk ใหม่ที่เพิ่มเข้ามาให้ใช้คำสั่ง
for host in /sys/class/scsi_host/host*; do
echo “- – -” | sudo tee $host/scan
done
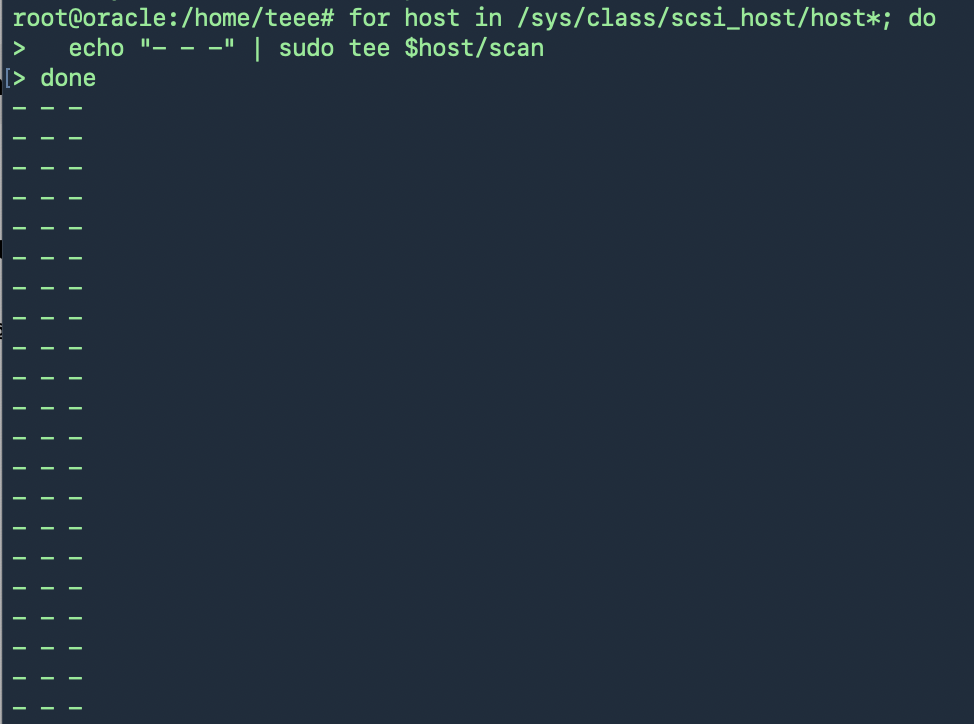
และตรวจสอบใหม่ก็จะเจอ Harddisk ใหม่ที่เพิ่มเข้ามา
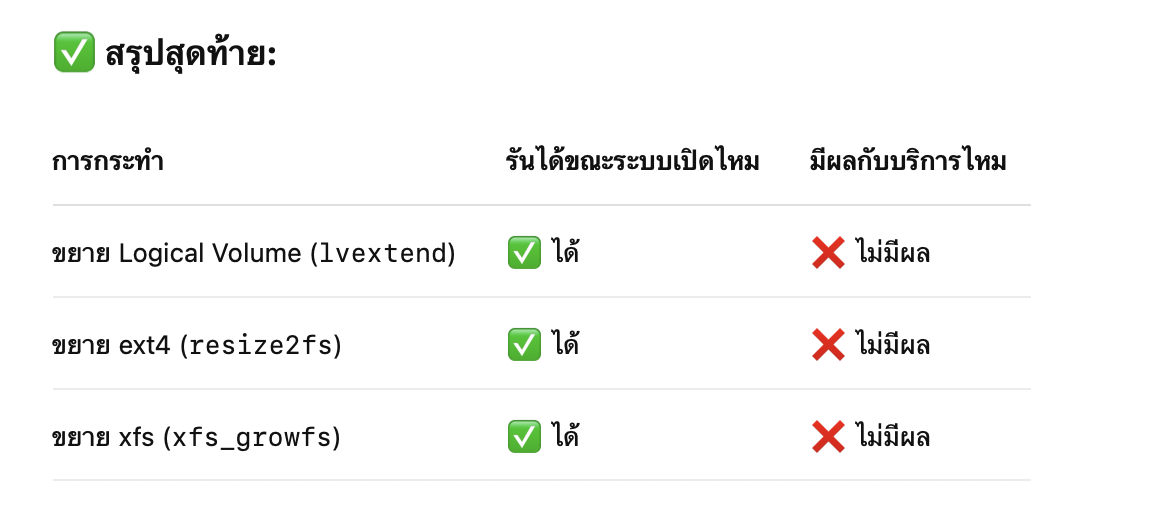
นำไปใช้งาน สร้าง Physical Volume (PV) ใหม่
root@oracle:/home/teee# pvcreate /dev/sdb
Physical volume “/dev/sdb” successfully created.
ขยาย Volume Group (VG)
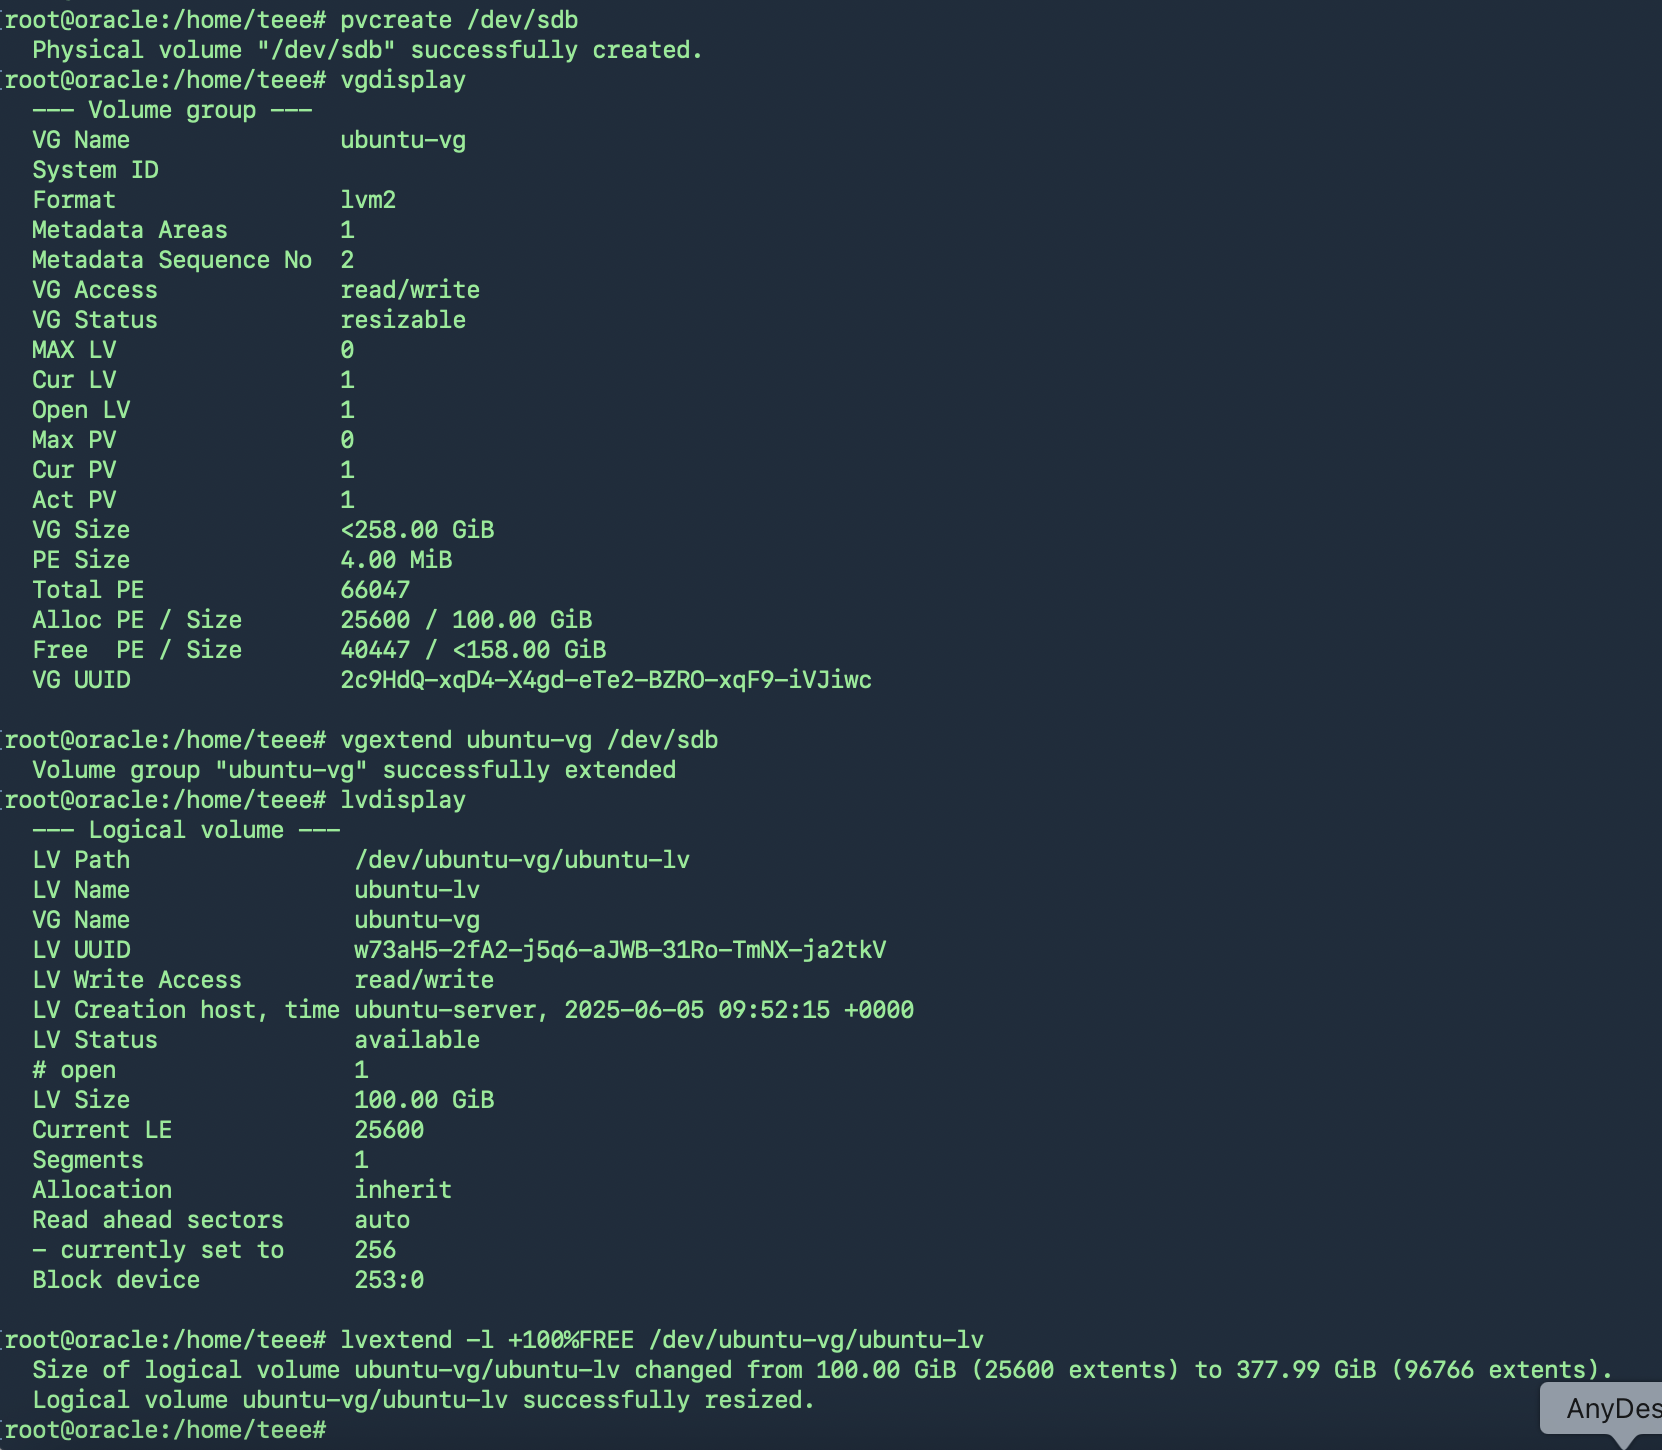
ตรวจสอบก่อนว่าใช้ File System ชนิดไหน
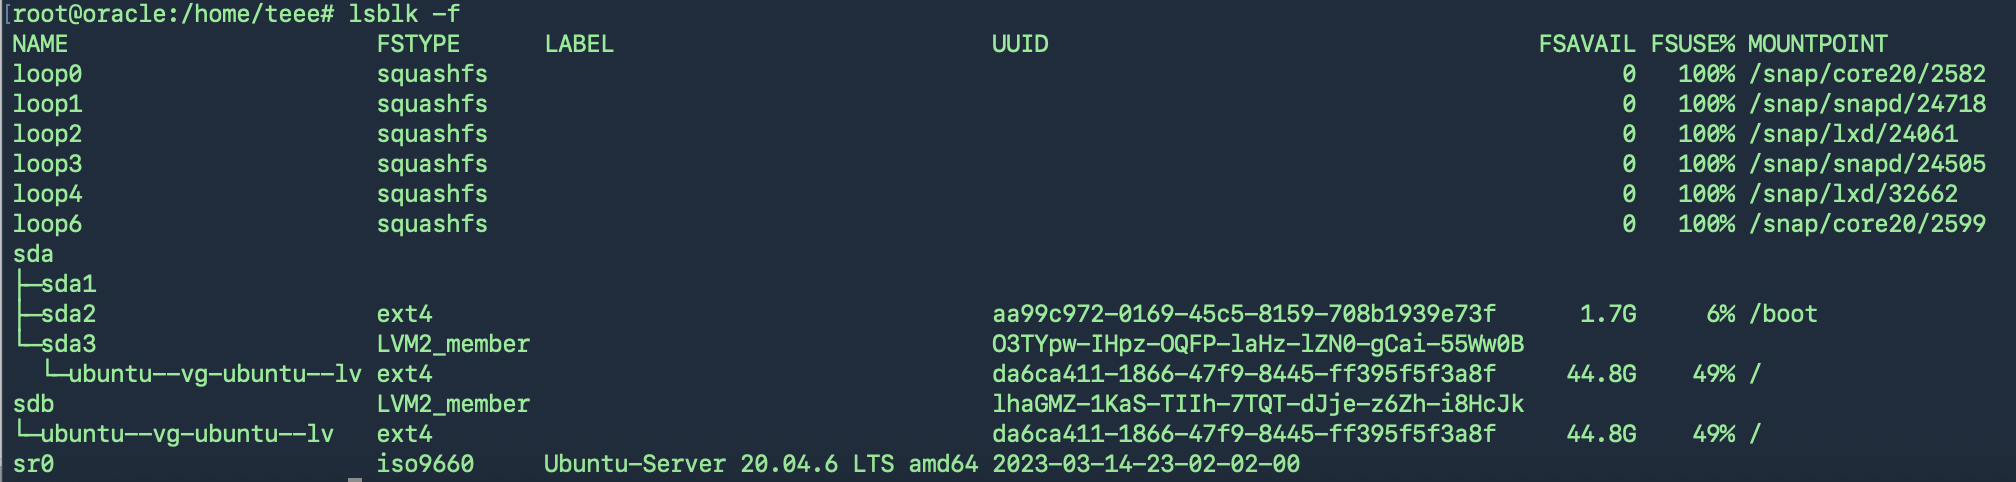
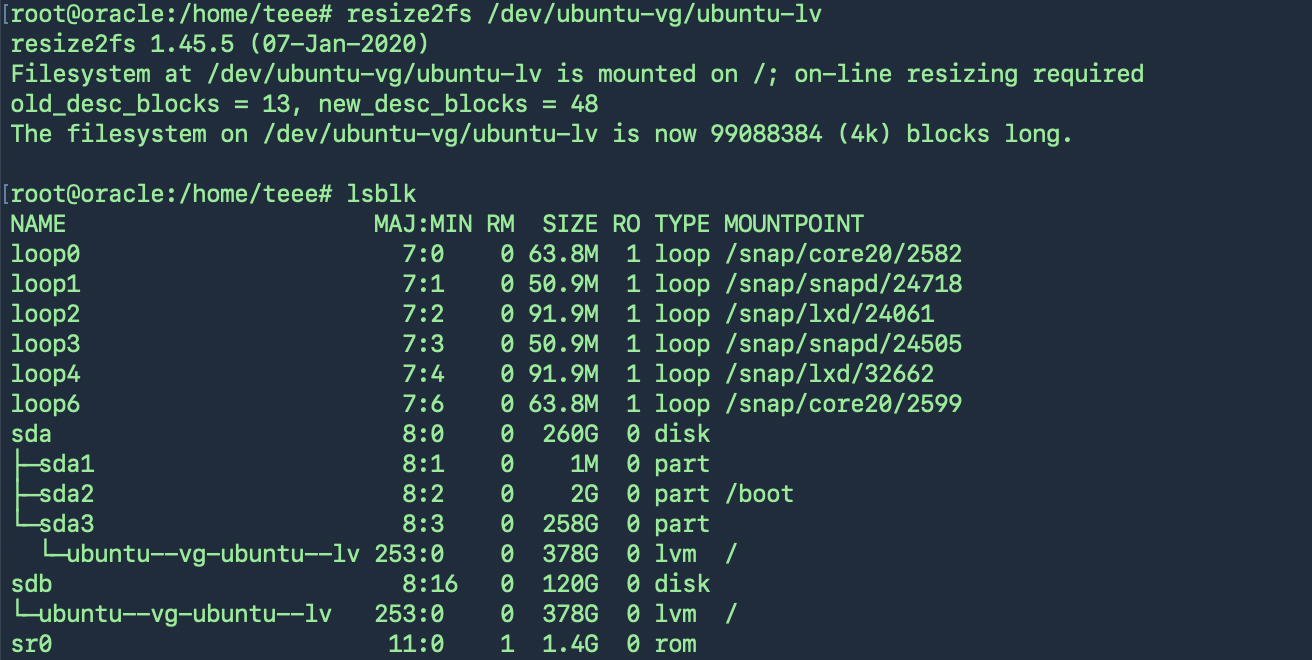
resize2fs(สำหรับ ext4) หรือ xfs_growfs(สำหรับ xfs)
-
ext4: resize2fs สามารถทำแบบ online ได้ ถ้า mount อยู่แล้ว
Linux ค้นหาไฟล์ที่เก่ากว่า 30 วันให้ลบออก
ใน Linux สามารถใช้คำสั่ง find เพื่อค้นหาและลบไฟล์ที่ เก่ากว่า 1 เดือน ได้ตามนี้
คำสั่ง:-
#find /path/to/folder -type f -mtime +30 -exec rm -f {} \;
/path/to/folder = โฟลเดอร์ที่คุณต้องการค้นหา (เช่น /var/log หรือ /mnt/backup)
-type f = เลือกเฉพาะไฟล์ (ไม่รวมโฟลเดอร์)
-mtime +30 = ไฟล์ที่ ถูกแก้ไขครั้งสุดท้ายมากกว่า 30 วัน (ประมาณ 1 เดือน)
-exec rm -f {} \; = ลบไฟล์ที่เจอทันที
ถ้าต้องการแค่ดูรายการไฟล์ (ไม่ลบ):
#find /path/to/folder -type f -mtime +30
Xsession: unable to start x session
Xsession: unable to start x session — “no /home/teee/.xsession” file no session manager , no windows manager ,and no terminal emulator found, abourting
ข้อความผิดพลาดนี้บอกว่า X ไม่สามารถเริ่มเซสชันได้เพราะ:
-
ไม่มีไฟล์
~/.xsession -
ไม่มี session manager
-
ไม่มี window manager
-
ไม่มี terminal emulator
สาเหตุที่เป็นไปได้:
-
XFCE ยังไม่ได้ติดตั้งครบ
-
ไม่มี display manager หรือถูกตั้งค่าผิด
-
X11 พยายามเริ่มต้นจาก
.xsessionแต่ไม่มีการกำหนดค่า
วิธีแก้ไข
วิธีที่ 1: ตรวจสอบและติดตั้ง XFCE พร้อม X11 อย่างถูกต้อง
sudo apt update
sudo apt install xfce4 xfce4-goodies xorg lightdm
ระหว่างการติดตั้ง ถ้ามีคำถามเรื่อง Display Manager ให้เลือก lightdm
วิธีที่ 2: ตรวจสอบว่ามี session ของ XFCE ใน /usr/share/xsessions
ls /usr/share/xsessions
ควรเห็นไฟล์ชื่อประมาณ:
-
xfce.desktop
วิธีที่ 3:ตรวจสอบว่าติดตั้ง terminal emulator ด้วย
เช่น xfce4-terminal หรือ xterm:
sudo apt install xfce4-terminal xterm
เสร็จแล้วลอง Reboot ดู
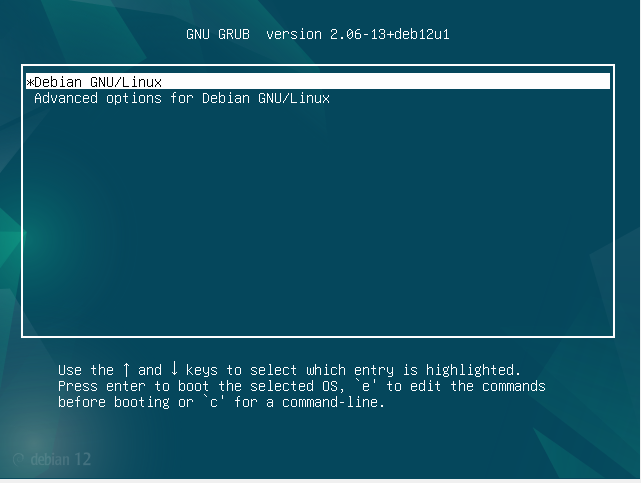
Debian แก้ไขคำสั่งบูต GRUB ชั่วคราวเพื่อเข้าผ่าน shell
เลือกบรรทัดแรก (Debian GNU/Linux) แล้วกด e เพื่อ “edit”
หาบรรทัดที่ขึ้นต้นว่า:
linux /boot/vmlinuz-… root=UUID=… ro quiet
ลบ quiet ออก และ เพิ่ม:
linux /boot/vmlinuz-… root=UUID=… ro systemd.unit=multi-user.target
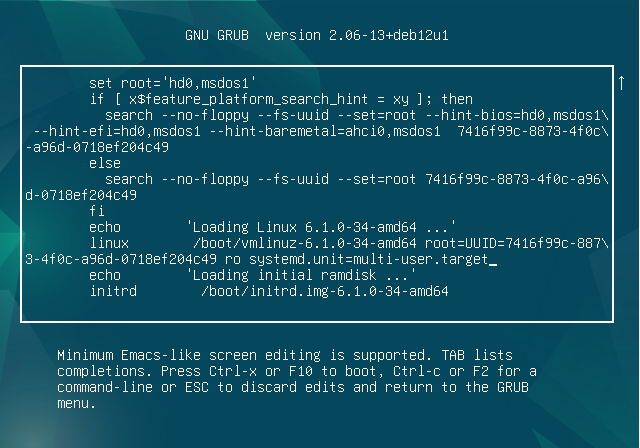
กด Ctrl + X หรือ F10 เพื่อบูตด้วยค่าที่คุณแก้ไข
Debian เปิดเครื่องเจอแต่ loopback interface
อาจเป็นไปได้ว่า interface จะ down อยู่ ให้ใช้คำสั่งครวจสอบ
#ip link show
#ip link set enp0s3 up
#dhclient enp0s3
Ubuntu แก้ไข motd
ปิดระบบ dynamic MOTD (ให้แสดงแค่ /etc/motd)
sudo chmod -x /etc/update-motd.d/*
sudo nano /etc/motd
ติดตั้ง Elasticsearch V.8
root@serv:/home/teee# wget -qO – https://artifacts.elastic.co/GPG-KEY-elasticsearch | sudo gpg –dearmor -o /usr/share/keyrings/elasticsearch-keyring.gpg
sudo: gpg: command not found
root@serv:/home/teee# apt-get install gpg -y
root@serv:/home/teee# wget -qO – https://artifacts.elastic.co/GPG-KEY-elasticsearch | sudo gpg –dearmor -o /usr/share/keyrings/elasticsearch-keyring.gpg
root@serv:/home/teee# echo “deb [signed-by=/usr/share/keyrings/elasticsearch-keyring.gpg] https://artifacts.elastic.co/packages/8.x/apt stable main” | sudo tee /etc/apt/sources.list.d/elastic-8.x.list
root@serv:/home/teee# sudo apt-get update && sudo apt-get install elasticsearch
————————— Security autoconfiguration information ——————————
Authentication and authorization are enabled.
TLS for the transport and HTTP layers is enabled and configured.
The generated password for the elastic built-in superuser is : EvW+InHCo0sPl-ej_M8t
If this node should join an existing cluster, you can reconfigure this with
‘/usr/share/elasticsearch/bin/elasticsearch-reconfigure-node –enrollment-token ‘
after creating an enrollment token on your existing cluster.
You can complete the following actions at any time:
Reset the password of the elastic built-in superuser with
‘/usr/share/elasticsearch/bin/elasticsearch-reset-password -u elastic’.
Generate an enrollment token for Kibana instances with
‘/usr/share/elasticsearch/bin/elasticsearch-create-enrollment-token -s kibana’.
Generate an enrollment token for Elasticsearch nodes with
‘/usr/share/elasticsearch/bin/elasticsearch-create-enrollment-token -s node’.
### Reset Elasticsearch Password ###
root@sanserv:/home/teee# /usr/share/elasticsearch/bin/elasticsearch-reset-password –interactive -u elastic
This tool will reset the password of the [elastic] user.
You will be prompted to enter the password.
Please confirm that you would like to continue [y/N]y
Enter password for [elastic]:
Re-enter password for [elastic]:
Password for the [elastic] user successfully reset.
AddNewUser
root@serv:/home/teee# /usr/share/elasticsearch/bin/elasticsearch-users useradd teee -p (MyPassword) -r superuser
root@serv:/home/teee# cat /etc/elasticsearch/users
usertest:(password)
ทดสอบการล็อกอิน
หลังเพิ่มผู้ใช้งานใหม่แล้ว ให้ทดสอบการล็อกอินด้วย curl:
# curl -u myuser:mypassword -X GET http://127.0.0.1:9200
root@serv:/home/teee# curl -u teee:(MyPassword)-X GET https://127.0.0.1:9200
curl: (60) SSL certificate problem: self-signed certificate in certificate chain
More details here: https://curl.se/docs/sslcerts.html
curl failed to verify the legitimacy of the server and therefore could not
establish a secure connection to it. To learn more about this situation and
how to fix it, please visit the web page mentioned above.
แก้ไขไฟล์คอนฟิก Elasticsearch:
root@serv:/home/teee# nano /etc/elasticsearch/elasticsearch.yml
เพิ่มหรือแก้ไขบรรทัดต่อไปนี้:
ตั้งค่าใหม่
root@serv:/home/teee# nano /etc/elasticsearch/elasticsearch.yml
#TEEE
cluster.name: (YourClustername)
node.name: node-1
path.data: /var/lib/elasticsearch
path.logs: /var/log/elasticsearch
network.host: 127.0.0.1
http.port: 9200
transport.port: 9300
cluster.initial_master_nodes: [“127.0.0.1”]
elasticsearch_username = teee
elasticsearch_password = (MyPassword)
elasticsearch_hosts = http://127.0.0.1:9200
elasticsearch_ssl_verification_mode = none
# ตั้งค่าจาก true เป็น false ถ้าเชื่อมต่อแบบ http
# Enable encryption for HTTP API client connections, such as Kibana, Logstash, and Agents
xpack.security.http.ssl:
enabled: false
keystore.path: certs/http.p12
ตั้งค่าจาก true เป็น false ถ้าเชื่อมต่อแบบ http
# Enable encryption and mutual authentication between cluster nodes
xpack.security.transport.ssl:
enabled: false
verification_mode: certificate
keystore.path: certs/transport.p12
truststore.path: certs/transport.p12
network.host: 0.0.0.0 # เปิดให้เข้าถึงจากทุกที่
# หรือ
network.host: 192.168.1.10 # ตั้งให้เฉพาะเครื่องที่มี IP นี้เท่านั้นที่สามารถเชื่อมต่อได้
คุณต้องตั้งค่าอย่างน้อยหนึ่งในตัวแปรด้านล่างในไฟล์ elasticsearch.yml เพื่อให้ Elasticsearch รู้จักวิธีค้นหาโหนดในคลัสเตอร์:
1.discovery.seed_hosts: ใช้ระบุโฮสต์หรือ IP ของโหนดในคลัสเตอร์ที่จะใช้ในการค้นหาโหนดอื่นๆ
2.discovery.seed_providers: ใช้ระบุโปรแกรมค้นหาของโหนดภายนอก เช่น zen-disco
3.cluster.initial_master_nodes: กำหนดโหนดที่สามารถเริ่มต้นเป็น Master Node ในคลัสเตอร์แรก
วิธีตั้งค่าที่แนะนำ:
•สำหรับการตั้งค่าผลิตภัณฑ์ที่มีหลายโหนด (Multiple Nodes), คำแนะนำคือการใช้ discovery.seed_hosts และ cluster.initial_master_nodes
# ตั้งค่า discovery.seed_hosts เป็น IP ของโหนดในคลัสเตอร์
discovery.seed_hosts: [“192.168.1.10”, “192.168.1.11”]
# ตั้งค่า cluster.initial_master_nodes สำหรับ Master Node เริ่มต้นในคลัสเตอร์
cluster.initial_master_nodes: [“node-1”, “node-2”]
ในที่นี้:
•discovery.seed_hosts คือรายการของ IP หรือชื่อโฮสต์ของโหนดที่สามารถค้นหาคลัสเตอร์ได้
•cluster.initial_master_nodes คือรายชื่อโหนดที่ Elasticsearch จะเลือกเป็น Master Node แรกเมื่อเริ่มต้นคลัสเตอร์ (สำหรับกรณีเริ่มต้นคลัสเตอร์ใหม่)
หมายเหตุ:
•cluster.initial_master_nodes จะต้องตั้งค่าบนโหนดทุกตัวในคลัสเตอร์ตอนเริ่มต้นครั้งแรก (หลังจากนั้นจะไม่จำเป็นต้องตั้งค่าอีก)
•เมื่อคลัสเตอร์เริ่มต้นแล้ว, คุณไม่จำเป็นต้องใช้ cluster.initial_master_nodes อีกต่อไป เพราะระบบจะใช้การตั้งค่า discovery.seed_hosts หรือ discovery.zen-disco สำหรับการค้นหาโหนดต่อไป
เริ่มบริการและตั้งค่าให้ Elasticsearch เริ่มทำงานทุกครั้งที่ระบบบูต:
SystemDiag ขณะที่ทำการ StartUP
root@serv:~# tail -f /var/log/elasticsearch/graylog.log
การเปิดใช้งานการเชื่อมต่อแบบ SSL/TLS ใน Elasticsearch ต้องทำการตั้งค่าคีย์และใบรับรองที่จำเป็นในไฟล์ elasticsearch.yml และสร้างหรือเพิ่มใบรับรองที่เหมาะสมสำหรับเซิร์ฟเวอร์
ขั้นตอนการเปิดใช้งาน SSL/TLS ใน Elasticsearch:
1. สร้างใบรับรอง (Certificate)
Elasticsearch มีเครื่องมือสำหรับสร้างใบรับรองที่มาพร้อมกับแพ็กเกจชื่อว่า elasticsearch-certutil:
สร้างใบรับรองสำหรับ HTTPS:
root@serv:/home/teee# cd /usr/share/elasticsearch/bin
root@serv:/usr/share/elasticsearch/bin# ./elasticsearch-certutil http
Generate a CSR? [y/N]y
Generate a certificate per node? [y/N]y
You can use any descriptive name that you like, but we recommend using the name
of the Elasticsearch node.
node #1 name: node-1
Enter all the hostnames that you need, one per line.
When you are done, press once more to move on to the next step.
localhost
Is this correct [Y/n]y
Enter all the IP addresses that you need, one per line.
When you are done, press once more to move on to the next step.
(enter your graylog ip address)
Is this correct [Y/n]y
Key Name: node-1
Subject DN: CN=node-1
Key Size: 2048
Do you wish to change any of these options? [y/N]n
Generate additional certificates? [Y/n]n
## What password do you want for your private key(s)?
Your private key(s) will be stored as a PEM formatted file.
We recommend that you protect your private keys with a password
If you do not wish to use a password, simply press at the prompt below.
Provide a password for the private key: [ for none]
What filename should be used for the output zip file? [/usr/share/elasticsearch/elasticsearch-ssl-http.zip]
root@serv:/usr/share/elasticsearch/bin# cd /usr/share/elasticsearch/
root@serv:/usr/share/elasticsearch# apt-get install zip -y
root@serv:/usr/share/elasticsearch# unzip elasticsearch-ssl-http.zip -d /etc/elasticsearch/certs
root@serv:/usr/share/elasticsearch# cd /etc/elasticsearch/certs
root@serv:/etc/elasticsearch/certs# ls -l
total 32
drwxr-xr-x 4 root root 4096 Jan 30 04:46 elasticsearch
-rw-rw—- 1 root elasticsearch 10029 Jan 30 02:07 http.p12
-rw-rw—- 1 root elasticsearch 1915 Jan 30 02:07 http_ca.crt
drwxr-xr-x 2 root root 4096 Jan 30 04:46 kibana
-rw-rw—- 1 root elasticsearch 5838 Jan 30 02:07 transport.p12
เปิดใช้งาน SSL
# Enable security features
xpack.security.enabled: true
xpack.security.enrollment.enabled: true
# Enable encryption for HTTP API client connections, such as Kibana, Logstash, and Agents
xpack.security.http.ssl:
enabled: true
keystore.path: /etc/elasticsearch/certs/http.p12
# Enable encryption and mutual authentication between cluster nodes
xpack.security.transport.ssl:
enabled: true
verification_mode: certificate
keystore.path: /etc/elasticsearch/certs/transport.p12
truststore.path: /etc/elasticsearch/certs/transport.p12
root@serv:/home/teee# systemctl start elasticsearch
ทดสอบการเชื่อมต่อแบบ SSL
root@serv:/etc/elasticsearch/certs# curl -u teee:MyPassword –cacert /etc/elasticsearch/certs/http_ca.crt -X GET https://127.0.0.1:9200
{
“name” : “node-1”,
“cluster_name” : “graylog”,
“cluster_uuid” : “B92A2i1YQNSmfsRo60NRnQ”,
“version” : {
“number” : “8.17.1”,
“build_flavor” : “default”,
“build_type” : “deb”,
“build_hash” : “d4b391d925c31d262eb767b8b2db8f398103f909”,
“build_date” : “2025-01-10T10:08:26.972230187Z”,
“build_snapshot” : false,
“lucene_version” : “9.12.0”,
“minimum_wire_compatibility_version” : “7.17.0”,
“minimum_index_compatibility_version” : “7.0.0”
},
“tagline” : “You Know, for Search”
}