Archive for the ‘VPN’ Category
ติดตั้ง NetBird VPN Self Hosted
 กรกฎาคม 30th, 2026 |
  Author:
 ความต้องการของระบบ
ขั้นต่ำ
* Ubuntu 22.04 / 24.04
* CPU 2 Core
* RAM 2 GB (แนะนำ 4 GB)
* SSD 20 GB
* Public IP
* Domain Name เช่น
* vpn.example.com
* netbird.example.com
เปิด Firewall
TCP 80
TCP 443
UDP 3478
หากใช้ Routing Peer เพิ่มภายหลัง อาจต้องเปิด UDP เพิ่มตามการใช้งานของ WireGuard ด้วย
Step 1 ติดตั้ง Docker
root@netbvpn:/home/teee# sudo apt update
root@netbvpn:/home/teee# sudo apt upgrade -y
ติดตั้ง Docker
root@netbvpn:/home/teee# curl -fsSL https://get.docker.com | sh
เพิ่ม User
root@netbvpn:/home/teee# sudo usermod -aG docker $USER
root@netbvpn:/home/teee# newgrp docker
ตรวจสอบ
root@netbvpn:/home/teee# docker version
Client: Docker Engine – Community
Version: 29.6.x
API version: 1.xx
Go version: go1.2x.x
Git commit: dfc4efb
Built: Thu Jul 16 16:12:18 2026
OS/Arch: linux/amd64
Context: default
Server: Docker Engine – Community
Engine:
Version: 29.6.x
API version: 1.xx (minimum version 1.40)
Go version: go1.2x.x
Git commit: 3d80467
Built: Thu Jul 16 16:12:18 2026
OS/Arch: linux/amd64
Experimental: false
containerd:
Version: v2.2.x
GitCommit: 11ce9d5f3c68c941867e82890e93e815c1304f1b
runc:
Version: 1.3.x
GitCommit: v1.3.6-0-g491b69ba
docker-init:
Version: 0.19.0
GitCommit: de40ad0
root@netbvpn:/home/teee# docker compose version
Docker Compose version v5.x.x
Step 2 ติดตั้ง jq และ curl
root@netbvpn:/home/teee# sudo apt install -y curl jq git
Step 3 ตั้ง DNS
ไปชี้ DNS name กับ IP ให้ชี้มาที่เครื่องที่ติตดั้งนี้
ให้ชี้มายัง Public IP ของ Server
A
(hostname).omtel.ltd
167.xxx.xxx.xxx
Step4 สร้างโฟลเดอร์สำหรับ NetBird
root@netbvpn:/home/teee# mkdir -p /opt/netbird
root@netbvpn:/home/teee# cd /opt/netbird
Step5 กำหนด Domain
ตัวอย่าง
export NETBIRD_DOMAIN=netbird.omtel.ltd
เปลี่ยนเป็นโดเมนของคุณ
Step6 รัน Quickstart
root@netbvpn:/opt/netbird# curl -fsSL https://github.com/netbirdio/netbird/releases/latest/download/getting-started.sh | bash
Which reverse proxy will you use?
[0] Traefik (recommended – automatic TLS, included in Docker Compose)
[1] Existing Traefik (labels for external Traefik instance)
[2] Nginx (generates config template)
[3] Nginx Proxy Manager (generates config + instructions)
[4] External Caddy (generates Caddyfile snippet)
[5] Other/Manual (displays setup documentation)
Enter choice [0-5] (default: 0): 0
Enter your email for Let’s Encrypt certificate notifications.
Email address: xxx@omtel.ltd
Do you want to enable the NetBird Proxy service?
The proxy allows you to selectively expose internal NetBird network resources
to the internet. You control which resources are exposed through the dashboard.
Enable proxy? [y/N]: n
Starting NetBird services
[+] up 32/32
✔ Image netbirdio/netbird-server:latest Pulled 8.0s
✔ Image traefik:v3.6 Pulled 7.5s
✔ Image netbirdio/dashboard:latest Pulled 7.0s
✔ Network netbird_netbird Created 0.0s
✔ Volume netbird_netbird_traefik_letsencrypt Created 0.0s
✔ Volume netbird_netbird_data Created 0.0s
✔ Container netbird-traefik Started 0.7s
✔ Container netbird-dashboard Started 0.6s
✔ Container netbird-server Started 0.7s
Waiting for NetBird server to become ready . . done
Done!
==========================================
NETBIRD SETUP COMPLETE
==========================================
You can access the NetBird dashboard at:
https://netbird.omtel.ltd
Follow the onboarding steps to set up your NetBird instance.
Traefik is handling TLS certificates automatically via Let’s Encrypt.
If you see certificate warnings, wait a moment for certificate issuance to complete.
Open ports:
– 443/tcp (HTTPS – all NetBird services)
– 80/tcp (HTTP – redirects to HTTPS)
– 3478/udp (STUN – required for NAT traversal)
This setup is ideal for homelabs and smaller organization deployments.
For enterprise environments requiring high availability and advanced integrations,
consider a commercial on-prem license or scaling your open source deployment:
Commercial license: https://netbird.io/pricing#on-prem
Scaling guide: https://docs.netbird.io/scaling-your-self-hosted-deployment
แล้วระบบจะสร้างไฟล์
docker-compose.yml
config.yaml
dashboard.env
และสั่ง docker compose up -d ให้อัตโนมัติ
Step7 ตรวจสอบ Container
root@netbvpn:/opt/netbird# docker ps
CONTAINER ID IMAGE COMMAND CREATED STATUS PORTS NAMES
d81ad12884bf netbirdio/dashboard:latest “/usr/bin/supervisor…” 2 minutes ago Up 2 minutes 80/tcp, 443/tcp netbird-dashboard
4ef3b90c5cfb traefik:v3.6 “/entrypoint.sh –lo…” 2 minutes ago Up 2 minutes 0.0.0.0:80->80/tcp, [::]:80->80/tcp, 0.0.0.0:443->443/tcp, [::]:443->443/tcp netbird-traefik
7bbe490b93f0 netbirdio/netbird-server:latest “/go/bin/netbird-ser…” 2 minutes ago Up 2 minutes 0.0.0.0:3478->3478/udp, [::]:3478->3478/udp netbird-server
Step8 เข้าใช้งาน
เข้าผ่านทางหน้าเว็บ
https://netbird.omtel.ltd
ครั้งแรกจะให้สร้าง
* Admin User
* Email
* Password
 Posted in
ติดตั้ง OpenVPN ให้รองรับ 1000 Client
OpenVPN
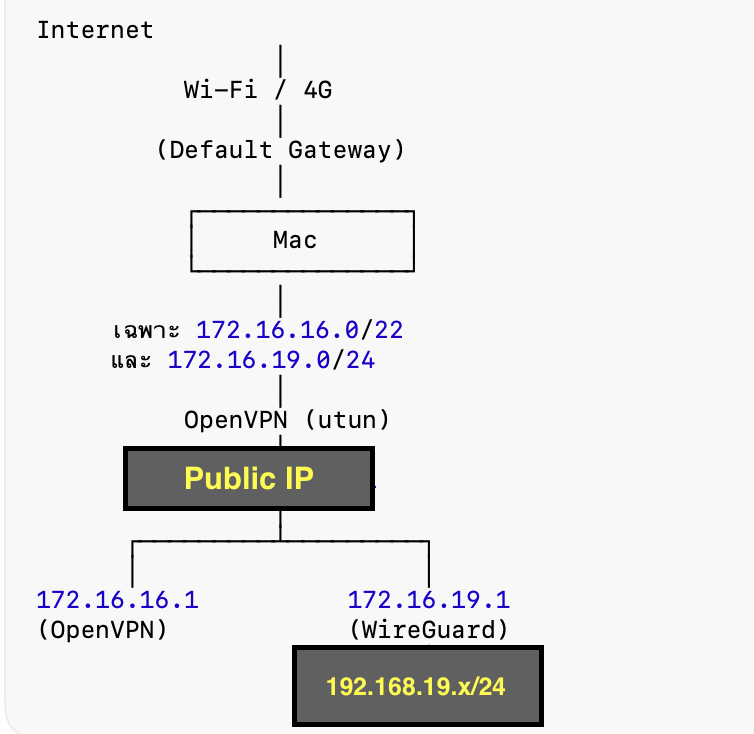
172.16.16.0/22
Network
172.16.16.0
Mask
255.255.252.0
Range
172.16.16.2-172.16.19.254
1022 IP
**** เพียงพอสำหรับ 1000 Client ****
1. Install
root@np:/home/teee# apt install openvpn easy-rsa openssl ca-certificates -y
2. EasyRSA
root@np:/home/teee# make-cadir /etc/openvpn/easy-rsa
root@np:/home/teee# cd /etc/openvpn/easy-rsa
root@np:/etc/openvpn/easy-rsa# ./easyrsa init-pki
Using Easy-RSA ‘vars’ configuration:
* /etc/openvpn/easy-rsa/vars
Notice
——
‘init-pki’ complete; you may now create a CA or requests.
Your newly created PKI dir is:
* /etc/openvpn/easy-rsa/pki
Using Easy-RSA configuration:
* /etc/openvpn/easy-rsa/vars
root@np:/etc/openvpn/easy-rsa# ./easyrsa build-ca nopass
Using Easy-RSA ‘vars’ configuration:
* /etc/openvpn/easy-rsa/vars
…+++++++++++++++++++++++++++++++++++++++*…………+.+…..+…+…………………….+..+…….+..+…+.+..+…….+++++++++++++++++++++++++++++++++++++++*………..+……….+………..+………+.+…+……+…..+….+………+…..+…..+……….+..+……………+….+…+……..+…+……+.+………+…..+.++++++
You are about to be asked to enter information that will be incorporated
into your certificate request.
What you are about to enter is what is called a Distinguished Name or a DN.
There are quite a few fields but you can leave some blank
For some fields there will be a default value,
If you enter ‘.’, the field will be left blank.
—–
Common Name (eg: your user, host, or server name) [Easy-RSA CA]:(Your Server-Name)
Notice
——
CA creation complete. Your new CA certificate is at:
* /etc/openvpn/easy-rsa/pki/ca.crt
Create an OpenVPN TLS-AUTH|TLS-CRYPT-V1 key now: See ‘help gen-tls’
Build-ca completed successfully.
——
ตั้งชื่อ CA เช่น. Your Server-Name-CA
สร้าง Server Certificate
root@np:/etc/openvpn/easy-rsa# ./easyrsa build-server-full server nopass
Using Easy-RSA ‘vars’ configuration:
* /etc/openvpn/easy-rsa/vars
.+…+..+++++++++++++++++++++++++++++++++++++++*….+…….+…+…..+++++++++++++++++++++++++++++++++++++++*….+….+……+…+..+…+…………+….+…+..+……+………+.+..+…+….+…+………..+…….+……..+.++++++
—–
Notice
——
Private-Key and Public-Certificate-Request files created.
Your files are:
* req: /etc/openvpn/easy-rsa/pki/reqs/server.req
* key: /etc/openvpn/easy-rsa/pki/private/server.key
You are about to sign the following certificate:
Requested CN: ‘server’
Requested type: ‘server’
Valid for: ‘825’ days
subject=
commonName = server
Type the word ‘yes’ to continue, or any other input to abort.
Confirm requested details: yes (ตอบ yes)
Using configuration from /etc/openvpn/easy-rsa/pki/634563e8/temp.6.1
Check that the request matches the signature
Signature ok
The Subject’s Distinguished Name is as follows
commonName :ASN.1 12:’server’
Certificate is to be certified until Oct 9 09:52:01 2028 GMT (825 days)
Write out database with 1 new entries
Database updated
Notice
——
Inline file created:
* /etc/openvpn/easy-rsa/pki/inline/private/server.inline
Notice
——
Certificate created at:
* /etc/openvpn/easy-rsa/pki/issued/server.crt
DH
root@np:/etc/openvpn/easy-rsa# ./easyrsa gen-dh
Using Easy-RSA ‘vars’ configuration:
* /etc/openvpn/easy-rsa/vars
Generating DH parameters, 2048 bit long safe prime
……………………………………………………………………………………………………………………………………………………………………………….++*++*++*++*++*++*++*++*++*++*++*++*++*++*++*++*++*++*++*++*++*++*++*++*++*++*++*++*++*++*++*++*++*++*++*++*++*++*++*++*++*++*++*++*++*++*++*++*++*++*++*++*++*++*++*++*++*++*++*++*++*++*++*++*
DH parameters appear to be ok.
Notice
——
DH parameters of size 2048 created at:
* /etc/openvpn/easy-rsa/pki/dh.pem
TLS Key
root@np:/etc/openvpn/easy-rsa# openvpn –genkey secret ta.key
Client
root@np:/etc/openvpn/easy-rsa# ./easyrsa build-client-full client01 nopass<—ทดลองสร้าง Client01
Using Easy-RSA ‘vars’ configuration:
* /etc/openvpn/easy-rsa/vars
.+……………+..+.+..+….+…..+++++++++++++++++++++++++++++++++++++++*…..+.+…+…..+…………….+…+..+…+…………+.+..+…+…….+…+…..+.+……+…+……………………+…+..+…………+……………+…+.+..+….+…++++++
—–
Notice
——
Private-Key and Public-Certificate-Request files created.
Your files are:
* req: /etc/openvpn/easy-rsa/pki/reqs/client01.req
* key: /etc/openvpn/easy-rsa/pki/private/client01.key
You are about to sign the following certificate:
Requested CN: ‘client01’
Requested type: ‘client’
Valid for: ‘825’ days
subject=
commonName = client01
Type the word ‘yes’ to continue, or any other input to abort.
Confirm requested details: yes
Using configuration from /etc/openvpn/easy-rsa/pki/3020d3d9/temp.6.1
Check that the request matches the signature
Signature ok
The Subject’s Distinguished Name is as follows
commonName :ASN.1 12:’client01′
Certificate is to be certified until Oct 9 09:55:58 2028 GMT (825 days)
Write out database with 1 new entries
Database updated
Notice
——
Inline file created:
* /etc/openvpn/easy-rsa/pki/inline/private/client01.inline
Notice
——
Certificate created at:
* /etc/openvpn/easy-rsa/pki/issued/client01.crt
3.Copy Files
root@np:/etc/openvpn/easy-rsa# mkdir /etc/openvpn/server
mkdir: cannot create directory ‘/etc/openvpn/server’: File exists
root@np:/etc/openvpn/easy-rsa# ls -l /etc/openvpn/server/
total 0
root@np:/etc/openvpn/easy-rsa# cp pki/ca.crt pki/dh.pem ta.key pki/issued/server.crt pki/private/server.key /etc/openvpn/server/
root@np:/etc/openvpn/easy-rsa# ls -l /etc/openvpn/server/
total 24
-rw——- 1 root root 1196 Jul 7 16:58 ca.crt
-rw——- 1 root root 428 Jul 7 16:58 dh.pem
-rw——- 1 root root 4499 Jul 7 16:58 server.crt
-rw——- 1 root root 1704 Jul 7 16:58 server.key
-rw——- 1 root root 636 Jul 7 16:58 ta.key
4. Server Config
root@np:/etc/openvpn/easy-rsa# nano /etc/openvpn/server/server.conf
port 1194
proto udp
dev tun
user nobody
group nogroup
persist-key
persist-tun
topology subnet
server 172.16.16.0 255.255.252.0
ifconfig-pool-persist ipp.txt
push “route 172.16.19.0 255.255.255.0”
#push “redirect-gateway def1” <— ปิดไว้
push “dhcp-option DNS 1.1.1.1”
push “dhcp-option DNS 8.8.8.8”
keepalive 10 120
cipher AES-256-GCM
data-ciphers AES-256-GCM:AES-128-GCM
auth SHA256
tls-version-min 1.2
tls-crypt ta.key
ca ca.crt
cert server.crt
key server.key
dh dh.pem
verb 3
explicit-exit-notify 1
=== SAVE ===
#push “redirect-gateway def1” <— ปิดไว้
ผู้ใช้ OpenVPN จะเข้าเฉพาะเครือข่ายภายใน แต่ Internet ยังออกผ่าน Wi-Fi/4G ของเครื่องเอง ซึ่งจะไม่เปลืองแบนด์วิดท์ของ VPS
Push Route เฉพาะ Network ภายใน ให้เหลือประมาณนี้
push “route 172.16.16.0 255.255.252.0”
push “route 172.16.19.0 255.255.255.0”
push “dhcp-option DNS 1.1.1.1”
push “dhcp-option DNS 8.8.8.8”
5. Enable Routing
nano /etc/sysctl.conf
net.ipv4.ip_forward=1 <- เพิ่ม
sysctl -p <–Apply
6. IP Tables
root@np:/home/teee# iptables -A INPUT -p udp –dport 1194 -j ACCEPT
iptables -I INPUT 1 -i tun0 -j ACCEPT
iptables -A INPUT -p udp –dport 1194 -j ACCEPT
iptables -A FORWARD -i tun0 -o wg0 -j ACCEPT
iptables -A FORWARD -i wg0 -o tun0 -m conntrack –ctstate RELATED,ESTABLISHED -j ACCEPT
iptables-save > /etc/iptables/rules.v4
ถ้าจะออก Internet ผ่าน OpenVPN ต้องเพิ่ม
iptables -t nat -A POSTROUTING -s 172.16.16.0/22 -o eth0 -j MASQUERADE
แต่ถ้าจะใช้เฉพาะเข้าหา FreeSwitch ไม่จำเป็น
7. Start OPENVPN
root@np:/home/teee# systemctl enable openvpn-server@server
Created symlink ‘/etc/systemd/system/multi-user.target.wants/openvpn-server@server.service’ → ‘/usr/lib/systemd/system/openvpn-server@.service’.
root@np:/home/teee# systemctl start openvpn-server@server
8. Check Status
root@np:/home/teee# netstat -lntup
Active Internet connections (only servers)
Proto Recv-Q Send-Q Local Address Foreign Address State PID/Program name
udp 0 0 0.0.0.0:1194 0.0.0.0:* 423784/openvpn
root@np:/home/teee# ifconfig
tun0: flags=4305<UP,POINTOPOINT,RUNNING,NOARP,MULTICAST> mtu 1500
inet 172.16.16.1 netmask 255.255.252.0 destination 172.16.16.1
unspec 00-00-00-00-00-00-00-00-00-00-00-00-00-00-00-00 txqueuelen 500 (UNSPEC)
RX packets 0 bytes 0 (0.0 B)
RX errors 0 dropped 0 overruns 0 frame 0
TX packets 0 bytes 0 (0.0 B)
TX errors 0 dropped 0 overruns 0 carrier 0 collisions 0
==== ทดสอบ ควรได้ผลดังนี้. ======
# เข้า OpenVPN Server
ping 172.16.16.1
# เข้า WireGuard / FreeSWITCH
ping 172.16.19.1
# เข้า FreeSWITCH ถ้ามี IP อื่น
ping 172.16.19.x
# Internet
ping 8.8.8.8
# DNS
ping google.com
=== แก้ไขเพิ่มเติม ===
root@np:/etc/systemd/system# nano /usr/lib/systemd/system/openvpn-server@.service
GNU nano 8.4 /usr/lib/systemd/system/openvpn-server@.service *
[Unit]
Description=OpenVPN service for %I
After=network-online.target
Wants=network-online.target
Documentation=man:openvpn(8)
Documentation=https://openvpn.net/community-resources/reference-manual-for-openvpn-2-6/
Documentation=https://community.openvpn.net/openvpn/wiki/HOWTO
[Service]
Type=notify
PrivateTmp=true
WorkingDirectory=/etc/openvpn/server
ExecStart=/usr/sbin/openvpn –status %t/openvpn-server/status-%i.log –status-version 2 –suppress-timestamps –config %i.conf
CapabilityBoundingSet=CAP_IPC_LOCK CAP_NET_ADMIN CAP_NET_BIND_SERVICE CAP_NET_RAW CAP_SETGID CAP_SETUID CAP_SETPCAP CAP_SYS_CHROOT CAP_DAC_OVERRIDE CAP_AU>
LimitNOFILE=65535 <—- เพิ่มบรรทัดนี้
TasksMax=infinity <—- เพิ่มบรรทัดนี้
OOMScoreAdjust=-900 <—- เพิ่มบรรทัดนี้
LimitNPROC=10 <– เปลี่ยนเป็น 4096
DeviceAllow=/dev/null rw
DeviceAllow=/dev/net/tun rw
ProtectSystem=true
ProtectHome=true
KillMode=process
RestartSec=5s
Restart=on-failure
[Install]
WantedBy=multi-user.target
===SAVE===
nano /etc/sysctl.conf
net.ipv4.ip_forward = 1
# Connection Queue
net.core.somaxconn=4096
# Socket Buffer
net.core.rmem_max=16777216
net.core.wmem_max=16777216
# Local Port Range
net.ipv4.ip_local_port_range=10240 65535
===SAVE===
มีอีกชุดที่แนะนำเพิ่ม
เนื่องจากคุณตั้งเป้า OpenVPN + WireGuard + FreeSWITCH รองรับประมาณ 1000 Users แนะนำใช้ชุดนี้แทน เพราะครบกว่า
#######################################################
# OpenVPN / WireGuard / FreeSWITCH Performance
#######################################################
# Enable Routing
net.ipv4.ip_forward=1
# TCP Queue
net.core.somaxconn=4096
# Socket Buffers
net.core.rmem_default=1048576
net.core.wmem_default=1048576
net.core.rmem_max=16777216
net.core.wmem_max=16777216
# UDP Memory
net.ipv4.udp_mem=3145728 4194304 6291456
# Port Range
net.ipv4.ip_local_port_range=10240 65535
# Reverse Path Filter
net.ipv4.conf.all.rp_filter=0
net.ipv4.conf.default.rp_filter=0
# SYN Queue
net.ipv4.tcp_max_syn_backlog=4096
# TIME_WAIT
net.ipv4.tcp_fin_timeout=15
===SAVE===
root@np:/etc/systemd/system# systemctl daemon-reload
root@np:/etc/systemd/system# systemctl restart openvpn-server@server
9. สคริต์สร้าง Client เชื่อมต่อ OpenVPN.
#nano make-ovpn.sh
===============================
#!/bin/bash
set -e
EASYRSA=”/etc/openvpn/easy-rsa”
if [ $# -ne 1 ]; then
echo “Usage: $0 ”
exit 1
fi
CLIENT=”$1″
CA=”$EASYRSA/pki/ca.crt”
CERT=”$EASYRSA/pki/issued/${CLIENT}.crt”
KEY=”$EASYRSA/pki/private/${CLIENT}.key”
TLSKEY=”$EASYRSA/ta.key”
OUT=”/root/${CLIENT}.ovpn”
SERVER_IP=”xxx.xxx.xxx.xxx” <—(Your Public IP) SERVER_PORT=”1194″ # ตรวจสอบไฟล์ for FILE in “$CA” “$CERT” “$KEY” “$TLSKEY” do if [ ! -f “$FILE” ]; then echo “Missing file:” echo “$FILE” exit 1 fi done echo “Creating $OUT” cat > “$OUT” <<EOF
client
dev tun
proto udp
remote ${SERVER_IP} ${SERVER_PORT}
resolv-retry infinite
nobind
persist-key
persist-tun
remote-cert-tls server
cipher AES-256-GCM
data-ciphers AES-256-GCM:AES-128-GCM
auth SHA256
auth-nocache
tls-version-min 1.2
verb 3
EOF
cat “$CA” >> “$OUT”
cat >> “$OUT” <<EOF
EOF
awk ‘
/BEGIN CERTIFICATE/ {p=1}
p
/END CERTIFICATE/ {exit}
‘ “$CERT” >> “$OUT”
cat >> “$OUT” <<EOF
EOF
cat “$KEY” >> “$OUT”
cat >> “$OUT” <<EOF
EOF
cat “$TLSKEY” >> “$OUT”
cat >> “$OUT” <<EOF
EOF
chmod 600 “$OUT”
echo
echo “=======================================”
echo “Created:”
echo “$OUT”
echo “=======================================”
ใช้ได้กับ OpenVPN 2.6+, macOS, Windows, Linux, Android, iPhone โดยฝัง Certificate และ Key ทั้งหมดไว้ในไฟล์ .ovpn เพียงไฟล์เดียว
chmod +x /root/make-ovpn.sh
สร้าง Client
เช่น
root@np:# /root/make-ovpn.sh macbook
จะได้ไฟล์
/root/macbook.ovpn
ตรวจสอบ รัน
root@np:#grep tls /root/macbook.ovpn
remote-cert-tls server
tls-version-min 1.2
<tls-crypt>
</tls-crypt>
ต้องไม่มี
tls-crypt ta.key
เสร็จแล้ว Copy ไฟล์นี้ไปที่เครื่อง Clinet MAC
ที่เครื่อง MAC ติดตั้งโปรแกรม. OpenVPN Connect for macOS
https://openvpn.net/client/
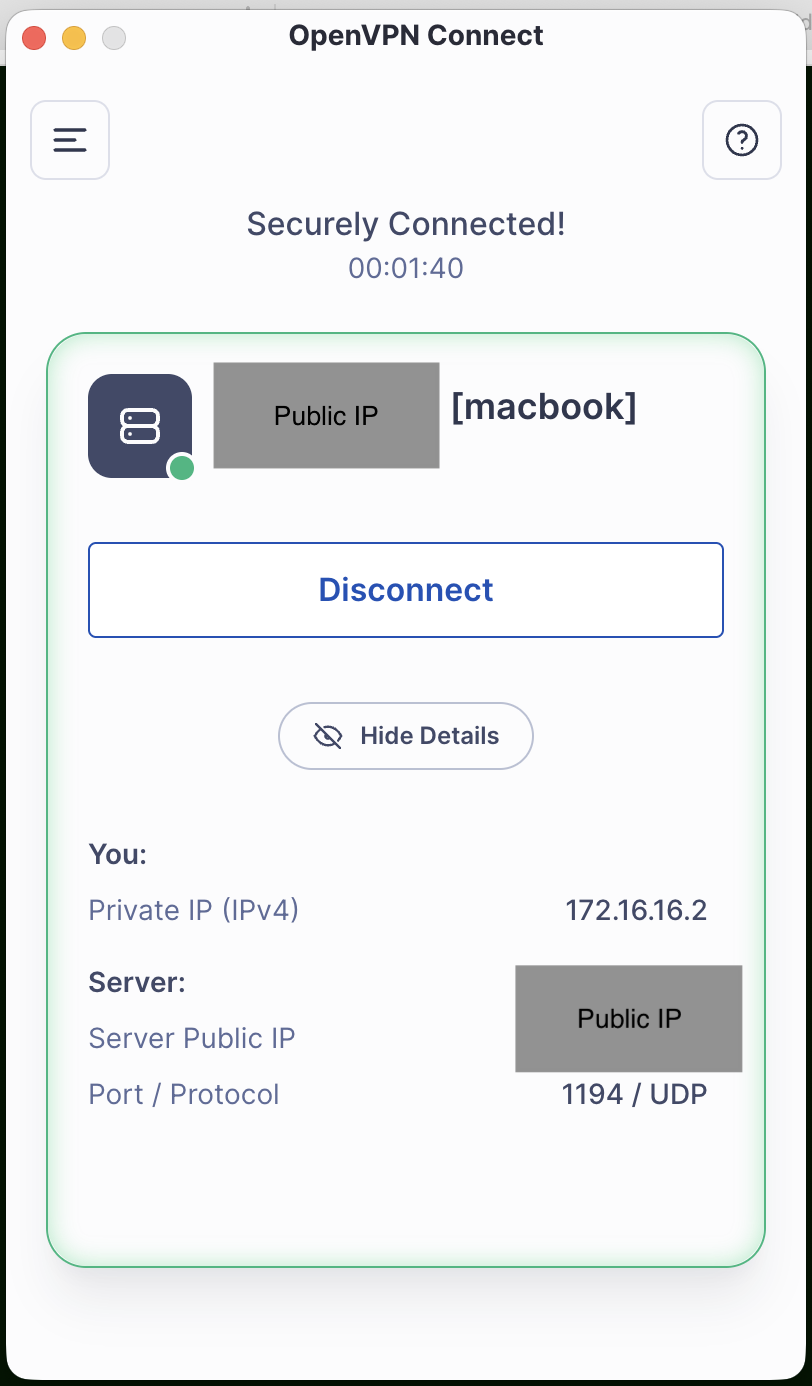
เสร็จแล้วลอง Import. macbook.ovpn > openvpn Client และลองเชื่อมต่อดู
10. เปิด Status File
root@np:/etc/openvpn/server# nano server.conf
status /var/log/openvpn/openvpn-status.log <—-เพิ่มบรรทัดนี้
status-version 3 <—-เพิ่มบรรทัดนี้
===SAVE===
สร้างโฟลเดอร์
root@np:/etc/openvpn/server# mkdir -p /var/log/openvpn
root@np:/etc/openvpn/server# chown nobody:nogroup /var/log/openvpn
root@np:/etc/systemd/system# systemctl daemon-reload
root@np:/etc/systemd/system# systemctl restart openvpn-server@server
ดู status การเชื่อมต่อแบบ Realtime
root@np:/var/log/openvpn# ls -l
total 4
-rw——- 1 root root 507 Jul 13 12:36 openvpn-status.log
root@np:/var/log/openvpn# tail -f openvpn-status.log
TITLE OpenVPN 2.6.14 x86_64-pc-linux-gnu [SSL (OpenSSL)] [LZO] [LZ4] [EPOLL] [PKCS11] [MH/PKTINFO] [AEAD] [DCO]
TIME 2026-07-13 12:36:13 1783920973
HEADER CLIENT_LIST Common Name Real Address Virtual Address Virtual IPv6 Address Bytes Received Bytes Sent Connected Since Connected Since (time_t) Username Client ID Peer ID Data Channel Cipher
HEADER ROUTING_TABLE Virtual Address Common Name Real Address Last Ref Last Ref (time_t)
GLOBAL_STATS Max bcast/mcast queue length 0
GLOBAL_STATS dco_enabled 0
END
e Real Address Last Ref Last Ref (time_t)
ROUTING_TABLE 172.16.16.2 macbook 171.100.89.168:63863 2026-07-13 12:36:41 1783921001
GLOBAL_STATS Max bcast/mcast queue length 0
GLOBAL_STATS dco_enabled 0
END
11. Logrotate
สร้างไฟล์
root@np:~# nano /etc/logrotate.d/openvpn
root@np:~# cat /etc/logrotate.d/openvpn
/var/log/openvpn/*.log {
daily
rotate 30
compress
missingok
notifempty
create 640 nobody nogroup
copytruncate
}
12. เปิด CRL (สำคัญมาก)
เวลาพนักงานลาออก ไม่ต้องเปลี่ยน CA
เพียง
./easyrsa revoke username
./easyrsa gen-crl
แล้ว
crl-verify crl.pem
13. Backup PKI
สิ่งที่ต้อง Backup
/etc/openvpn/easy-rsa/pki
โดยเฉพาะ
private/ca.key <— เก็บไว้ Offline
root@np:/etc/openvpn/easy-rsa/pki/private# ls -l
total 16
-rw——- 1 root root 1704 Jul 7 16:49 ca.key
-rw——- 1 root root 1704 Jul 7 16:55 client01.key
-rw——- 1 root root 1704 Jul 13 11:09 macbook.key
-rw——- 1 root root 1704 Jul 7 16:51 server.key
root@np:/etc/openvpn/easy-rsa/pki/private# cp ca.key /root
root@np:/etc/openvpn/easy-rsa/pki/private#