การตั้งค่า SD-WAN บน Fortigate เพื่อใช้งาน Internet มากกว่า 1 เส้น
เคสตัวอย่าง มี Internet ที่ใช้งาน อยู่ 2 เส้น โดยเป็น ISP คนละค่าย True และ NT
จุดประสงค์ของการตั้งค่าคือต้องการให้ True เป็น Internet เส้นหลัก จะสลับอัตโนมัติไปใช้งาน NT ในกรณีที่
True Fiber มีปัญหาไม่สามารถใช้งานได้ เมื่อ True กลับมาใช้งานได้แล้วก็จะสลับกลับมาใช้งานเป็นเส้นหลักเหมือนเดิม
1. ขั้นแรกตั้งค่า SD-WAN ให้สามารถใช้งาน Internet ได้ก่อน โดยตั้งค่าให้ต่อไปที่พอร์ท WAN1(True), WAN2(NT)
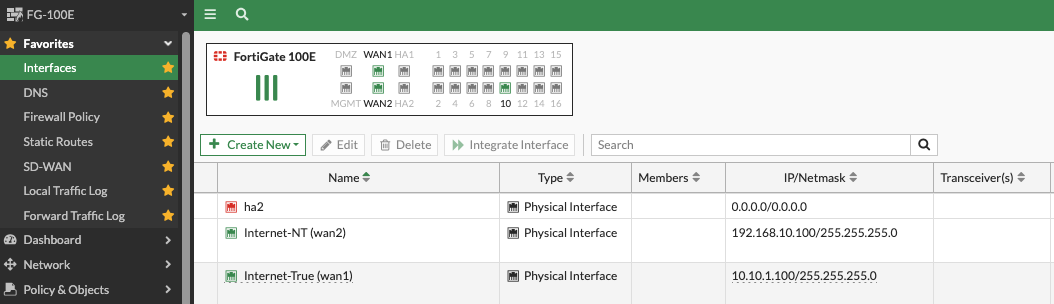
2. เพิ่ม Link ไปที่ SD-WAN ตามด้วย Cost ถ้ายิ่งน้อยคือจะให้ความสำคัญมาก่อนเป็นอันดับแรก

Statc Route ให้ชี้ Destination ไปที่ 0.0.0.0/0.0.0.0 เลือก Interface เป็น virtual-wan-link ตามตัวอย่าง

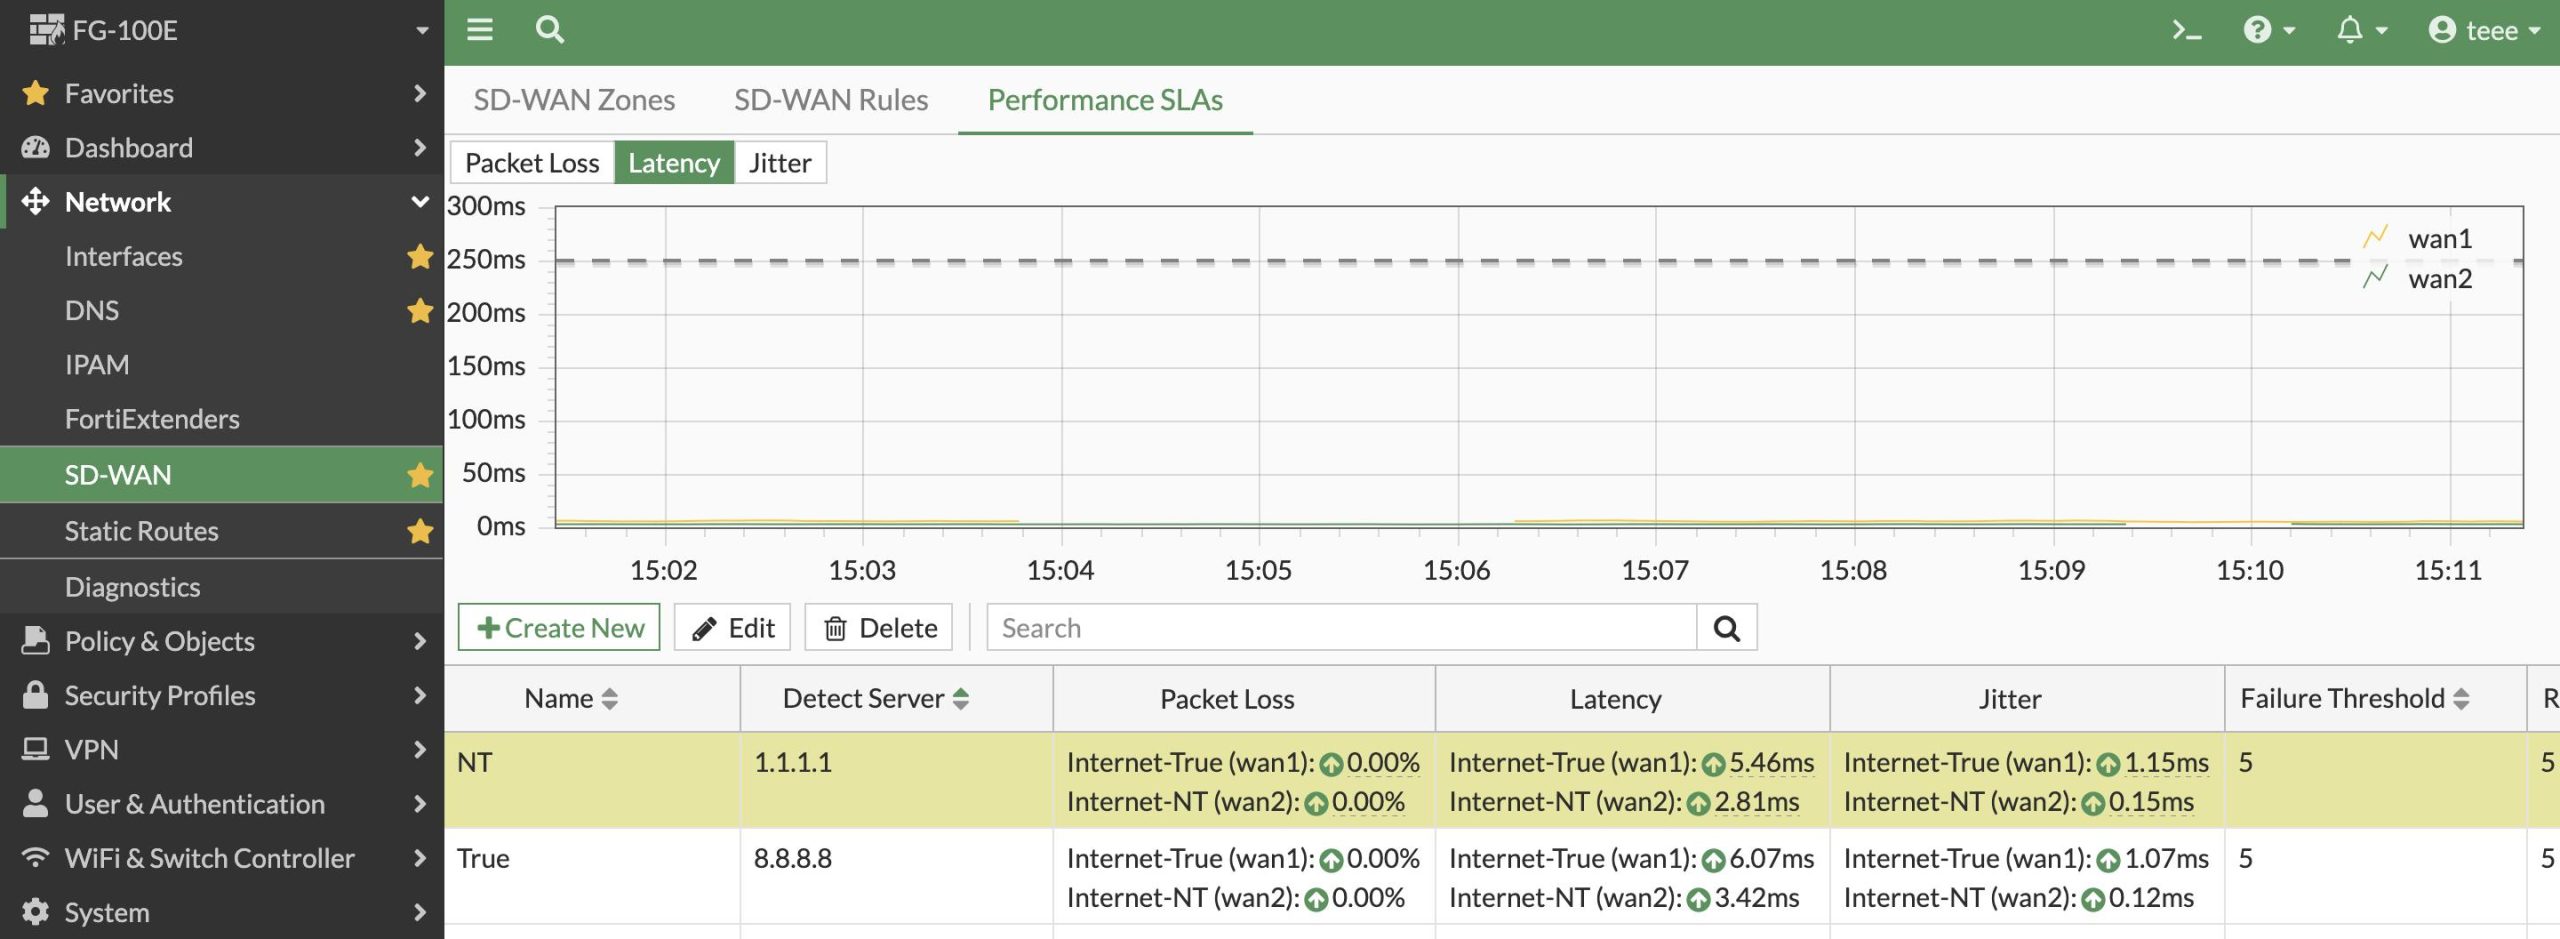
3. ถ้าจะ Monitor Link ด้วยก็ไห้ไปที่ SD-Wan เปิด SLA-target Ping
4. ข้อนี้สำคัญมากคือต้องการให้ True เป็น Link หลัก ถ้า Fiber ขาด ใช้งานไม่ได้ให้สลับไปใช้งาน NT และเมื่อ
ซ่อม Link กลับมาใช้งานได้แล้ว Fortigate ก็จะสลับกลับมาใช้งาน Link True เหมือนเดิม
Interface selection strategy > Manual
Interface preference > เลือก Interface True เป็น Link แรก เลือก NT เป็น Link ที่ 2 ตามลำดับ

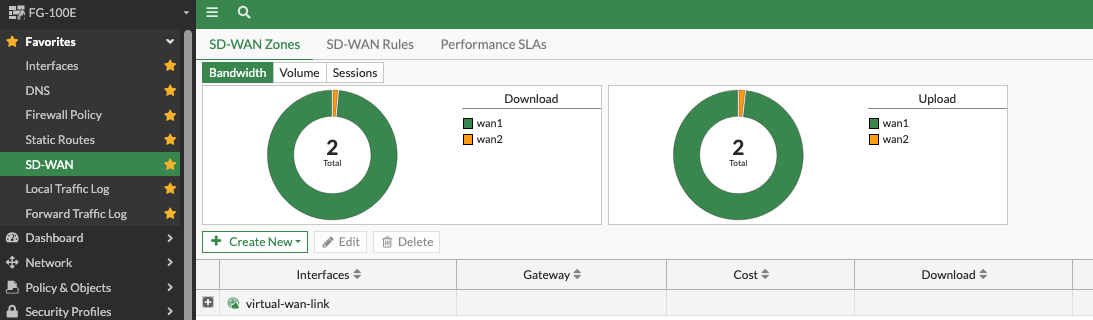
5. สุดท้ายอย่าลืมเช็คหน้า Dash Board ตามสีว่า ใช้งาน Link ไหนอยู่
6. หรือเช็ค Speed test ที่เว็บ https://www.speedtest.net/th จะมีบอกว่า Internet ที่ใช้งานวิ่งออกไปที่ ISP จ้าวไหน
วิธีการเก็บ Log IP ของ Client บน Fortigate โดยไม่ NAT
จุดประสงค์ของการทำคือต้องการเก็บ Log IP Client ที่วิ่งผ่าน Fortigate โดยไม่ NAT
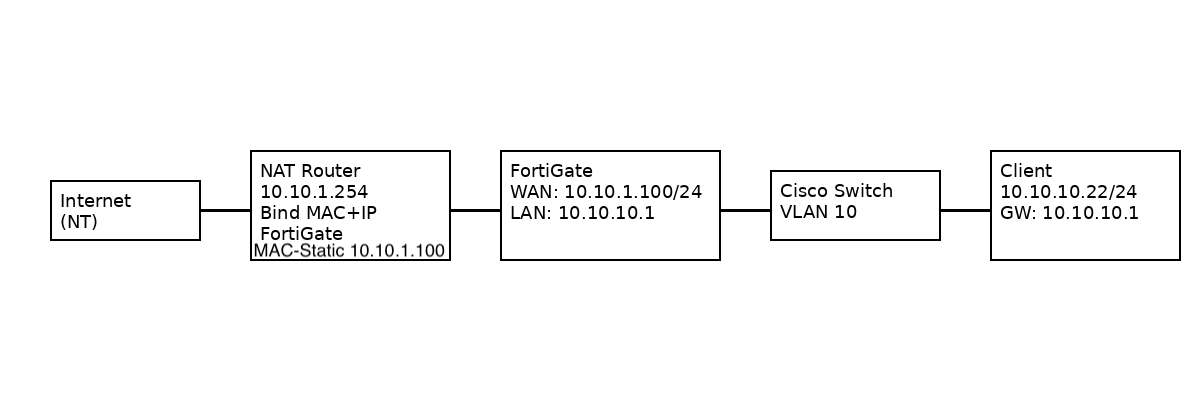
1. ที่ Router จะต้องทำ Static Route กลับมายังขา External ของ Fortigate ด้วย
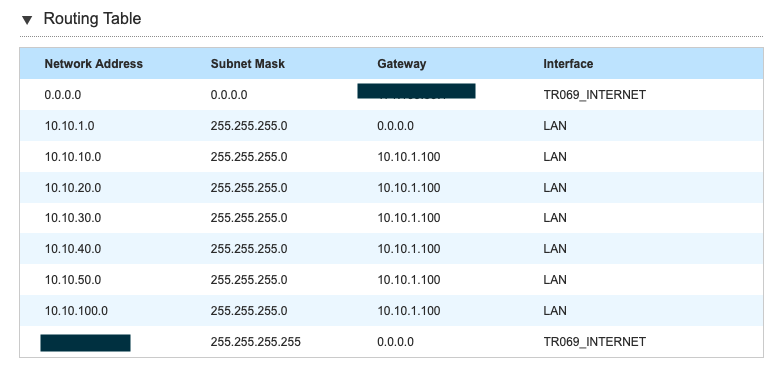
2. ที่ Fortigate เอา NAT ออก ให้ NAT ครั้งเดียวที่ Router พอแล้วจะได้ไม่ต้อง NAT ซ้ำซ้อนกันสองรอบ
**ถ้าไม่ได้ทำ Static Route กลับมาที่ Router จะต้อง Enable NAT ด้วย ไม่งั้นออกเน็ทไม่ได้ และ Log ที่เห็นก็จะเจอแค่ IP Interface LAN ของ Fortigate ไม่ได้ระบุว่ามาจากเครื่องไหน **
ตั้งค่า IP Management ให้กับ HPE ArubaOS-CX – LAB
ต้องการเทส LAB สำหรับ HPE Switch Aruba AOS-CX
ขั้นแรกให้สมัครบัญชีของ HPE ก่อน https://networkingsupport.hpe.com/
จากนั้นให้ทำการ Login เข้า HPE Portal
และตรง Global Search ให้ค้นหาคำว่า switch simulator
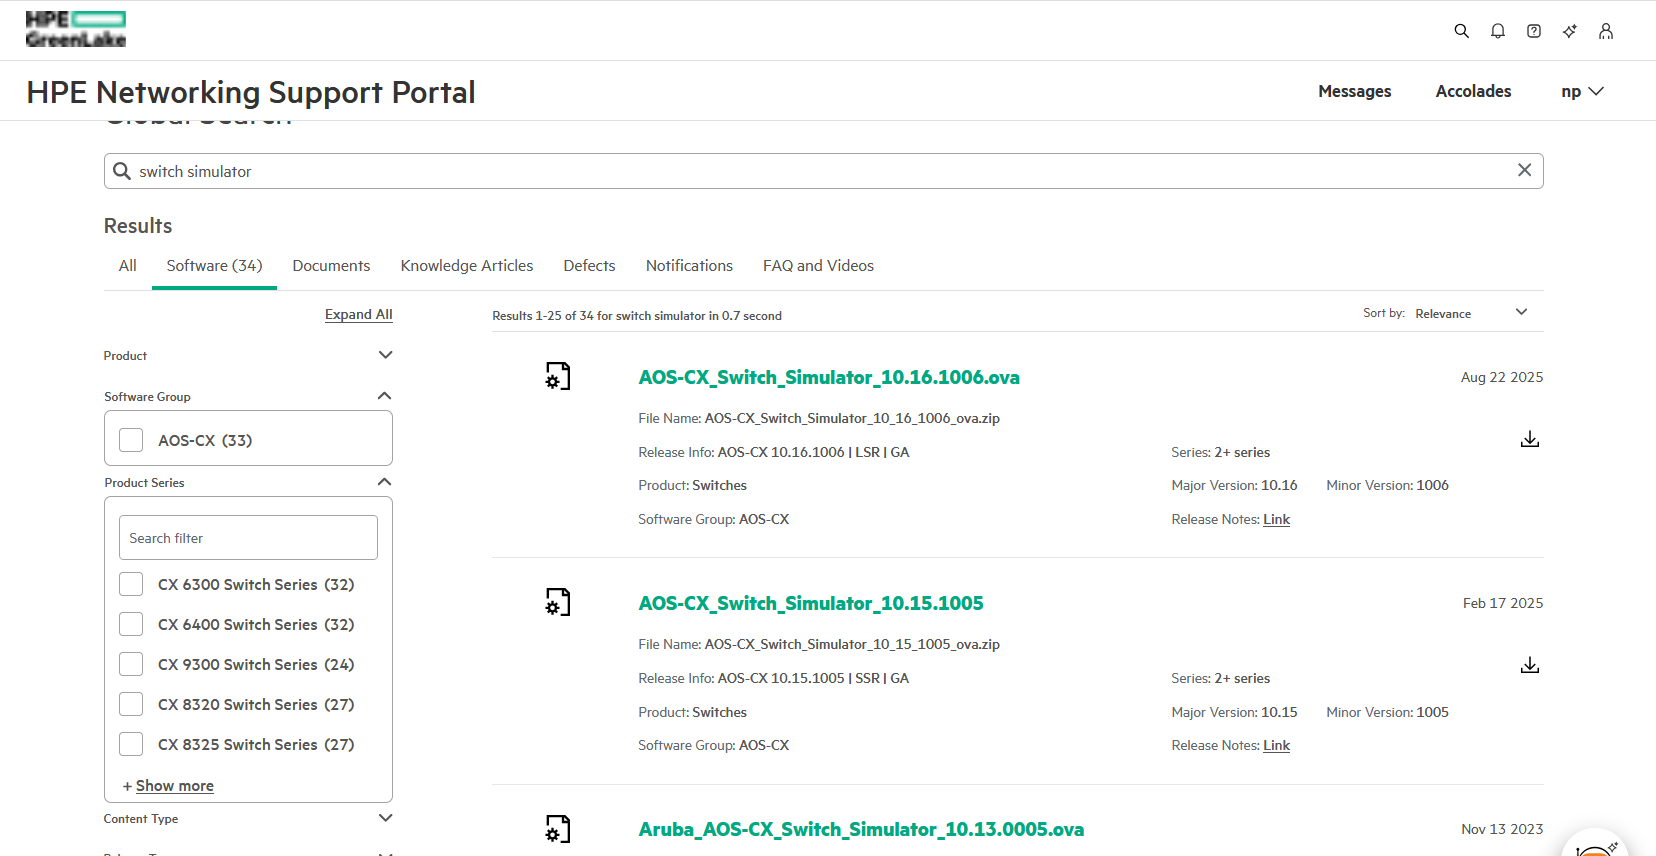
จากนั้นเลือกดาวโหลดที่เป็น *ova.zip
แตกไฟล์ออกจะได้ ไฟล์ที่นามสกุล *.ova ให้ทำการเปิดกับ virtualbox

จะได้หน้าตาประมาณนี้ Interface เป็น bridge เพื่อที่จะให้สามารถเชื่อมต่อกับเครื่อง host ได้และสามารถต่อออกเน็ทได้
display ให้ตั้งเป็น vmsvga ตามตัวอย่าง
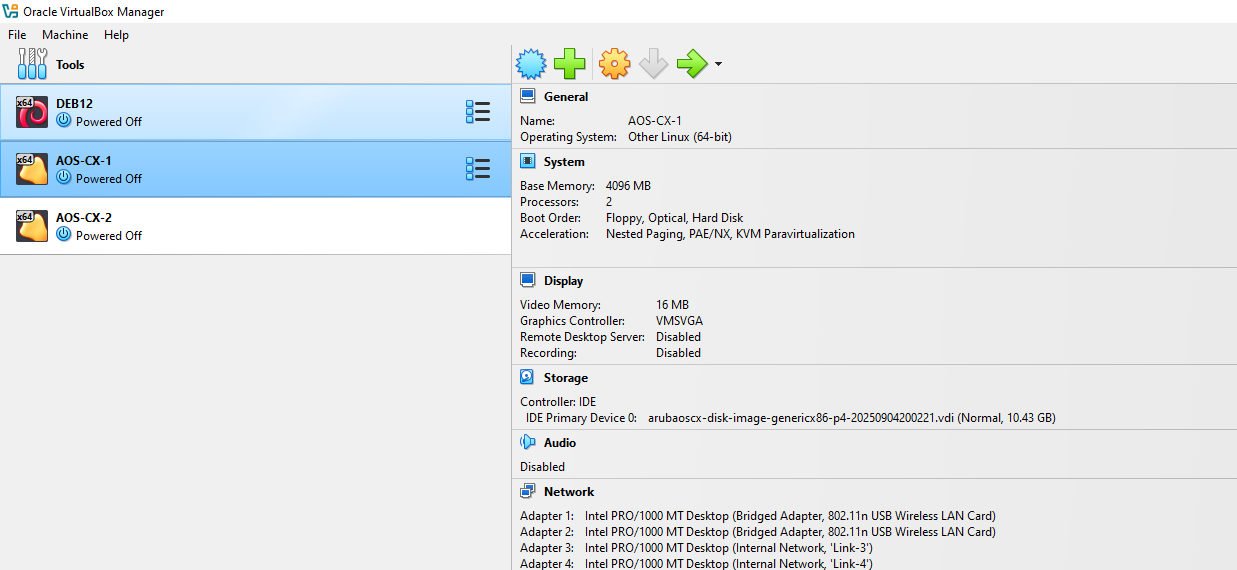
Adapter 1 ใน VirtualBox จะถูกจองไว้เป็น OOBM (Management Port) เสมอ (ใช้จัดการ Switch)
Adapter 2 เป็นต้นไป ถึงจะเป็น Data Port (1/1/1, 1/1/2, …)
การตั้งค่าที่ตัว VirtualBox (Hypervisor)
เพื่อให้ Port ข้อมูลออกอินเทอร์เน็ตได้ จะต้องขยับ Adapter ใน VirtualBox ใหม่:
ปิด VM ก่อน
Adapter 1: ปล่อยไว้เป็น Bridged (สำหรับเข้า SSH/Web UI จากเครื่องจริง)
Adapter 2 (สำคัญมาก): ต้องเปิดใช้งานและเลือกเป็น Bridged Adapter หรือ NAT (เพื่อให้ขา 1/1/1 ของ Switch เชื่อมกับโลกภายนอกได้)
Adapter 3 – 9: ตั้งค่าเป็น Internal Network หรือตามที่ต้องการใช้งาน
จากนั้นให้ทำการ StarVM
หลังจาก start เสร็จจะมีให้ Login โดย default จะชื่อผู้ใช้งาน admin รหัสผ่านไม่มี enter ผ่านได้เลย จากนั้นก็สามารถตั้งค่า อื่นๆได้เลย
# คำสั่งพื้นฐานของ AOS-CX
#conf t
#show interface mgmt
#interface mgmt
#ip (dhcp/static) 10.10.10.111/24
#default-gateway 10.10.10.254
#nameserver 8.8.8.8
#no shutdown
หรือ
#ip dns server-address 8.8.8.8 vrf mgmt
#show ip dns vrf mgmt
#ping 8.8.8.8 vrf mgmt
#username admin password plaintext StrongPassword123! role network-admin
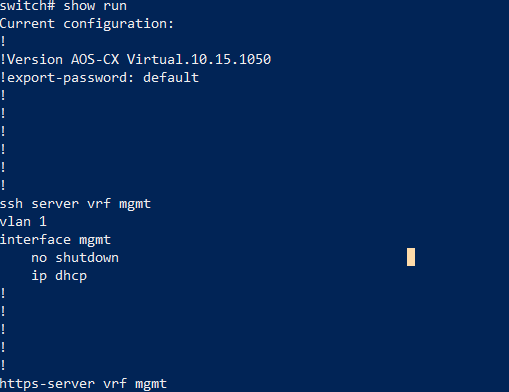
#ssh server vrf mgmt
ถ้าอยากให้ SSH ได้เฉพาะ mgmt (แนะนำ)
ถ้าจะใช้ in-band ให้ใช้ vrf default
#ssh server port (เปลี่ยนจากพอร์ท 22 เป็น พอร์ทอื่นเพื่อความปลอดภัย)
#end
#write memory
#show run
#boot system (สำหรับสั่ง Reboot)
ถ้าอยากจะลบ config ออกทั้งหมดให้เป็น default factory
#erase startup-config
#boot system ถ้ามีข้อความถามว่า save ไหมให้กด n และจะถามอีกครั้งว่า Reboot ไหมให้กด y จะทำการ Reboot ให้
หลังจากได้ทำการ Reboot แล้วจะเข้าสู่ขั้นตอนการตั้งค่าใหม่อีกครั้งโดย default login เข้าจะชื่อ admin / ไม่มีรหัสผ่าน
สามารถดู ip ได้จากที่ login เข้าหน้า console ใช้คำสั่ง
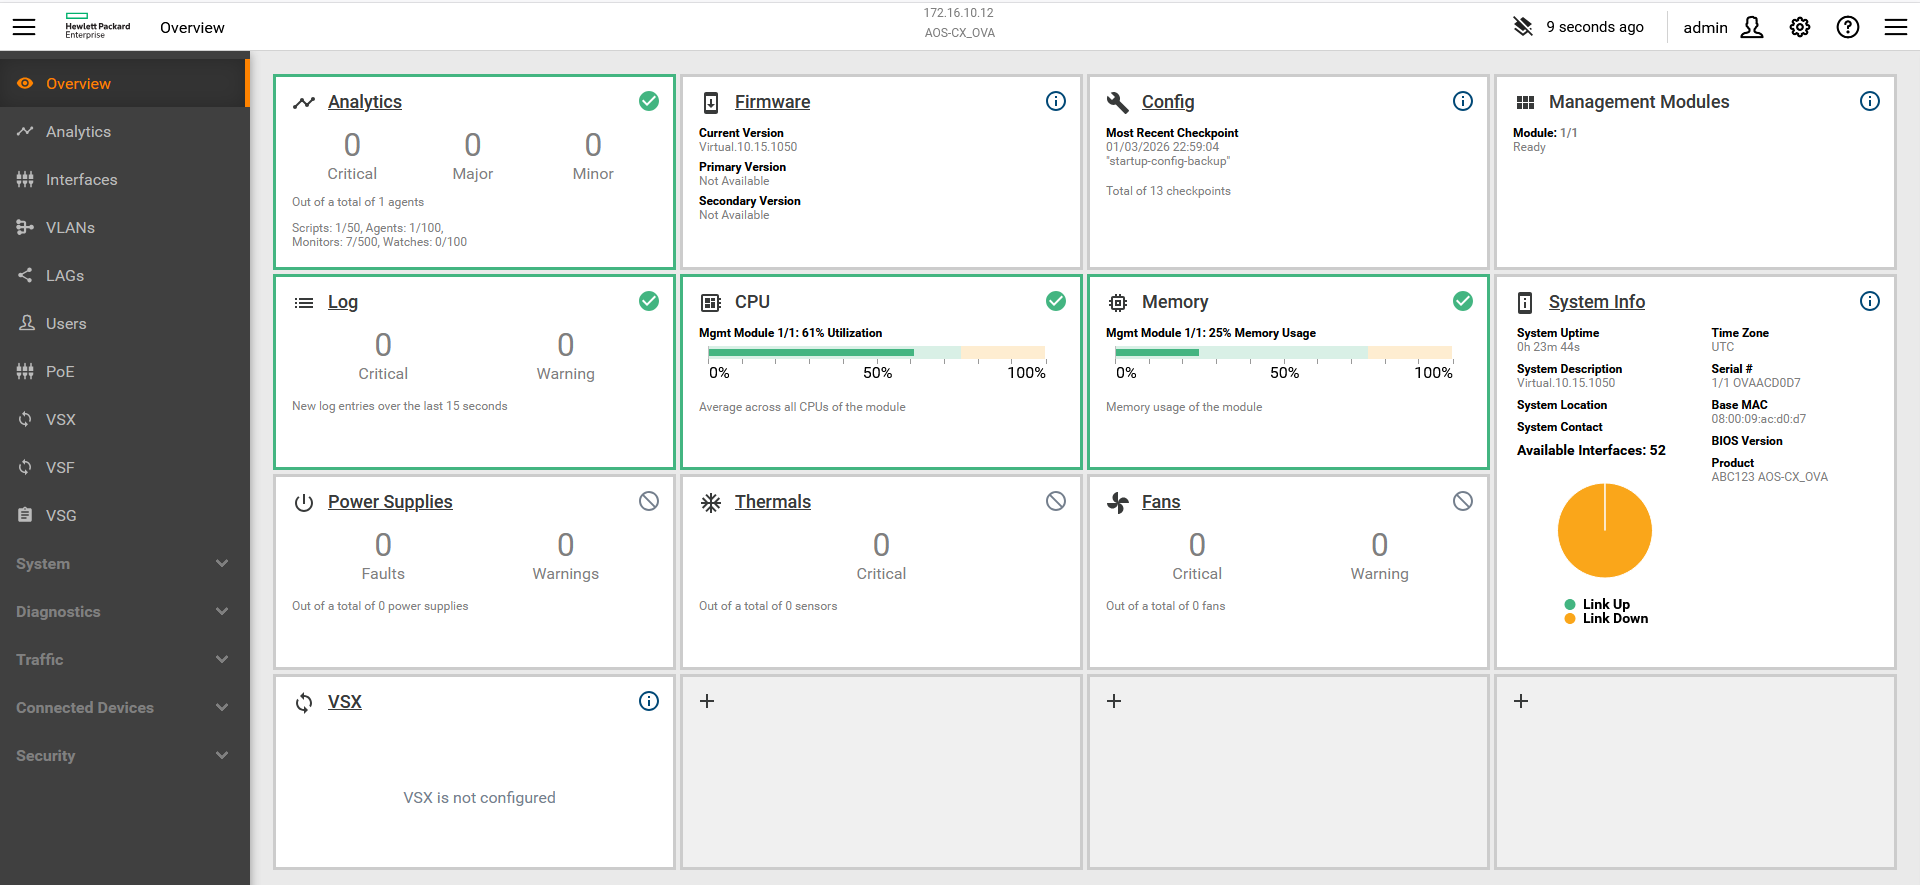
#show interface mgmt เมื่อรู้ IP แล้วก็สามารถ ssh เข้าเพื่อทำการทดสอบ config ใหม่ได้เลยโดยใช้ User admin
ssh admin@ip (ไม่มีรหัสผ่าน)
สามารถเข้าดูการตั้งค่าหน้าเว็บได้ด้วยนะ
ตั้งค่า ssh,console password,enable mode password,banner
SWITCH(config)#hostname C3850-24P
C3850-24P(config)#vlan 10
C3850-24P(config)#interface vlan10
C3850-24P(config-if)#ip address 10.10.10.250 255.255.255.0
C3850-24P(config-if)#no shut
C3850-24P(config-if)#exit
C3850-24P(config)#ip name-server 8.8.8.8
C3850-24P(config)#ip default-gateway 10.10.10.254
C3850-24P(config)#interface gigabitEthernet 1/0/24
C3850-24P(config)#switchport mode access
C3850-24P(config)#switchport access vlan 10
C3850-24P(config)#exit
SSH
C3850-24P#conf t
C3850-24P(config)#ip domain-name omtel.local
C3850-24P(config)#crypto key generate rsa
The name for the keys will be: C3850-24P.omtel.local
Choose the size of the key modulus in the range of 512 to 4096 for your
General Purpose Keys. Choosing a key modulus greater than 512 may take
a few minutes.
How many bits in the modulus [1024]: 2048
% Generating 2048 bit RSA keys, keys will be non-exportable…
[OK] (elapsed time was 100 seconds)
C3850-24P(config)#ip ssh version 2
C3850-24P(config)#username admin privilege 15 secret YourSecurePassword
C3850-24P(config)#line vty 0 15
C3850-24P(config-line)#login local
C3850-24P(config-line)#transport input ssh
C3850-24P(config-line)#exit
(Option)
C3850-24P(config)#ip ssh time-out 60
C3850-24P(config)#ip ssh authentication-retries 3
Console Password
C3850-24P#conf t
C3850-24P(config)#line console 0
C3850-24P(config-line)#password YourSecurePassword
C3850-24P(config-line)#login
C3850-24P(config-line)#exit
C3850-24P(config)#exit
C3850-24P#wr
Building configuration…
[OK]
ถ้าอยากให้ console disconnect อัตโนมัติหลังไม่ใช้งาน
C3850-24P(config-line)# exec-timeout 5 0
5 0 = 5 นาที 0 วินาที
ถ้าต้องการตั้งค่า Password สำหรับ Enable Mode (Privilege Exec Level 15) บน Cisco 3850 ทำได้ดังนี้
C3850-24P>en
C3850-24P#conf t
Enter configuration commands, one per line. End with CNTL/Z.
C3850-24P(config)#enable secret YourSecurePassword
C3850-24P(config)#exit
C3850-24P#wr
Building configuration…
[OK]
ถ้าอยากเอา Password ออกจาก Enable Mode
C3850-24P#conf t
C3850-24P(config)#no enable secret
ถ้าอยากเอา Password ออกจาก Console
C3850-24P#conf t
C3850-24P(config)#line console 0
C3850-24P(config-line)#no password
C3850-24P(config-line)#exit
C3850-24P(config)#exit
C3850-24P#wr
Building configuration…
[OK]
เพิ่ม Banner
C3850-24P(config)#banner motd#********************************************************
WARNING! Authorized access only!
Disconnect IMMEDIATELY if you are not an authorized user!
********************************************************
#
C3850-24P(config)#exit
C3850-24P#wr
Building configuration…
[OK]
กรณีที่มี Log วิ่งที่หน้าจอรบกวนการทำงาน สามารถปิดไปก่อนได้
C3850-24P#conf t
C3850-24P(config)#no logging console
C3850-24P(config)#exit
C3850-24P#wr
Building configuration…
[OK]
Cisco Catalyst 3850 (C3850) มีโหมดการบู๊ต (Boot Mode)
Cisco Catalyst 3850 (C3850) มีโหมดการบู๊ต (Boot Mode) อยู่ 2 แบบหลัก ๆ และแต่ละแบบใช้งานต่างกัน ดังนี้:
1. INSTALL MODE
โหมดนี้เป็นค่าเริ่มต้นของ C3850 รุ่นใหม่ ๆ และเป็นโหมดที่ Cisco แนะนำให้ใช้งาน
🔹 ลักษณะของ INSTALL MODE
ใช้ไฟล์ .bin ในรูปแบบ package-based
> ระบบโหลดไฟล์หลายตัวจากแพ็กเกจ ไม่ใช่ไฟล์เดียวแบบ monolithic
> สามารถใช้คำสั่ง software install เพื่อจัดการอัปเกรด/ดาวน์เกรดแบบปลอดภัย
> รองรับ ISSU (In-Service Software Upgrade) ในบางรุ่น
> การอัปเกรดจะไม่ยุ่งยาก และไฟล์จะอยู่ใน flash:packages.conf
🔹 ตรวจสอบว่าอยู่โหมดไหน
show version | include Mode
หรือ
show version | include System
Switch#show version | include Mode
Model Revision Number : AC0
Model Number : WS-C3850-24T
Switch Ports Model SW Version SW Image Mode
Switch#show version | include System
Copyright (c) 1986-2025 by Cisco Systems, Inc.
Cisco IOS-XE software, Copyright (c) 2005-2025 by cisco Systems, Inc.
System returned to ROM by Reload Command
System image file is “flash:cat3k_caa-universalk9.16.12.13.SPA.bin” <– Bundle Mode
หลักฐานว่าตอนนี้เป็น Bundle Mode
show version ให้ข้อมูลว่า:
System image file is “flash:cat3k_caa-universalk9.16.12.13.SPA.bin”
ถ้าเป็น Install Mode จะต้องเห็นประมาณนี้:
System image file is “flash:packages.conf”
Switch operating mode is INSTALL mode
แต่จากที่ใช้คำสั่งแสดงว่าบู๊ตจากไฟล์ .bin โดยตรง ซึ่งเป็นลักษณะเฉพาะของ Bundle Mode
ทำไมถึงอยู่ Bundle Mode
เพราะ switch กำลังบู๊ตจากไฟล์นี้:
cat3k_caa-universalk9.16.12.13.SPA.bin
Cisco 3850 เมื่อใช้ไฟล์ .bin ในการบู๊ตแบบ monolithic จะถูกถือว่าเป็น Bundle Mode ทันที
จุดตรวจสอบ ผลลัพธ์ ชี้ว่าเป็นโหมด
System image file boot จาก .bin ✔ Bundle Mode
packages.conf ไม่มี ✔ Bundle Mode
output “Mode” ไม่มี Install mode ✔ Bundle Mode
2. BUNDLE MODE
โหมดนี้เป็นแบบ legacy และไม่แนะนำให้ใช้ในงาน Production
🔹 ลักษณะของ BUNDLE MODE
ใช้ไฟล์ IOS แบบ monolithic (.bin) โดยบู๊ตตรงจากไฟล์ เช่น:
boot system switch all flash:cat3k_caa-universalk9.16.12.04.SPA.bin
> ไม่ใช้ packages.conf
> บู๊ตช้ากว่า install mode
> ไม่รองรับ ISSU
>ไฟล์ภาพระบบไม่ได้ติดตั้งลง flash แบบ package เหมือน install mode
>เหมาะสำหรับการแก้ไขปัญหาเฉพาะหน้า หรือ boot ชั่วคราว
สิ่งที่ควรรู้: Bundle Mode ไม่เหมาะสำหรับ Production
เพราะว่า:
>บู๊ตช้ากว่า
>ไม่รองรับ ISSU
>ใช้ CPU/Flash มากกว่า (โหลด image แบบ Live)
>ไม่ใช่ default mode ที่ Cisco แนะนำ
ถ้าอยากเปลี่ยนเป็น Install Mode (โหมดแนะนำ)
ทำได้ง่าย ๆ โดยใช้คำสั่ง:
ขั้นตอนแนะนำ
1) ตรวจสอบว่ามีไฟล์ .bin อยู่ใน flash
dir flash:
ถ้า ไม่มีไฟล์ packages.conf นั่นคือสัญญาณชัดเจนว่า Switch ของคุณอยู่ใน Bundle Mode อย่างสมบูรณ์ — และยัง ไม่เคยถูกติดตั้ง (install) เป็น Package Mode มาก่อน
แต่ไม่ต้องกังวล เพราะ Cisco 3850 สามารถสร้าง packages.conf ใหม่ได้โดยใช้คำสั่ง software install ซึ่งจะติดตั้ง package ที่จำเป็นทั้งหมดให้อัตโนมัติ
2)มี free space อย่างน้อย ~1GB
dir flash:
3)สลับ Mode
ถอนการตั้งค่า boot system เดิม (ป้องกัน boot loop)
Switch#conf t
Enter configuration commands, one per line. End with CNTL/Z.
Switch(config)#no boot system
Switch(config)#end
Switch#write memory
Building configuration…
[OK]
สร้างระบบ Install Mode
ใช้คำสั่ง:
Switch#install add file flash:cat3k_caa-universalk9.16.12.13.SPA.bin activate commit
This operation requires a reload of the system. Do you want to proceed?
Please confirm you have changed boot config to flash:packages.conf [y/n]y
— Starting initial file syncing —
Info: Finished copying flash:cat3k_caa-universalk9.16.12.13.SPA.bin to the selected switch(es)
Finished initial file syncing
— Starting Add —
Performing Add on all members
[1] Add package(s) on switch 1
[1] Finished Add on switch 1
Checking status of Add on [1]
Add: Passed on [1]
Finished Add
Image added. Version: 16.12.13.0.10689
install_add_activate_commit: Activating PACKAGE
Following packages shall be activated:
/flash/cat3k_caa-webui.16.12.13.SPA.pkg
/flash/cat3k_caa-srdriver.16.12.13.SPA.pkg
/flash/cat3k_caa-rpcore.16.12.13.SPA.pkg
/flash/cat3k_caa-rpbase.16.12.13.SPA.pkg
/flash/cat3k_caa-guestshell.16.12.13.SPA.pkg
This operation may require a reload of the system. Do you want to proceed? [y/n]y
switch: set BOOT flash:packages.conf
switch: boot
Switch จะโหลด Install Mode จาก packages.conf
หลังบู๊ตเสร็จ จะเข้าปกติและสามารถใช้ privileged EXEC ได้
Switch#show version | include System
Copyright (c) 1986-2025 by Cisco Systems, Inc.
Cisco IOS-XE software, Copyright (c) 2005-2025 by cisco Systems, Inc.
System returned to ROM by Image Install
System image file is “flash:packages.conf” <–Install Mode
Netplan Ubuntu
LAN
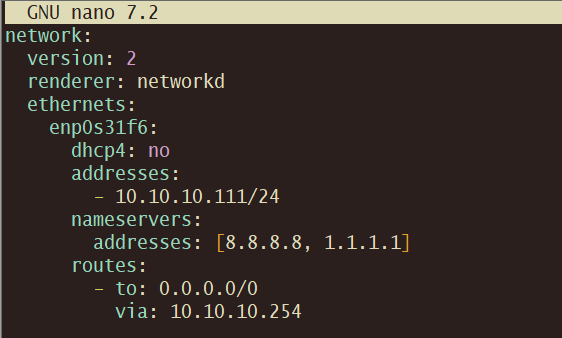
nano /etc/netplan/00-installer-config.yaml
sudo chmod 600 /etc/netplan/00-installer-config.yaml
sudo netplan apply
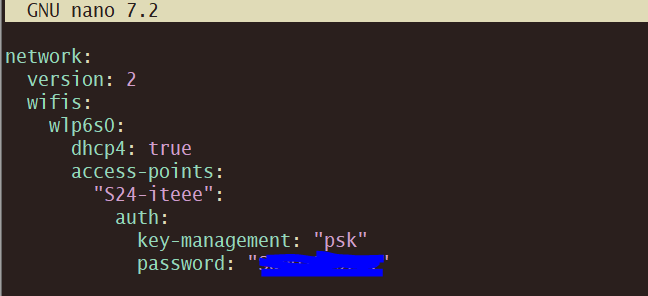
WiFi
sudo nano /etc/netplan/50-cloud-init.yaml
ตัวอย่าง Network Interface – Debian 13.1
# This file describes the network interfaces available on your system
# and how to activate them. For more information, see interfaces(5).
source /etc/network/interfaces.d/*
# The loopback network interface
auto lo
iface lo inet loopback
# The primary network interface
allow-hotplug enp0s31f6
iface enp0s31f6 inet dhcp
#auto enp0s31f6
#iface enp0s31f6 inet static
# address 192.168.100.42
# netmask 255.255.255.0
# gateway 192.168.100.1
# dns-nameservers 8.8.8.8 1.1.1.1
Notebook- ปรับการตั้งค่า power ของระบบ (ไม่ให้ suspend เมื่อพับหน้าจอ)-Debian
ปัญหาที่เจอบน Debian/ThinkPad คือเวลาพับหน้าจอ ระบบจะเข้าสู่ suspend/hibernate ทำให้ SSH server หยุดทำงาน ทำให้ไม่สามารถเข้า SSH ได้
วิธีแก้
ปรับการตั้งค่า power ของระบบ (ไม่ให้ suspend เมื่อพับหน้าจอ)
แก้ไขไฟล์ logind configuration:
sudo nano /etc/systemd/logind.conf
หา (หรือเพิ่ม) บรรทัดเหล่านี้:
HandleLidSwitch=ignore
HandleLidSwitchDocked=ignore
HandleLidSwitch=ignore → เมื่อพับฝา ไม่ทำ suspend
HandleLidSwitchDocked=ignore → ใช้เวลาเชื่อมต่อ docking station
รีสตาร์ท systemd-logind:
sudo systemctl restart systemd-logind
ทดสอบ: พับหน้าจอแล้วเครื่องยังคงทำงาน คุณยังสามารถ SSH เข้าได้
ขึ้นข้อความ -bash: warning: setlocale: LC_CTYPE: cannot change locale (UTF-8): No such file or directory
ข้อความนี้:
-bash: warning: setlocale: LC_CTYPE: cannot change locale (UTF-8): No such file or directory
💡 หมายเหตุ: ข้อความ warning นี้ไม่กระทบการใช้งานปกติของระบบ แต่แก้ไขแล้วจะไม่ขึ้นทุกครั้งที่เปิด shell
เกิดจาก ระบบไม่รู้จัก locale ที่คุณตั้งค่าไว้ โดยเฉพาะ UTF-8
1. ตรวจสอบ locale ที่ติดตั้ง:
teee@san:~$ locale -a
C
C.utf8
en_US.utf8
POSIX
th_TH.utf8
คุณอาจเห็นรายการเช่น en_US.utf8 หรือ th_TH.utf8
2.ถ้าไม่มี locale ที่ต้องการ ให้ generate:
ตัวอย่างสำหรับ en_US.UTF-8:
sudo locale-gen en_US.UTF-8
sudo update-locale LANG=en_US.UTF-8
3.แก้ไฟล์ environment ของผู้ใช้ (เช่น ~/.bashrc หรือ ~/.profile)
teee@san:~$ export LC_CTYPE=UTF-8
teee@san:~$ export LC_CTYPE=en_US.utf8
teee@san:~$ source ~/.bashrc
teee@san:~$ locale
LANG=en_US.UTF-8
LANGUAGE=en_US:en
LC_CTYPE=”en_US.UTF-8″
LC_NUMERIC=”en_US.UTF-8″
LC_TIME=”en_US.UTF-8″
4. Logout/Login อีกครั้ง
การอัปเกรด จาก Debian 12.11 (Bookworm) → Debian 13.0 (Trixie)
การอัปเกรด จาก Debian 12.11 (Bookworm) → Debian 13.0 (Trixie) ทำได้แบบ in-place upgrade (ไม่ต้องลงใหม่)
ขั้นตอนการอัปเกรด Debian 12 → 13
⚠️ ข้อควรระวัง
• ควร backup ข้อมูลและ config สำคัญ (เช่น /etc, /home, ฐานข้อมูล ฯลฯ) ก่อน
• ทำการอัปเกรดผ่าน SSH + tmux/screen เผื่อเน็ตหลุดจะได้ไม่พัง
• ต้องมี free space ใน / และ /boot พอสมควร
1. อัปเดต Debian 12 (Bookworm) ให้ล่าสุดก่อน
sudo apt update
sudo apt upgrade
sudo apt full-upgrade
sudo apt –purge autoremove
ตรวจสอบเวอร์ชัน
root@san:~# lsb_release -a
No LSB modules are available.
Distributor ID: Debian
Description: Debian GNU/Linux 12 (bookworm)
Release: 12
Codename: bookworm
ควรขึ้นว่า Debian GNU/Linux 12.11 (bookworm)
2. เปลี่ยน APT sources ไปที่ Trixie
เปิดไฟล์ /etc/apt/sources.list ด้วย editor (เช่น nano)
sudo nano /etc/apt/sources.list
แล้วเปลี่ยนคำว่า bookworm → trixie
#deb http://deb.debian.org/debian bookworm main contrib non-free non-free-firmware
#deb http://deb.debian.org/debian-security bookworm-security main contrib non-free non-free-firmware
#deb http://deb.debian.org/debian bookworm-updates main contrib non-free non-free-firmware
deb http://deb.debian.org/debian trixie main contrib non-free non-free-firmware
deb http://deb.debian.org/debian-security trixie-security main contrib non-free non-free-firmware
deb http://deb.debian.org/debian trixie-updates main contrib non-free non-free-firmware
3. อัปเดตแพ็กเกจให้เห็น repo ใหม่
sudo apt update
4. ทำ minimal upgrade
sudo apt upgrade –without-new-pkgs
5. อัปเกรดเต็มระบบเป็น Debian 13
sudo apt full-upgrade
ตรงนี้จะใช้เวลานาน และอาจมี prompt ถามว่าจะเก็บไฟล์ config เดิมหรือใช้ไฟล์ใหม่ (แนะนำกด N เพื่อเก็บ config เดิม เว้นแต่คุณอยาก reset)
6. ล้างของเก่า
sudo apt –purge autoremove
7. รีบูตเครื่อง
sudo reboot
8. ตรวจสอบเวอร์ชันหลังอัปเกรด
lsb_release -a
ควรขึ้นว่า
root@san:/home/teee# lsb_release -a
No LSB modules are available.
Distributor ID: Debian
Description: Debian GNU/Linux 13 (trixie)
Release: 13
Codename: trixie
แต่ถ้าขึ้น Error
Description: Debian GNU/Linux 13.0 (trixie)
Errors were encountered while processing:
ca-certificates
php-composer-ca-bundle
python3-certifi
python3-requests
freeradius-config
python3-pip
python3-httplib2
ca-certificates-java
python3-reportbug
liblwp-protocol-https-perl
libwww-perl
python3-pip-whl
reportbug
E: Sub-process /usr/bin/dpkg returned an error code (1)
ปัญหานี้เจอบ่อยตอน major upgrade ของ Debian → สาเหตุคือ dependency chain เปลี่ยน / มีไฟล์ค้าง / แพ็กเกจไม่ compatible แบบตรงๆ
root@san:~# dpkg –configure -a
Setting up ca-certificates (20250419) …
Updating certificates in /etc/ssl/certs…
0 added, 0 removed; done.
Setting up php-composer-ca-bundle (1.5.6-1) …
Setting up python3-certifi (2025.1.31+ds-1) …
Setting up python3-requests (2.32.3+dfsg-5) …
Setting up freeradius-config (3.2.7+dfsg-1) …
Installing new version of config file /etc/freeradius/3.0/certs/Makefile …
Installing new version of config file /etc/freeradius/3.0/clients.conf …
Installing new version of config file /etc/freeradius/3.0/mods-available/date …
Installing new version of config file /etc/freeradius/3.0/mods-available/detail …
Installing new version of config file /etc/freeradius/3.0/mods-available/eap …
Installing new version of config file /etc/freeradius/3.0/mods-available/json …
Installing new version of config file /etc/freeradius/3.0/mods-available/ldap …
Installing new version of config file /etc/freeradius/3.0/mods-available/ldap_google …
Installing new version of config file /etc/freeradius/3.0/mods-available/linelog …
Installing new version of config file /etc/freeradius/3.0/mods-available/mschap …
Installing new version of config file /etc/freeradius/3.0/mods-available/python3 …
Installing new version of config file /etc/freeradius/3.0/mods-available/radutmp …
Installing new version of config file /etc/freeradius/3.0/mods-available/rest …
Installing new version of config file /etc/freeradius/3.0/mods-available/smsotp …
Configuration file ‘/etc/freeradius/3.0/mods-available/sql’
==> Modified (by you or by a script) since installation.
==> Package distributor has shipped an updated version.
What would you like to do about it ? Your options are:
Y or I : install the package maintainer’s version
N or O : keep your currently-installed version
D : show the differences between the versions
Z : start a shell to examine the situation
The default action is to keep your current version.
*** sql (Y/I/N/O/D/Z) [default=N] ? N
Configuration file ‘/etc/freeradius/3.0/radiusd.conf’
==> Modified (by you or by a script) since installation.
==> Package distributor has shipped an updated version.
What would you like to do about it ? Your options are:
Y or I : install the package maintainer’s version
N or O : keep your currently-installed version
D : show the differences between the versions
Z : start a shell to examine the situation
The default action is to keep your current version.
*** radiusd.conf (Y/I/N/O/D/Z) [default=N] ? N
root@san:~# apt -f install
Reading package lists… Done
Building dependency tree… Done
Reading state information… Done
The following packages were automatically installed and are no longer required:
icu-devtools libicu-dev libnsl-dev libpthread-stubs0-dev libsub-override-perl libtirpc-dev node-busboy node-end-of-stream node-pump python3-httplib2 python3-pycurl python3-pyparsing
python3-pysimplesoap sgml-base
Use ‘apt autoremove’ to remove them.
0 upgraded, 0 newly installed, 0 to remove and 419 not upgraded.
root@san:~# apt autoremove
root@san:~# sudo apt update
root@san:~# apt list –upgradable
root@san:~# apt upgrade
Aug 18 14:07:33 san apachectl[1755]: apache2: Syntax error on line 146 of /etc/apache2/apache2.conf: Syntax error on line 1 of /etc/apache2/mods-enabled/perl.load: Cannot load /usr/lib/apache2/module>
Aug 18 14:07:33 san apachectl[1752]: Action ‘start’ failed.
Aug 18 14:07:33 san apachectl[1752]: The Apache error log may have more information
อันนี้เป็น error ของ Apache2 หลังอัปเกรด Debian → module perl โหลดไม่ได้
ซึ่งหมายถึง ไฟล์ mod_perl.so หายไป หรือไม่ compatible กับ Apache เวอร์ชันใหม่ (เพราะ Debian 13 ใช้ Apache 2.4.62 ขึ้นไป → mod_perl เดิมของ Debian 12 ไม่ใช้ได้แล้ว)
วิธีแก้ปัญหา
1. เช็คว่ามี mod_perl package ติดตั้งอยู่หรือไม่
dpkg -l | grep libapache2-mod-perl2
•ถ้าไม่เจอ → ต้องติดตั้งใหม่
•ถ้ามีแต่ไฟล์ไม่อยู่ → ลอง reinstall
2. ติดตั้งหรือ reinstall mod_perl
sudo apt update
sudo apt install –reinstall libapache2-mod-perl2
3. ถ้ายังมี error → ปิดการโหลด perl module ไปก่อน
sudo a2dismod perl
sudo systemctl restart apache2
Apache จะรันได้ตามปกติ แต่จะ ไม่มี mod_perl (ใช้ CGI/Perl script ไม่ได้)
4. ถ้าต้องการ mod_perl จริง ๆ
•ตรวจสอบ path ของ module:
ls -l /usr/lib/apache2/modules/ | grep perl
•แล้วแก้ไขไฟล์ /etc/apache2/mods-enabled/perl.load ให้ตรงกับไฟล์ที่มีอยู่จริง เช่น:
Apache
LoadModule perl_module /usr/lib/apache2/modules/mod_perl.so
(บางเวอร์ชันอาจจะชื่อ mod_perl.c หรือ path ย้าย)
5. Restart Apache อีกครั้ง
sudo systemctl restart apache2
sudo systemctl status apache2
👉 คำถามคือ: ยังต้องใช้ Perl บน Apache อยู่ไหม (เช่นรัน CGI/Perl script)?
•ถ้าไม่ใช้ → แค่ a2dismod perl แล้ว Apache จะกลับมาปกติ
•ถ้ายังใช้ → ต้องลง libapache2-mod-perl2 ใหม่ให้ตรงกับ Debian 13
✅ เสร็จแล้ว คุณจะได้ Debian 13.0 stable (Trixie)